
Users manual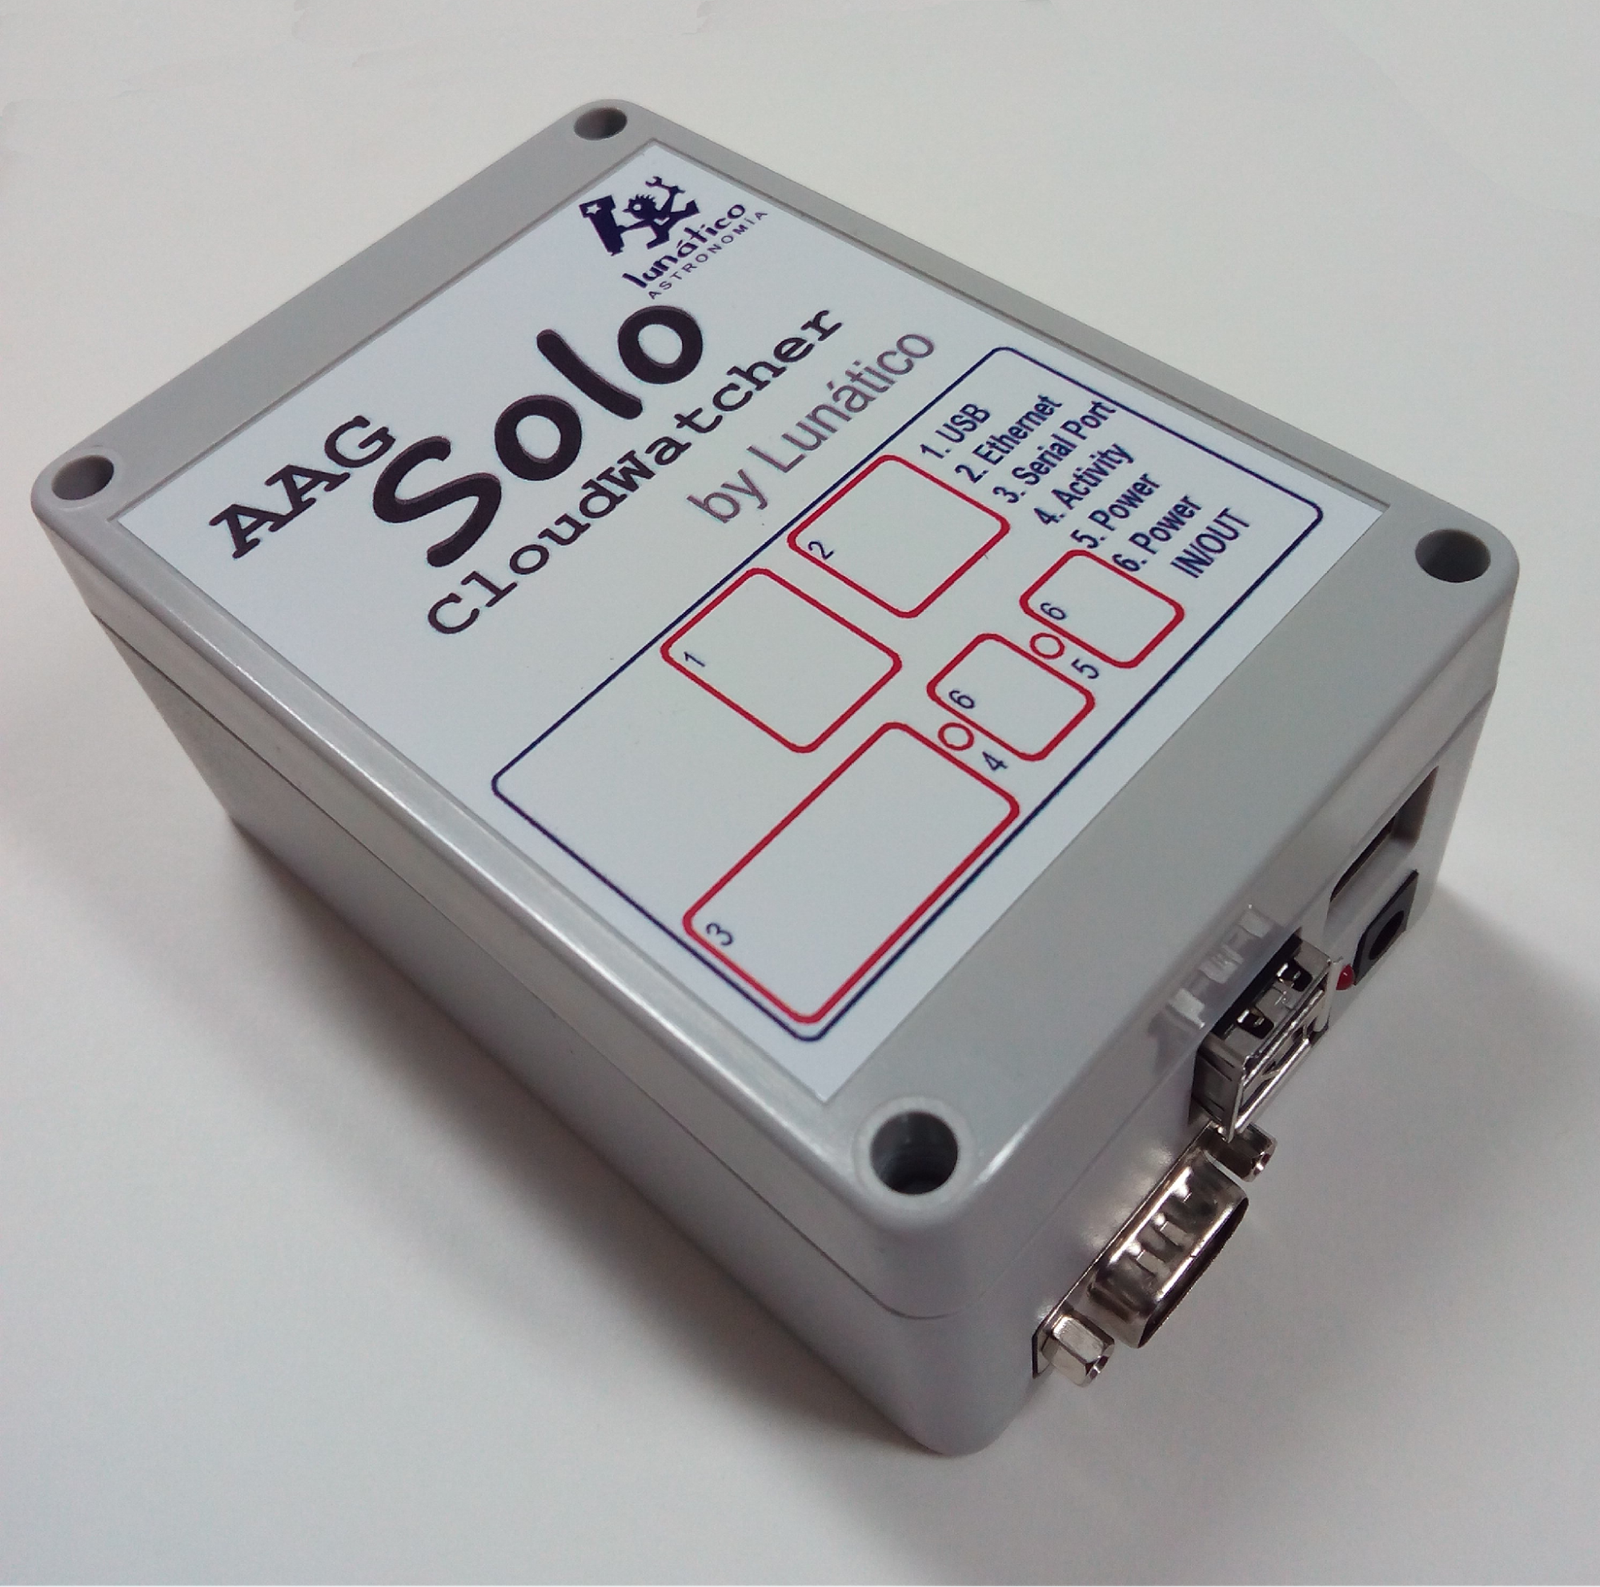
Thank you for your purchase of the CloudWatcher Solo!
The Solo has been designed to improve the overall usefulness of the CloudWatcher, monitoring it, adjusting the heater, and constantly publishing information accessible in a variety of ways.
1. Physical installation
The Solo has to be installed indoors. The installation cannot be more easy:
- unplug your CloudWatcher from the power supply (if applicable)
- using the same power supply, power the Solo - any of the two plugs will do
- with the included (short) cable, join the other jack plug in the Solo with the CW
- Attach the SubD-9 (serial) from the CW to the Solo
- and, of course, connect the Solo to your local network using a standard RJ45 cable (not supplied). Alternatively, once configured, the Solo can connect over Wi-Fi (see “Wi-Fi” in the Configuration section).
… that's it. In a few seconds the “activity” LED in the Solo will start blinking (slowly), showing it is communicating with the CloudWatcher
2. Accessing the data
Now that the Solo is up and running, and connected to your local network, it will fetch an IP address (automatically, using DHCP, as standard in the vast majority of networks) and start publishing information in a variety of ways.
There is a separate document explaining the procedure to enable your Solo being accessed from the internet.
2.1. Main web page
From your web explorer, now you can type: “http://aagsolo” (in the address bar, not in Google!), and you'll see the main Solo page:
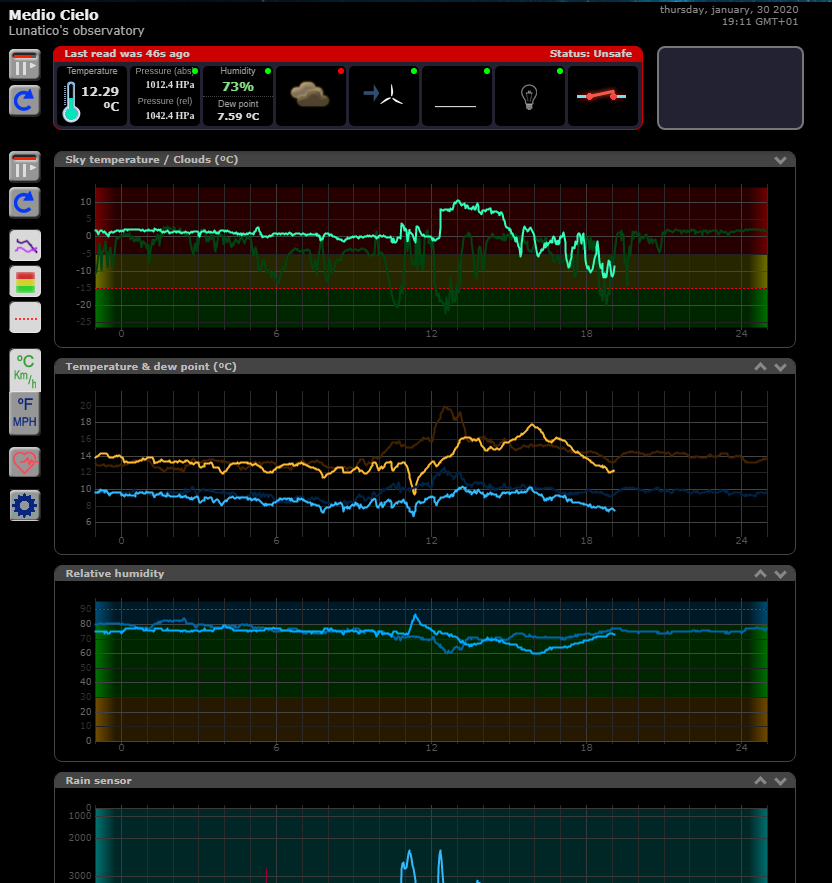
There are a few things worth explaining in this page:
- in the upper left side, the current readings are displayed. Hovering the mouse pointer over the icons will display the reading numerically.
- at its leftmost side, some buttons:
stop / start auto update (will refresh every 60 seconds if enabled)


reload data now
- in the upper right, a log panel with recent information
- covering the rest (and main portion) of the page, the graphs with information covering the current day and the day before. Note the arrows at the top rigth of each graph -
You can use them to rearrange the graphs.
- Also at its leftmost side, some buttons:
- stop / start auto update (will refresh every 60 seconds if enabled)
- reload data now
 show / hide yesterday's data
 show / hide the three color background (matching the 3 levels of each reading)
 show / hide a dotted line at the current “unsafe” setting
 choose between metric and imperial units
 show the internal debug data (useful when asking for support)
 open the configuration pages (see “Configuration”)
Last, in the lower right-hand side of the page the language can be changed, for the moment Auto, English and Spanish are available.
This page can be made accessible from the Internet; the way of doing so varies from router to router, but basically involves setting up a “NAT” rule for incoming connections at a given port to be redirected to the Solo – and of course the Solo needs to have a fixed IP address. You can check our running unit at:
2.2 Graphs and information explained
The information displayed by the page depends on the sensors installed; currently, the relative humidity sensor and the anemometer are optional, so may be shown or not.
The elements of every graph are very similar:
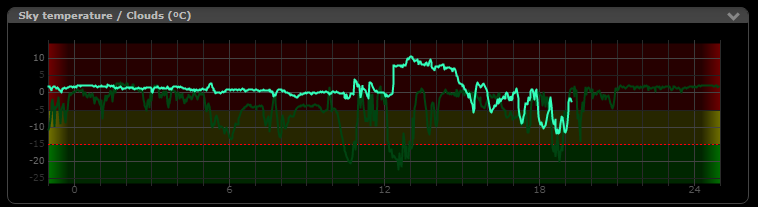
Current data is shown in a bright line (green for sky temperature), yesterday's as a more pale line.
A dotted orange line marks the boundary between safe and unsafe. Finally the three background colors match the three ranges specified (clear / cloudy / overcast, for sky temperature, etc.)
Some graphs however have some specificities. The rain graph, apart from the rain value (lower values indicate rain), also shows a red line reflecting the sensor heater behaviour.
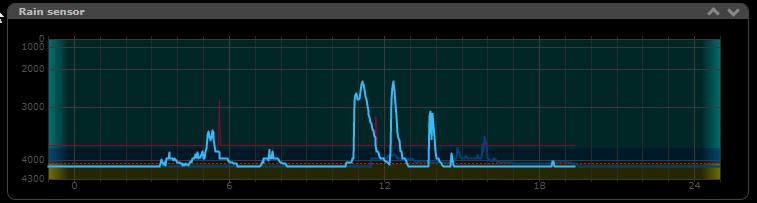
In this example can be seen the activity spikes of the heater matching the rain periods.
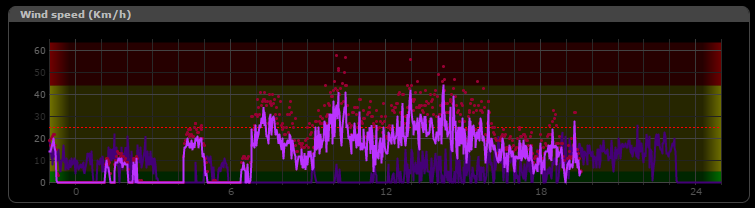
The wind graph (and icon at the top), will show the average wind speed as a line, and the gust as a dot:
2.3. Single Line Data files
Some programs and drivers (at least CCDAutopilot and CCDCommander in remote mode, and also our own and Chris Rowland's ASCOM safety monitor driver), just need to access a file with weather data formatted in a specific way.
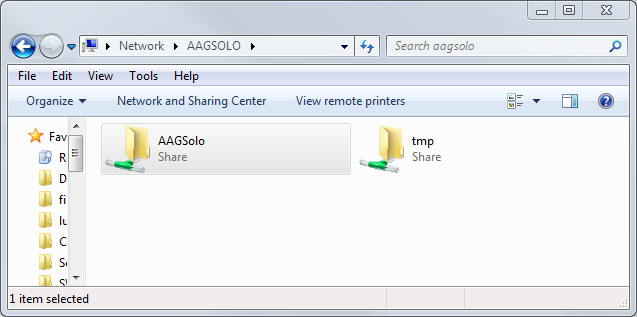
The Solo does publish this file, and thus you can add weather safety just accessing it from the network. Browse the network to the “aagsolo” computer (by the way, user “pi”, password “cloudwatcher”):
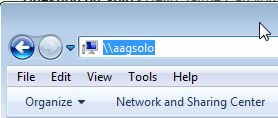
If you can't find AAGSolo by browsing the network, just type “\\aagsolo” in the address bar:
Forget the “tmp” folder, and go to the “AAGSolo” one:
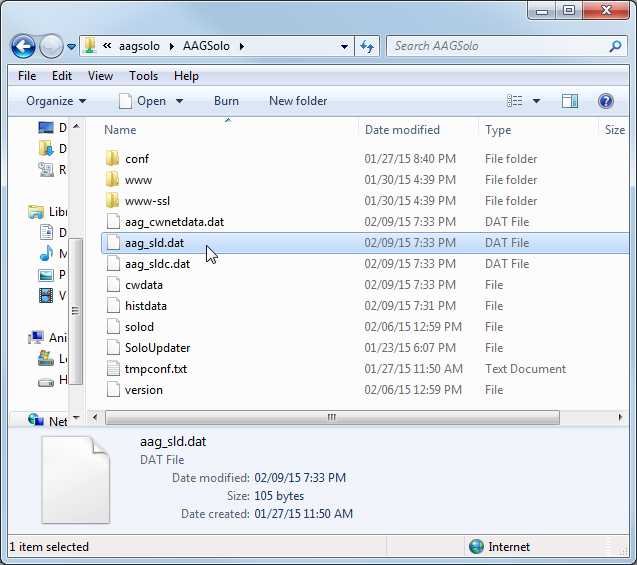
There are quite a few files, but it is “aag_sld.dat” (meaning AAG Single Line Data) the one we're looking for.
There's also a file called “aag_sldc.dat”, being the same but with a comma “,” separating the decimal numbers. I've check that at least CCDAP, if installed in a machine with a locale using that comma to separate decimal numbers, needs this file.
So, you just have to make your automation software (or ASCOM driver) point to this shared folder. Important, depending on the Windows version, you may have to connect to the “aagsolo” from the Windows explorer at least once at the start of every session.
2.4. ScopeDome data file
Accesing the network in the same way, we can find a special file for the ScopeDome software, namely “scopedome.csv”:
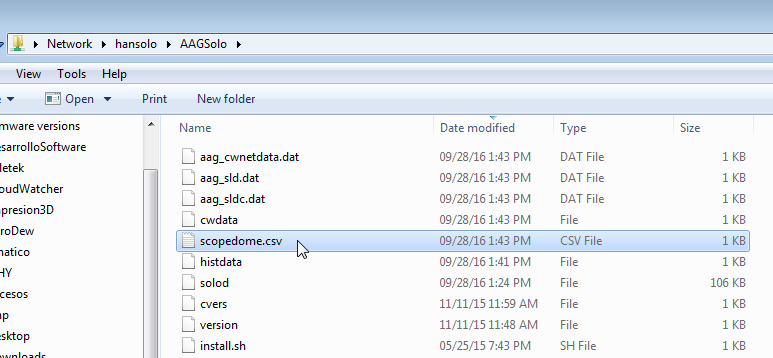
… just select this file in your ScopeDome software, Config, Cloud Sensor Config (Current Cloud Sensor Status File Name)
2.5. CloudWatcher “Master”
The Solo also behaves as a CloudWatcher Windows application in Master mode, so you can connect other instances of the Windows software, running as Remote, to the Solo.
To change your current Windows software from Master to Remote, go to the “Setup” tab, “Network” section, and select “remote”.
The windows software running in remote mode needs a special file to read the data from the sensor; browse the network again to the aagsolo machine (reminder, user “pi” password “cloudwatcher”), and you'll find the AAG_CWNetData.dat file:
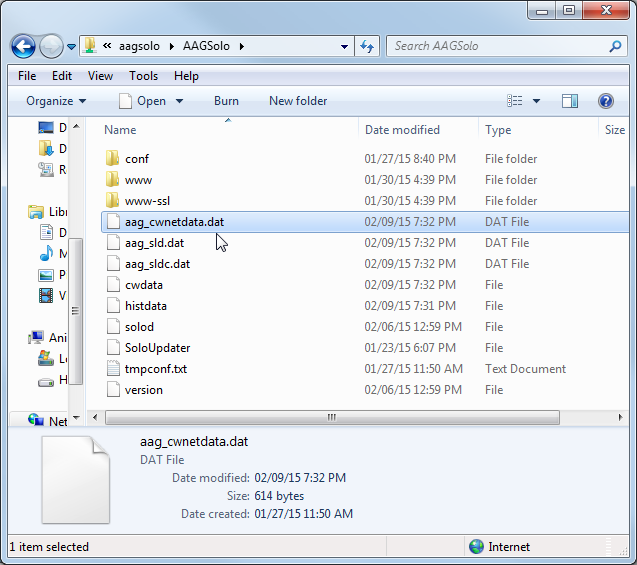
This is the file your “remote” AAG programs will need to operate. Selecting, from those remote mode applications, the folder containing it, will allow them to run.
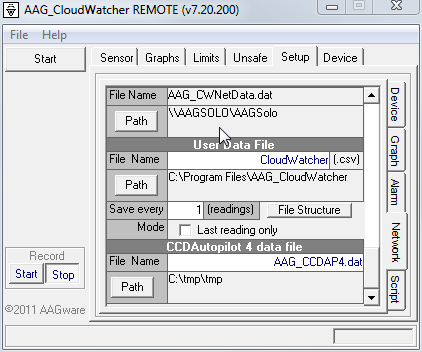
As said before, depending on the Windows version, you may have to connect to the “aagsolo” from the Windows explorer at least once at the start of every session.
2.6. Data Logger
An useful feature of the Solo is its ability to record a CSV file in a user supplied USB stick. You just need to insert, in one of Solo USB ports, a suitably formatted USB memory stick (suitably formatted means FAT – other formats may work if you know what you're doing...).
Once the stick is inserted, the Solo software will detect it, mount, and start adding information to a CSV file (userdata.csv) in the base folder of the stick – so you just have to insert the stick for the logging to start.
However, to remove the stick, you have to “unmount” it (similar to the Windows “safely remove” operation) – there is an option in the configuration pages to do so.
Final note: the software will append information to the file if it exists; if you have already taken the file in your computer and want to start afresh, just delete it from the USB stick before inserting it again in the Solo.
3. Configuration
To access the configuration pages, please, again in your web browser, type:
notice the “s” after http – this means it is a secure protocol. You'll get a warning, or maybe several, about the site not being secure. You are in your local network, so please trust you're accessing your Solo. You'll be asked for user and password, in this case the user is “solo”, the password the same as before, that is, “cloudwatcher”.
The reason for this warning is we're using a custom certificate that allows all information to be encrypted, for safety, but the certificate itself is not registered in a certification authority; that's a more complex and expensive step unneeded here.
Once you've agreed to proceed to the site, you can access three pages:
| configuration, where you'll be able to setup your Solo in a very similar way to the CloudWatcher Windows software. |
| system details, where you can make some adjustments, set the time / date, network configuration, change the default password1 (“cloudwatcher”), set up Wi-Fi, push notifications, MQTT and HTTP publishing, force individual sensors to report safe, reboot the system (just in case), and also shut it down. For the shutdown process, and given it will take you a trip to the observatory to start it again, you'll be challenged to confirm your selection. |
| USB status, it may be unmounted, as shown, or mounted. Clicking the button will check the USB status again (if unmounted) or unmount it prior to a safe removal (if mounted) |
| Last, update the system. From here you can check if there's a new version and, optionally, update to it. |


Just a few notes about the configuration – please consult the online documentation for the Windows program for more specific data.
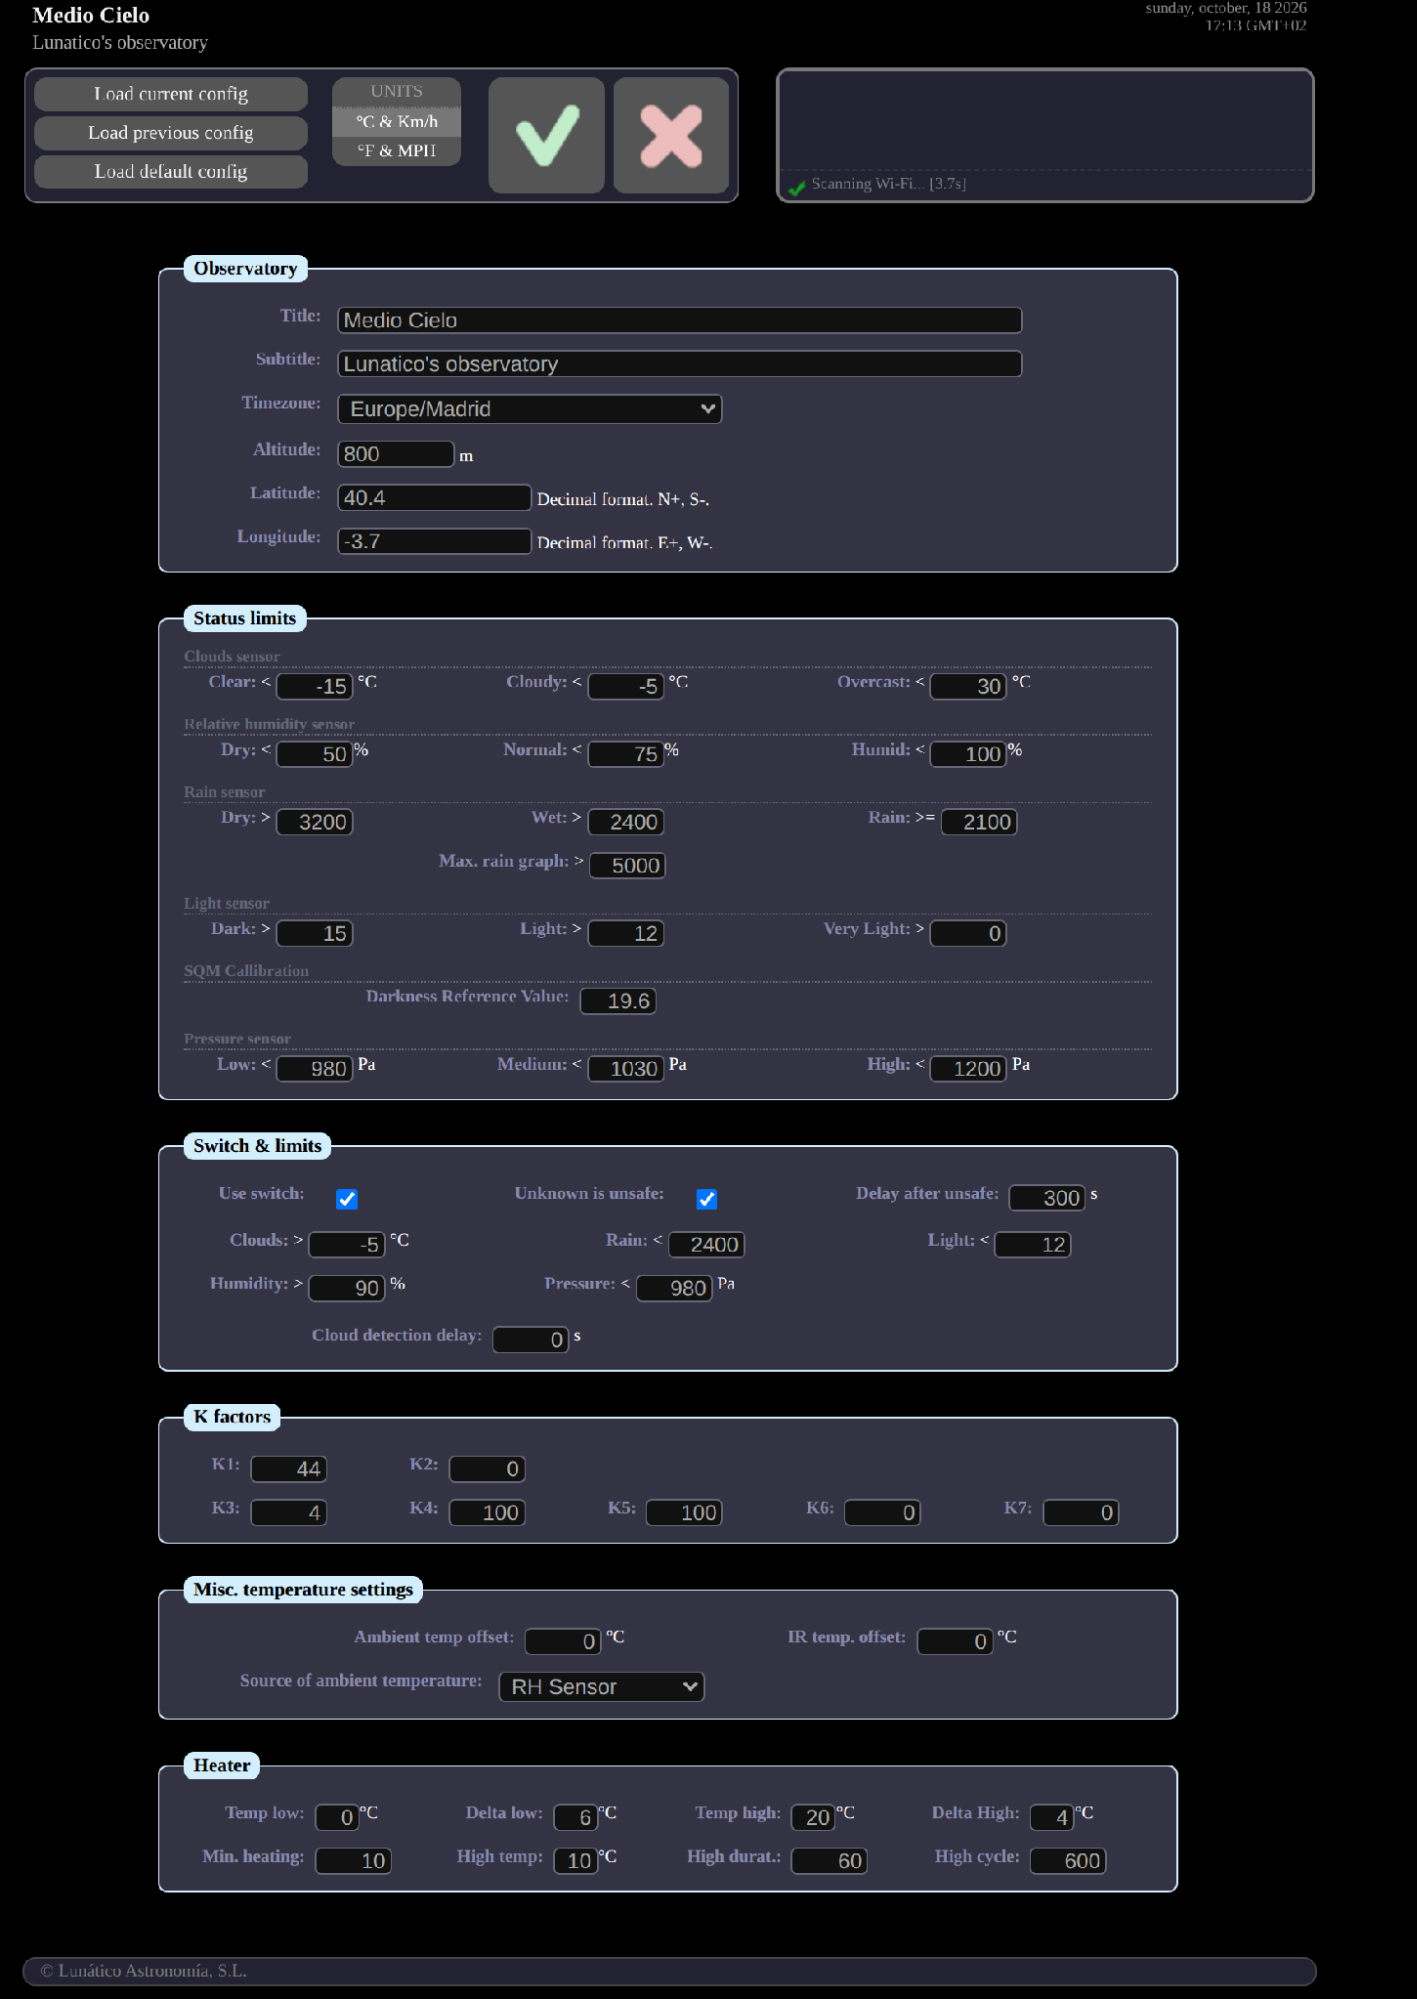
- Units (ºC Kmh, or ºF MPH): choose your favourite units.
- timezone: you have to select your time zone so the readings are accurate and match your local time, for the automation programs. The data in the web pages will match the local time of the place you're connecting from.
- load previous / default configuration: options to let you recover from errors or tests.
- max rain graph / max light graph: defining the upper limit of the graphs, so they look pretty. The other graphs (cloud, temperature, wind speed) adjust themselves in the current data range.
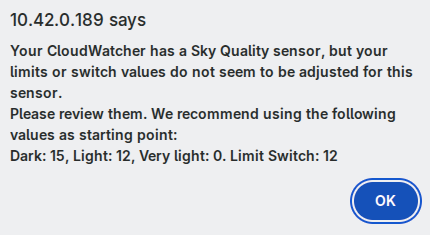
- Sky Quality sensor: newer CloudWatchers include a sky quality light sensor, which measures sky brightness in magnitudes per square arc-second (MPSAS, the unit used by SQM meters). With this sensor the light graph scales itself (there is no Max. light graph setting) and the light limits are given in MPSAS. A good starting point is Dark 15, Light 12, Very light 0, and 12 for Light in Switch & limits. The Solo warns you if your limits still look set for the old sensor.
- Darkness Reference Value (SQM Calibration, 19.6 by default): the sensor calibration, already adjusted at the factory. Changing this modifies the result reading, so use with care.
- Ambient and IR temperature offsets, used to compensate for the electronics heating and other factors; the offsets will be substracted from the raw readings of the sensors.
- Source of ambient temperature: rule of thumb, if you have the external RH sensor installed, select it as source of ambient temperature.
- And last, the “unsafe” limits; here you can specify the limit exceeding which a reading will be considered unsafe. This is a difference from the Windows software, where you had only 3 options (matching the 3 ranges) for setting unsafe.
- So, for instance, you can define wind speeds 0 to 5 Kmh to be calm, 6 to 25 to be windy, and above that to be very windy, but set the unsafe wind limit to, say, 20 Kmh.
The System page contains settings of a more computer nature, network, date and time, etc.
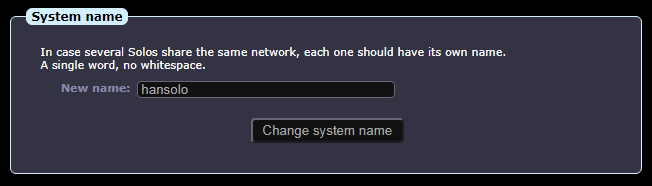
If several Solos will share the same network (as it happens in observatory hosting places), then it is generally advised to change the name, so each one is unique in the network.
3.1. Network config
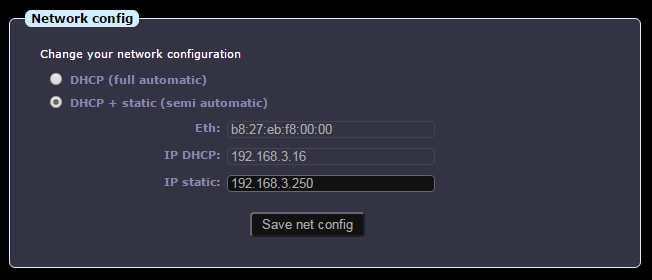
… here we can specify if we just want the address of the Solo to be obtained automatically for our router (full automatic), avoiding any problem, or if we prefer to also specify a static (fixed) address, which is useful to make the Solo accessible from the internet.
3.2. DNS Config
If your Solo fails to access the internet (more noticeable if the software updates fail to work), then you may need to adjust the DNS (name server):
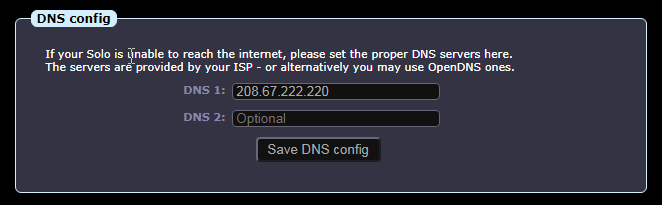
… the suggested one (208.67.222.220) is a good option, free to use, from FreeDNS. Another popular server is one from google, easier to remember, 8.8.8.8.
3.3. Wi-Fi
The Solo can also join your network over Wi-Fi, instead of (or as well as) the Ethernet cable. Wi-Fi requires a compatible USB Wi-Fi adapter plugged into the Solo. Newer dongles may not work, so be sure they are certified to work with Linux (more specifically with Linux Kernel version 5)
Also, make sure the Wi-Fi router you will be connecting it to supports 2.4GHz band and WPA2 security. The Solo does not support WPA3 yet.
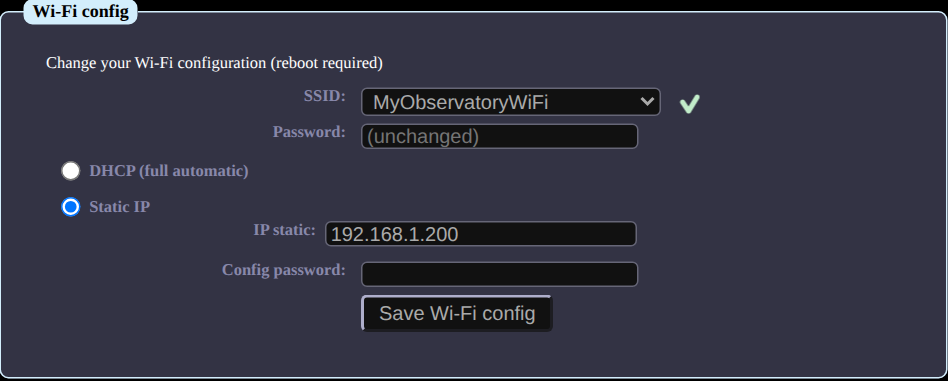
- SSID: choose your network from the list of networks in range. A green tick next to it means the Solo is currently connected to that network. Choose “No Wi-Fi” to switch Wi-Fi off.
- Password: the network password (8 to 63 characters). Leave it empty for an open network, or to keep the password already saved.
- DHCP (full automatic): the router assigns the address automatically. This is the safe choice.
- Static IP: the Solo still gets an address from the router, and also answers on the fixed address you type in IP static. Useful to make the Solo reachable at a known address.
- Config password: the password of these configuration pages, required to save the changes.
Pressing Save Wi-Fi config stores the settings and reboots the Solo. Wait a minute or two, then reload the page (using the new address, if it changed). The Wi-Fi settings are independent from the cable network settings described next.
3.4. ZeroConf
Filling the ZeroConf data will make the Solo publish, every few minutes, summary data to our cloud server. At this moment is useful for users of our android widget.
3.5. Push notifications


If you want the Solo to send push messages to your smartphone, PC, or whatever, now there is support for this using Pushbullet, a great and free system but not available for iOS, and also Pushover, almost free (very low, one time only payment), and available in every platform.
You'll need to open a Pushbullet or Pushover account; then you'll have the option to install a client or you can check your notifications in the website; the client program is available for many platforms, and quite useful IMHO.
To receive a message each time the weather changes from UNSAFE to SAFE (and vice versa), choose the service in Use, fill in its fields and press Save changes:
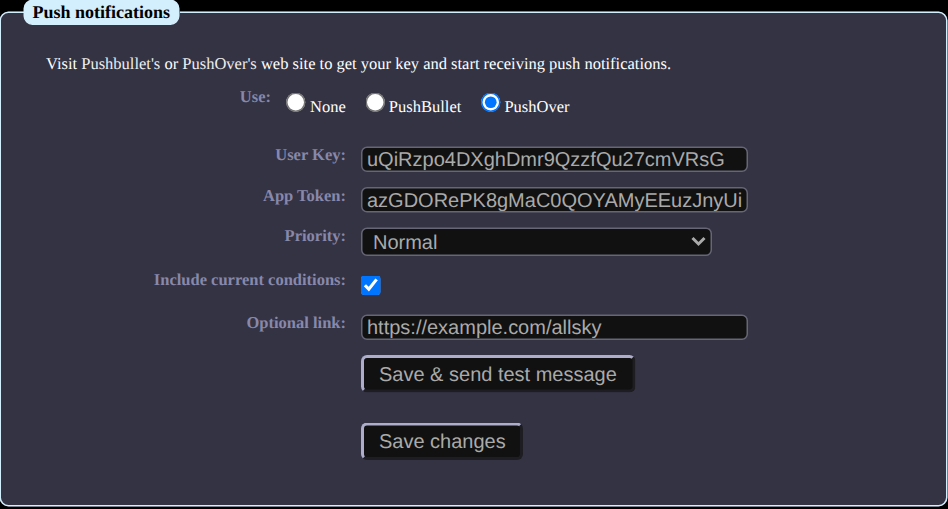
- PushBullet Key: the access token of your Pushbullet account (in Pushbullet, Settings, Account, “Create Access Token”).
- User Key (Pushover): shown on your Pushover dashboard once you log in at pushover.net.
- App Token (Pushover): Pushover only accepts messages sent by a registered application, so this field is required. Create one at https://pushover.net/apps/build (any name will do, for instance “AAG Solo”) and copy its API Token here.
- Priority (Pushover): from Lowest to High. Emergency repeats the alert every 30 seconds until you acknowledge it, for up to 10 minutes.
- Include current conditions: adds the latest readings to the message.
- Optional link: a web address added to the message, for instance your all-sky camera or this Solo's page.
- Save & send test message: saves the settings and sends a test message, so you can check everything works.
Note for existing Pushover users: older Solo versions asked for the key with a “po-” prefix (and “pb-” for Pushbullet). This is no longer used: select the service in Use and type the key without any prefix. Pushover now also needs the App Token; until you add it, Pushover will reject the messages.
Suggestion: activate it only in imaging nights.
3.6. MQTT publishing
The Solo can also publish its data to an MQTT broker, the usual choice for home automation systems (Home Assistant, Node-RED…) and many observatory dashboards.
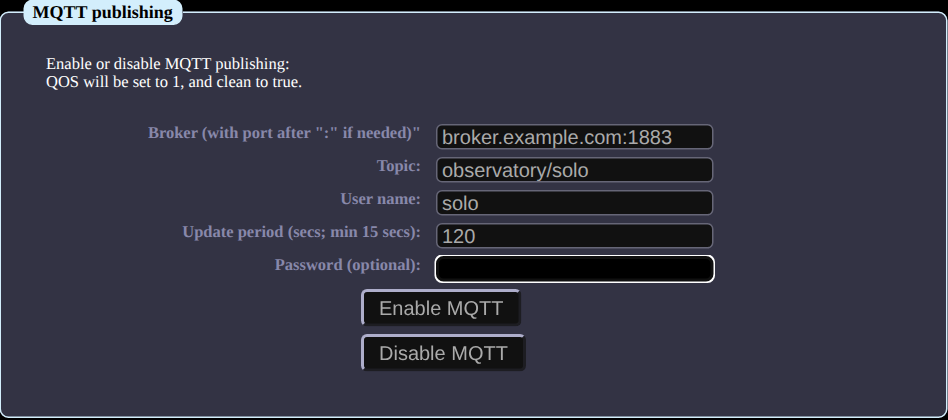
- Broker: name or IP address of your MQTT broker, adding the port after “:” if it is not the standard one, e.g. “broker.example.com:1883”.
- Topic: the topic the data is published to, e.g. “observatory/solo”.
- User name / Password: only if your broker requires them.
- Update period: seconds between messages (120 by default; 15 minimum).
Press Enable MQTT to save the settings and start publishing, or Disable MQTT to stop it. Each message is a JSON document with the current readings and the safe / unsafe status (the same one sent by HTTP publishing, described below), published with QoS 1 and a clean session. Publishing starts within a minute, no reboot needed.
3.7. HTTP publishing
The Solo can periodically send its latest data to a web server of your choice, for instance a home automation system or your own observatory software.
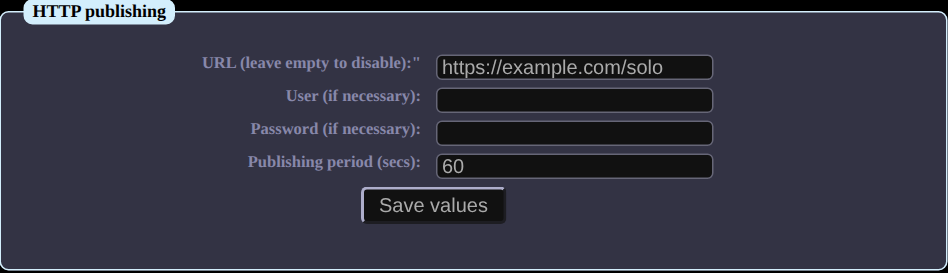
- URL: the address that will receive the data, e.g. “https://example.com/solo”. Leave it empty to disable publishing.
- User / Password: only if your server requires them; they are sent using standard HTTP Basic authentication.
- Publishing period: seconds between messages (60 by default; 5 minimum).
Press Save values to apply. Each message is an HTTP POST whose body is a JSON document (Content-Type “application/json”) with the current readings and the safe / unsafe status, the same information shown on the main page. The Solo picks up the change on its next cycle, no reboot needed.
3.8. Force safe
Each sensor can be individually forced to report SAFE, despite its reading and the configured limits.
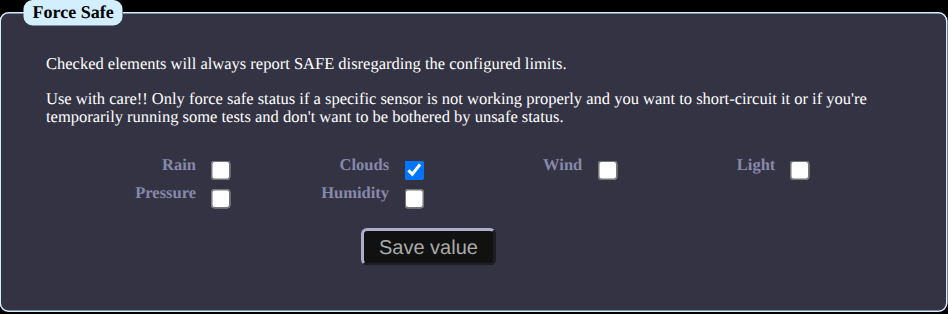
Tick the sensors to force (Rain, Clouds, Wind, Light, Pressure, Humidity) and press Save value. The rest of the sensors keep working normally, and the overall status still turns UNSAFE if any of them does.
Use with care! Only force a sensor if it is not working properly and you want to bypass it, or while you run some tests. Forcing a sensor will bypass its security, so “unsafe” will never be flagged for that condition. Remember to untick it as soon as possible.
The rest of the page is truly self explanatory (date and time, reboot, shutdown).
4. “Hidden” features
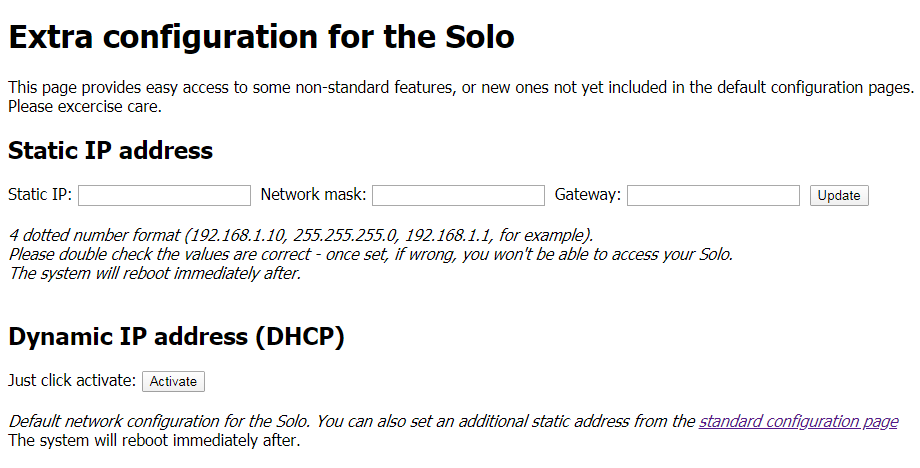
New features are added to an ugly page before going “official”. You can access this page from https://aagsolo/ExtraConf.html
It allows the user to specify a fully static IP address (not the safe, semi-static method in the normal configuration page), and to return it to its normal, DHCP-enabled state. Use with care. A wrong IP address may render the unit network invisible. You may have to replace the SD card in that case.
This is the current page:
5. Other interesting facts about the Solo
- The Solo is based on a small single-board computer (a Rock64 in current units, a Raspberry Pi in earlier ones), with a really friendly power consumption of just a few watts.
- Inside the box there's a SD card acting as the hard disk of the device. It is mounted in “read only” mode, meaning that:
- there's no problem at all unpowering the unit, the SD card will never become corrupt. It is only written, for a very short while, after configuration changes or a system update.
- It will take a while (minutes...), after powering the Solo, for it to retrieve the correct time and date, please be patient!
- Also, the SD will not “worn out”; these cards had a limited number of write operations, so being read only will extend its life almost indefinitely.
- You can get the last reading from the CloudWatcher easily to use in a program or a personal web: http://aagsolo/cgi-bin/cgiLastData
- In a similar way, you can get the historical data for up to 48h: http://aagsolo/cgi-bin/cgiHistData
- The system is quite hacker friendly; you can, under your responsibility, login via ssh and tweak the web pages or whatever. For ssh connections, the user is “pi”, the password “cloudwatcher”.
- … and, as always, your suggestions are most welcome.
6. For more information
The Solo is a data visualiser for the CloudWatcher. For more in-depth information, the CloudWatcher documentation should be checked. Specifically, some items we think are of special interest:
- Cloud detection, K-factors, calibration:
- Rain sensor heater settings:
Available in the online manual, here (same values as in the Solo configuration)
And of course all the information that is published in the web page of the CloudWatcher.