
The Caterpillar's software includes the ASCOM dome driver and is available from this link. It has two components: the dome driver and a safety monitor driver for the optional weather input (a CloudWatcher can be used for this purpose).
The ASCOM Platform must be installed before running the Caterpillar installer. The software and drivers are the same for both the Caterpillar and the CaterpillarR.
Selecting the driver
In your astronomy software's dome chooser, select Caterpillar Dome from the list. Open the driver's Setup dialog to configure the connection before connecting for the first time.
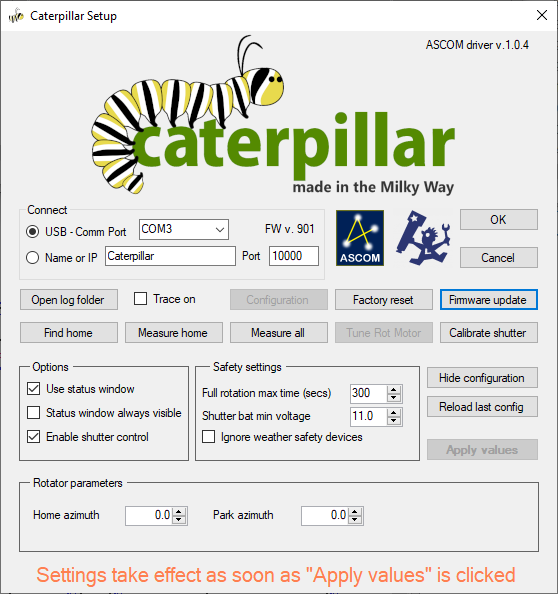
Connect
Enter the board's IP address (for WiFi) or select the COM port (for USB); the board communicates on UDP port 10000. The dialog also shows the connected board's firmware version (FW v.), and Firmware update lets you flash a new one without leaving the driver.
Open log folder and Trace on are diagnostic aids—enable tracing and reproduce an issue to be able to send the logs for support. Configuration / Hide configuration toggles the extended panel described below, and Factory reset resets the driver's own settings back to defaults.
Homing and calibration
These buttons perform the same kind of homing/calibration work as Motor and encoder calibration in Initial motor configuration and settings, but from the driver itself, without needing to reconnect with that tool:
| Find home | Drives the dome until it locates the physical home sensor. |
| Measure home | Finds the home sensor, then sweeps back and forth across it to precisely measure its trigger point from both directions. |
| Measure all | Measures the full circumference together with the home sensor; the complete calibration. |
| Tune Rot Motor | Matches the motor to the encoder, the same operation Initial motor configuration and settings performs, but for a different board revision; on the Caterpillar it is normally disabled. |
| Calibrate shutter | Measures the distance between the shutter's open and close limit switches. |
Options
| Use status window | Shows a small floating status window. |
| Status window always visible | Keeps that window on top at all times, instead of only when relevant. |
| Enable shutter control | Activates the shutter commands/buttons when a shutter board is present. |
Safety settings
| Full rotation max time (secs) | The longest a full rotation should take; if exceeded, the driver treats the dome as stuck and faults instead of spinning indefinitely. |
| Shutter bat min voltage | If the shutter's independent battery drops below this voltage, the shutter closes automatically. |
| Ignore weather safety devices | Lets the shutter open, and keeps it from auto-closing, even while the Safety Monitor reports unsafe weather. Use at your own discretion. |
This bypasses a safety feature meant to protect your equipment from weather—only enable it if you understand the risk (e.g. bench testing indoors, or taking sky flats under conditions the safety monitor would otherwise flag as unsafe).
Rotator parameters
Home azimuth is the real-world azimuth, in degrees, that corresponds to the home sensor position; Park azimuth is where the dome should move to when parking.
There is no separate "save" step—settings take effect as soon as you click Apply values. Reload last config discards any unapplied changes and reloads the last saved values instead.
Status window
Checking Use status window opens a small floating window with live status and quick manual controls—handy for keeping an eye on the dome without opening your full automation software.
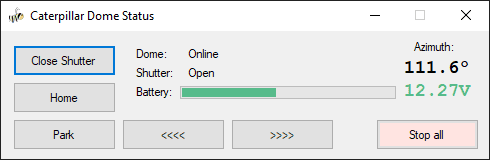
| Dome / Shutter | Connection and open/close state at a glance. |
| Battery | The shutter's independent battery voltage (see Shutter bat min voltage above). |
| Azimuth | The dome's current azimuth. |
| Close Shutter (toggles to Open Shutter) | Opens or closes the shutter. |
| Home / Park | Send the dome to its home or park position. |
<<<< / >>>> | Rotate the dome manually, one direction each. |
| Stop all | Immediately stops all motion, rotation and shutter alike. |