
1.1. Overview
To get your dome fully up and running with the Caterpillar, you will need to perform a few tasks:
- Connect all the elements to the Caterpillar boards: external drivers, motor, encoder, etc. Details in the following section
- Download the Caterpillar ASCOM driver and software
- Perform an initial setup with the "Initial motor configuration and settings" tool, as indicated below.
- Use your ASCOM or INDILib driver to calibrate the rotation (full calibration), and optionally the shutter.
- You are ready to go!
1.2. Example installations
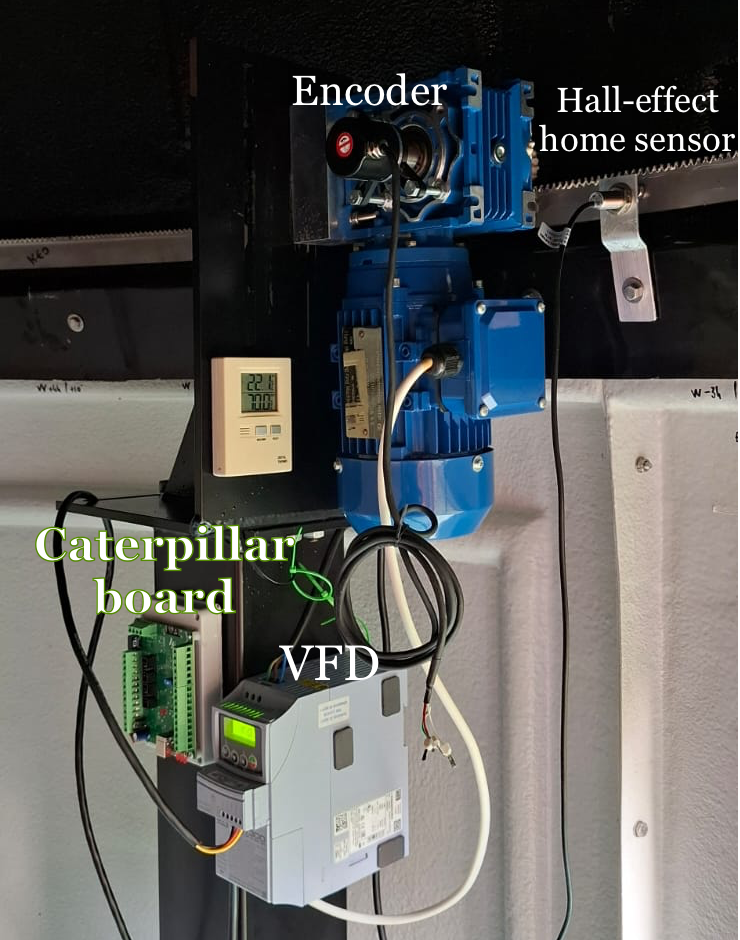
Have got a Caterpillar? We'd really appreciate it if you sent us a picture of your setup so we can feature it here to assist other users.
2.1. Hardware overview
The Caterpillar Dome FC is the "full" model, with separate boards to control the rotation and the shutter. For a standard dome, the system is comprised of two elements:
- The rotation element is made up of the Caterpillar board, connected to a motor (any of 3-phase, DC, or stepper), a rotary encoder, and a home switch.
- The shutter element depends on whether it has one or two parts.
- The opening always has a motor—any type, wired and configured just like the rotation motor—plus two limit switches, with an optional (recommended) encoder.
- If the shutter also has flaps, they are driven by a DC motor through the shutter board's dedicated flap connector, always with two more limit switches and no encoder option. See Shutter hardware for details.
Both boards communicate via an internal Wi-Fi link. The power input accepts from 12 up to 51 V DC; the board provides a regulated +5 V output for powering sensors. If the shutter board is installed in the rotating section of the dome, provisions must be made for it to be powered independently—a battery (charging at the park position) or conductor rails (busbar system) are two common options.
What you'll need
There are sections for each element below further ahead in the document. For now, this table gives an overview of the main elements required depending on your setup.
| Element | Notes | Amount required |
|---|---|---|
| Rotation board | Required for controlling the dome rotation | 1 per installation |
| Shutter board | Optional—for automated shutter and/or flap control | 1 per installation if controlling shutter/flaps |
| Rotation motor | Any type—DC, stepper (with external driver), 3-phase (via VFD, e.g. CFW300), or relay/contactor | 1 for rotation 1 for shutter 1 for flaps |
| Home sensor | Required for rotation—establishes azimuth reference (mechanical or hall-effect). Not used on the shutter, which relies on limit switches instead. | 1 per installation (for rotation) |
| Encoder | Required for rotation—rotary encoder for position feedback. Optional on the shutter's opening (recommended); flaps never take an encoder. | 1 for rotation 1 recommended for shutter |
| Power supply | +12 to +51 V DC | 1 or 2 per installation (1 can be shared by 2 boards) |
| Limit switches | Required if using shutter board—2 per element (open/close), 4 total with flaps | 2 for shutter 2 for flaps |
The following table refers to other elements dependent on the setup. They also have their own sections further into the document.
| Element | Notes |
|---|---|
| External driver for stepper motor / DC motor | The Caterpillar board doesn't drive stepper or DC motors directly, so a driver is required |
| Variable-frequency drive (VFD) | The Caterpillar uses a VFD to control 3-phase motors, paired with the relay expansion board (below) |
| Relay expansion board | A relay expansion board can be used to automate control of motors or drives that are normally operated through simple on/off switches or contactors |
Find 3D printing designs, including board holders, here: 3D files repository.
Example board connections
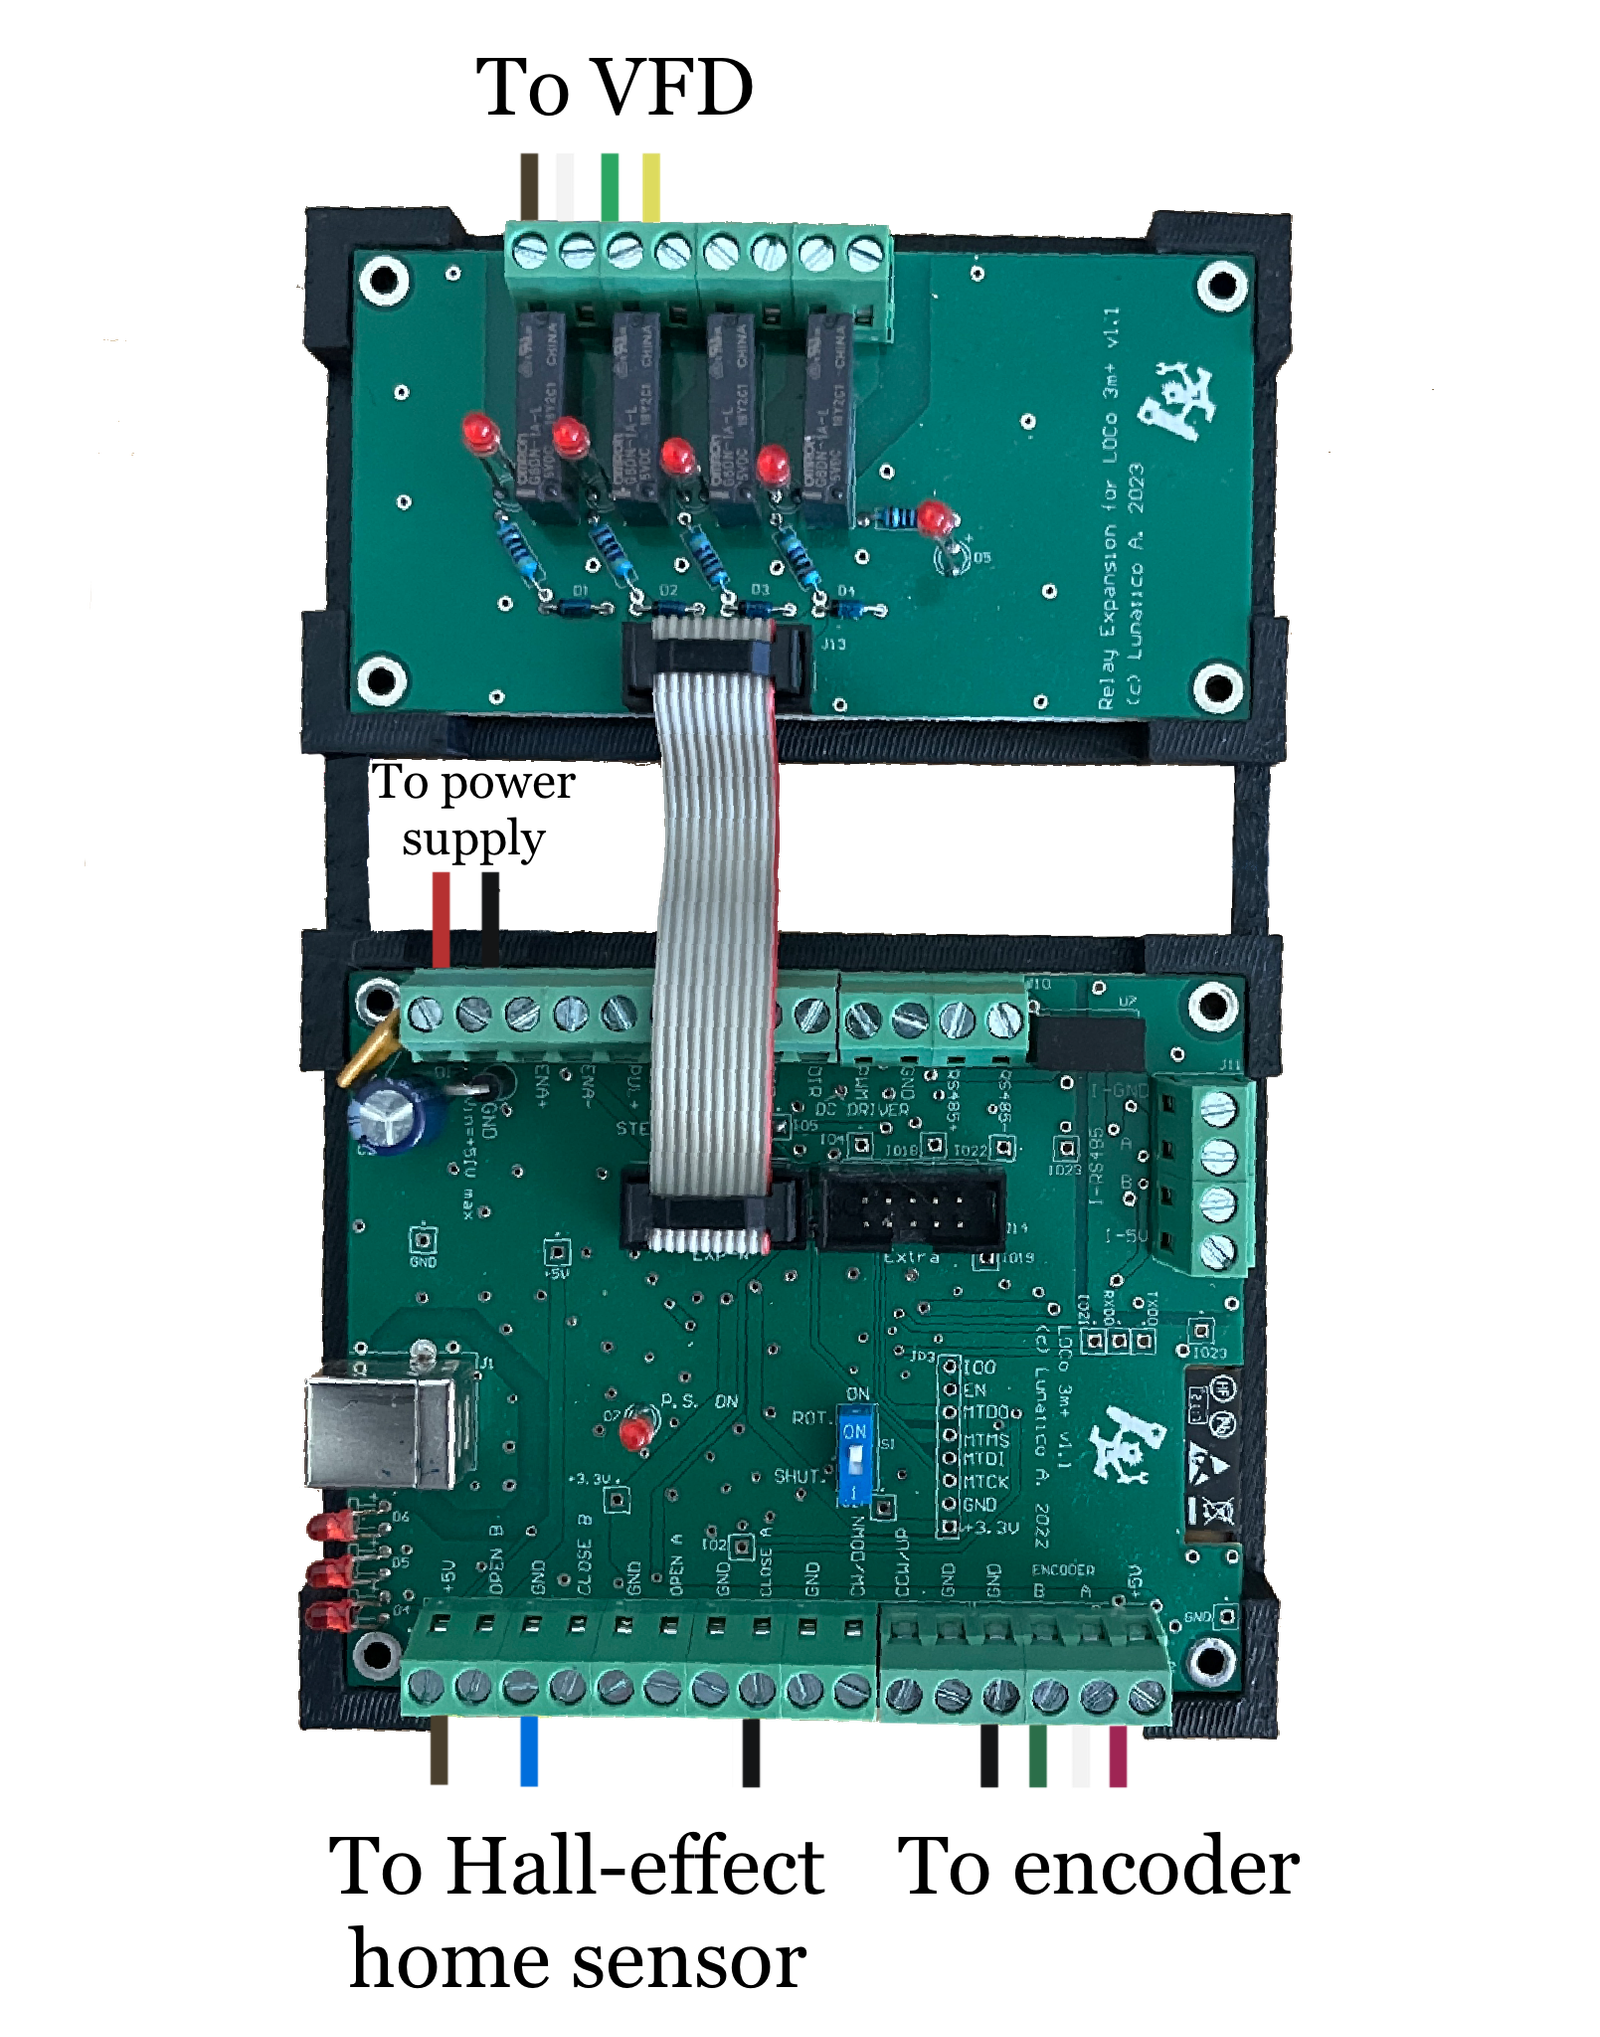
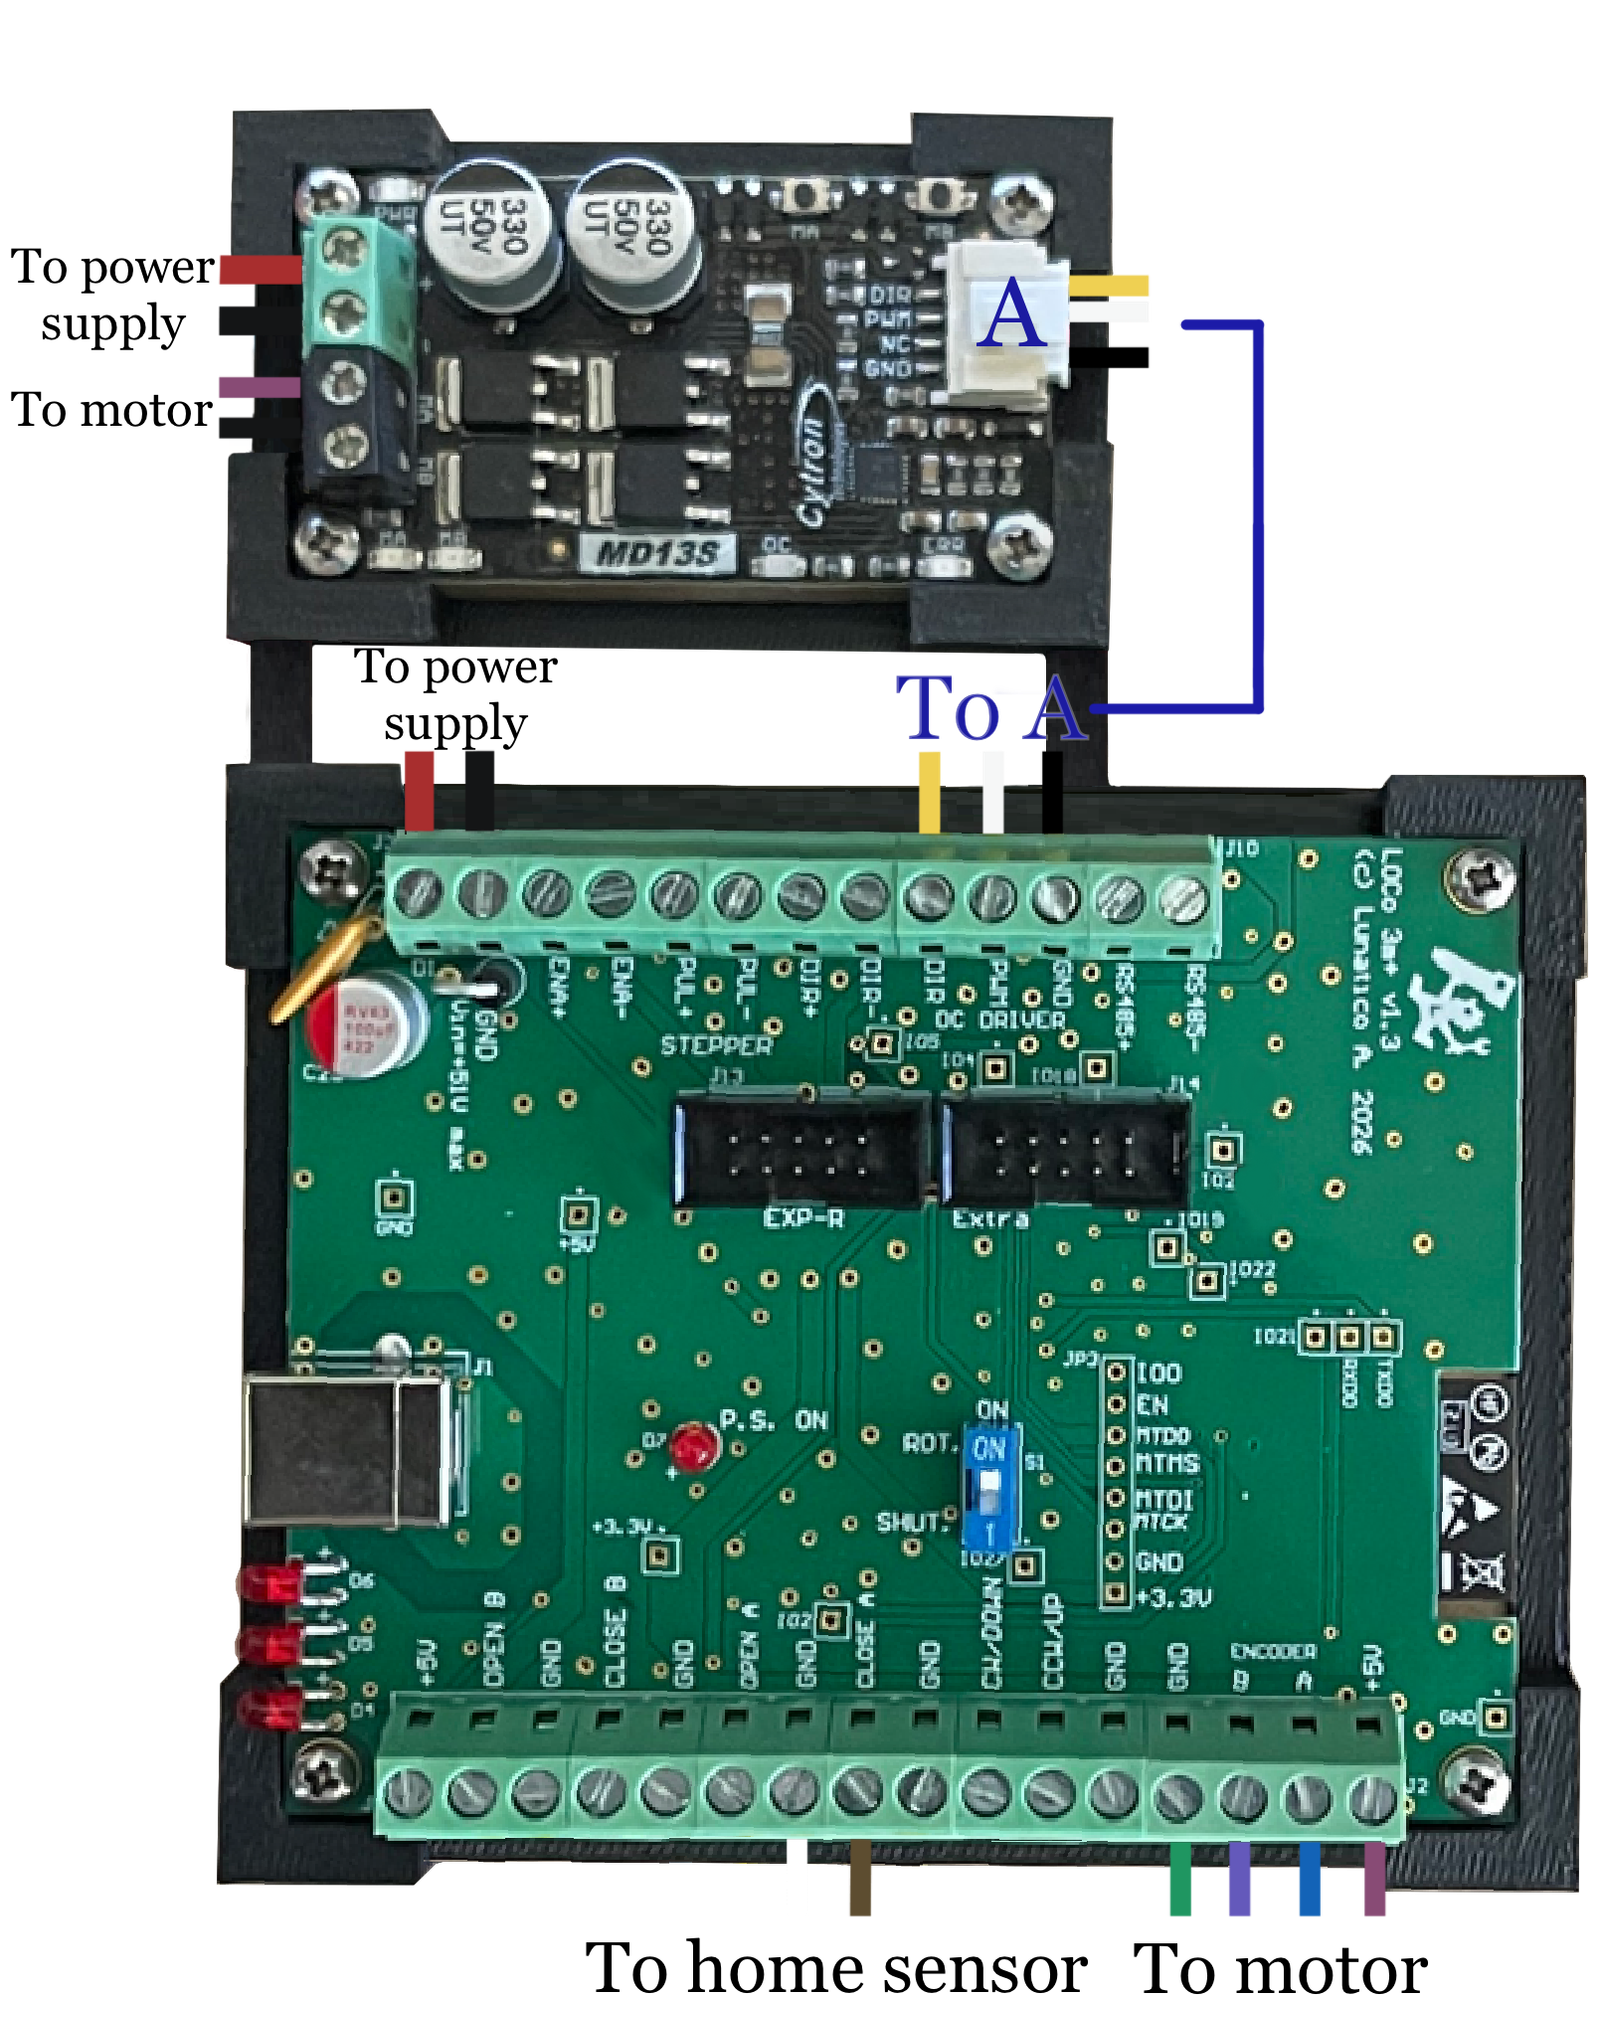
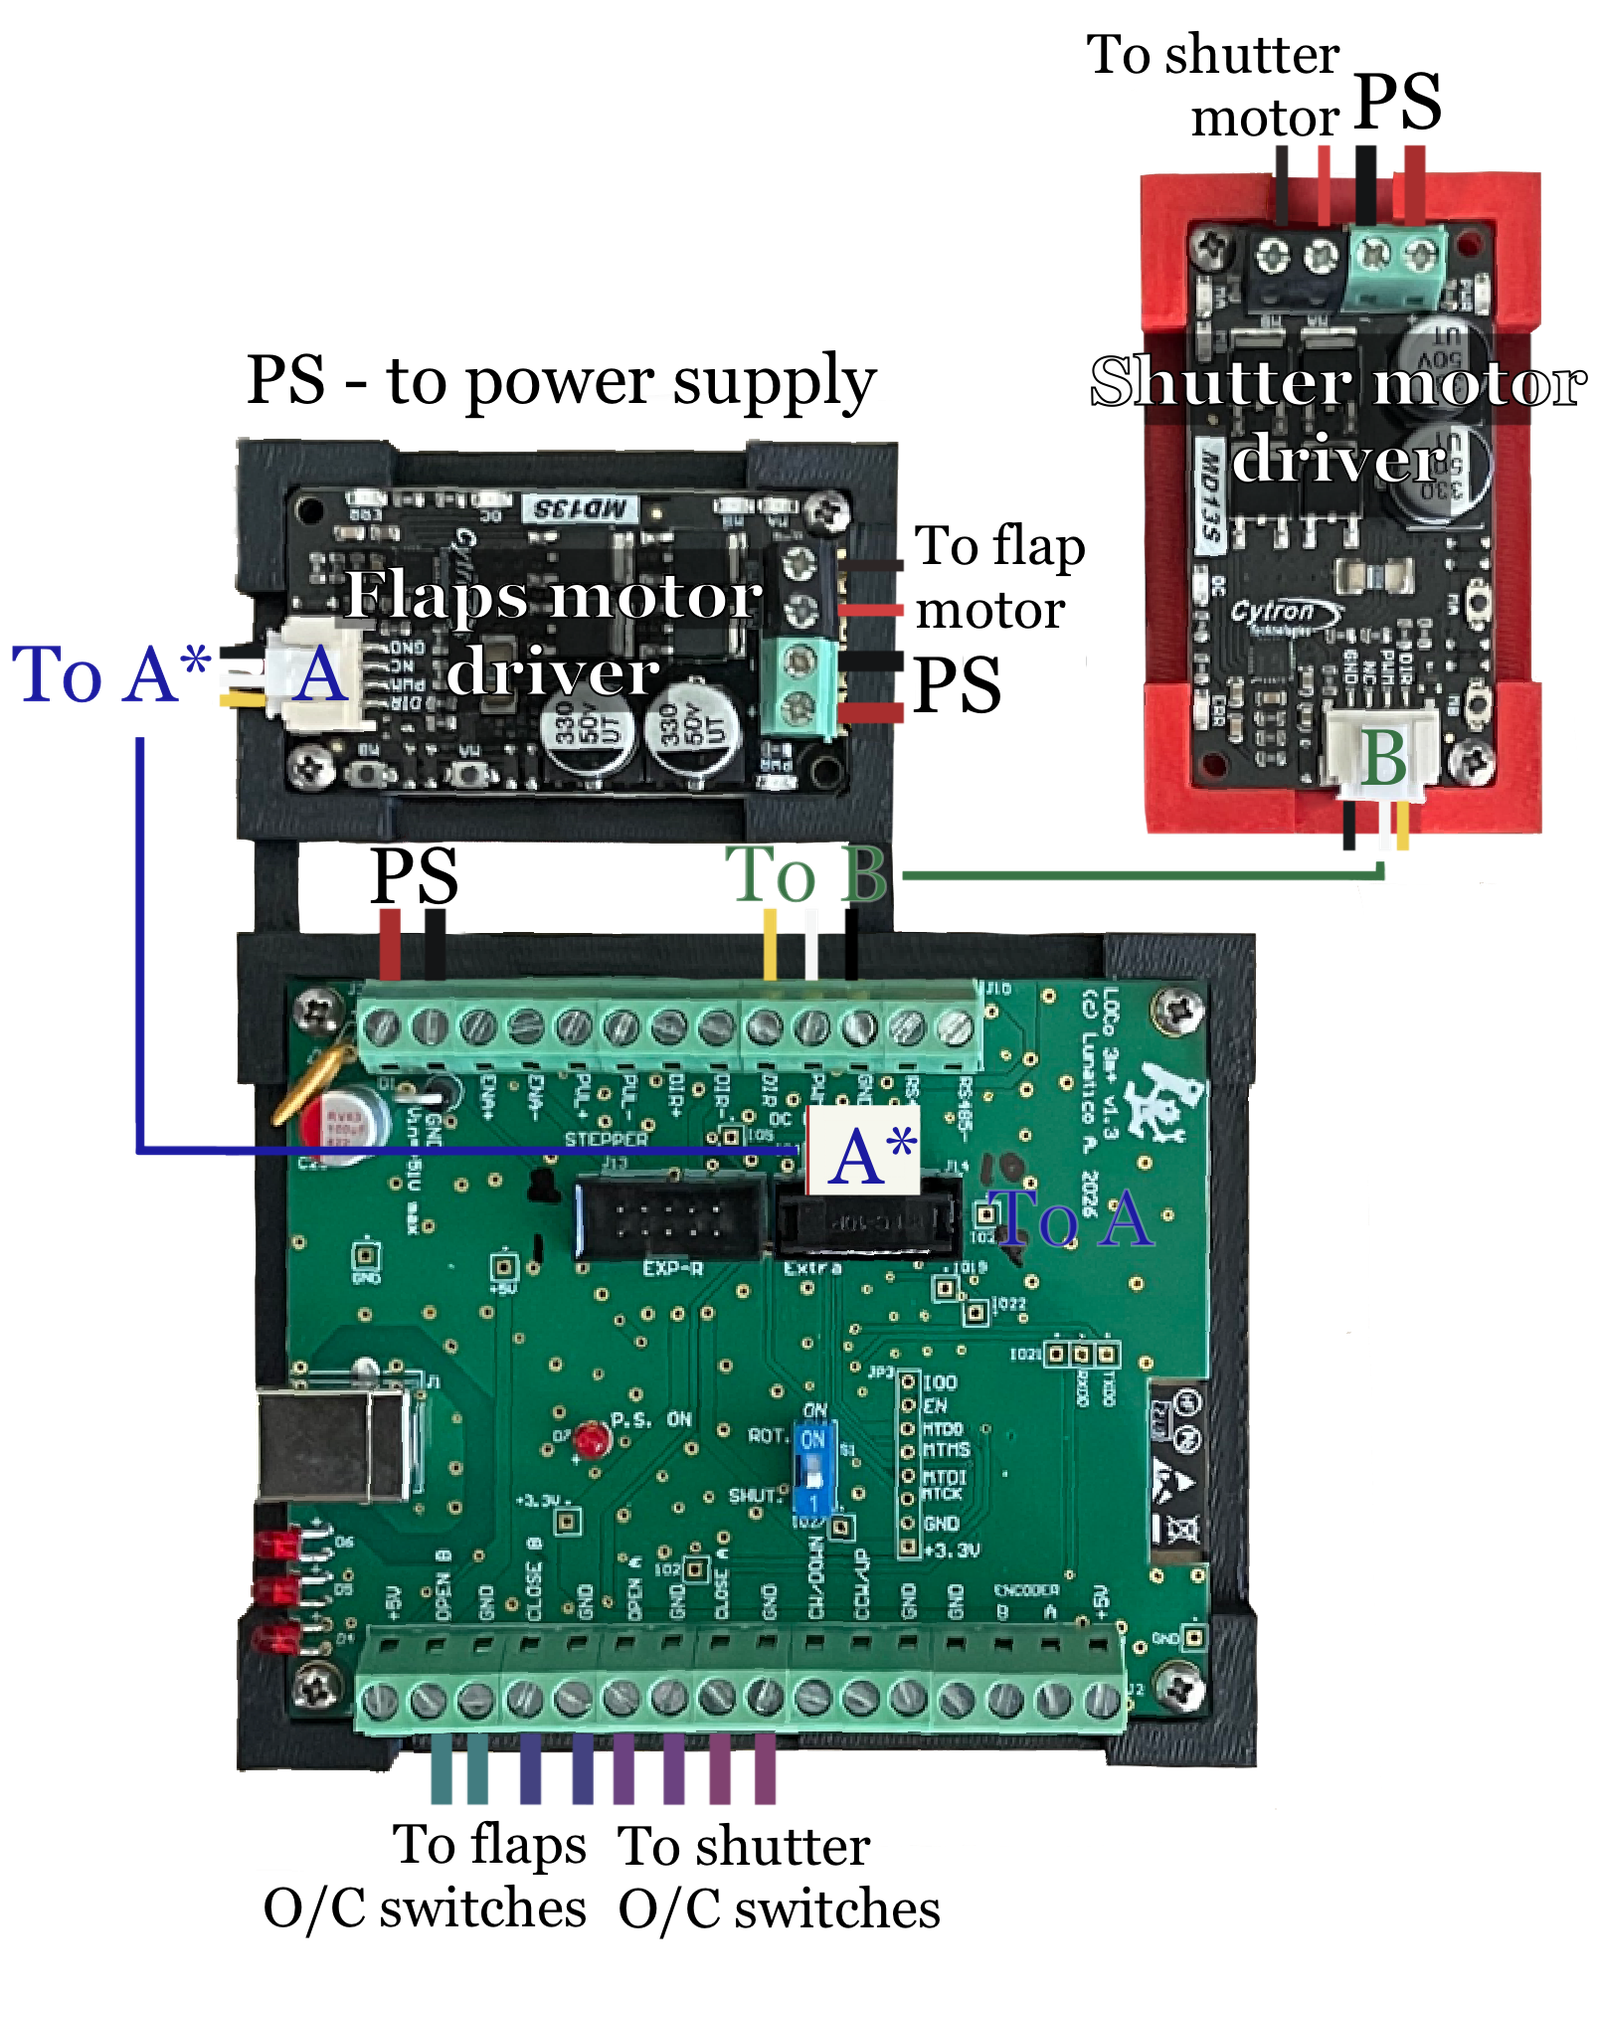
Need: the rest of the pics.
2.2. Home sensor
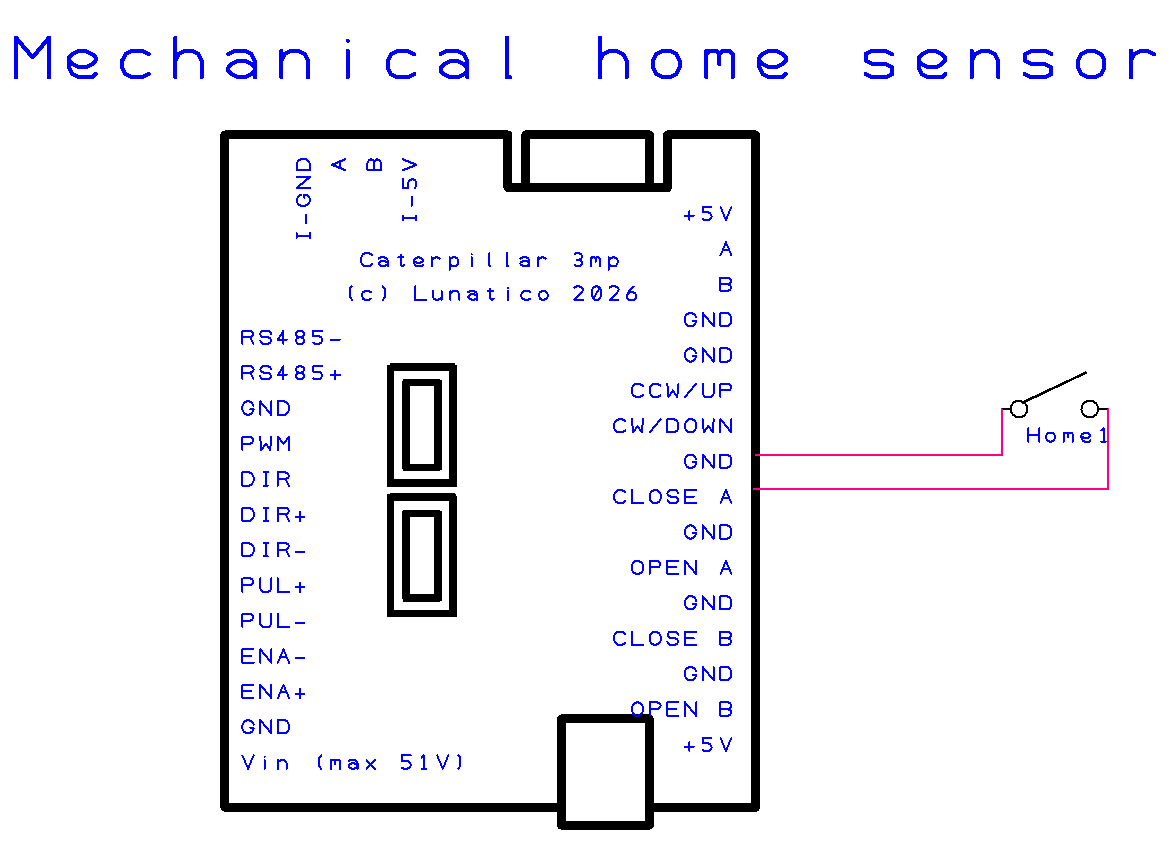
The rotation unit needs a home sensor. Both a mechanical or a hall-effect sensor (usually preferred) can be used. They are wired to the same connector on the board, which provides +5 V required for the hall-effect one.
The shutter has no home sensor—its open and close positions come from limit switches instead.
In normal operation, should the home sensor not be found after a complete revolution, the system will stop and issue a warning.
Hall-effect sensor (preferred)
Popular NPN hall-effect sensors include an LED that will light when the sensor is active, which is very convenient to test the system during installation.
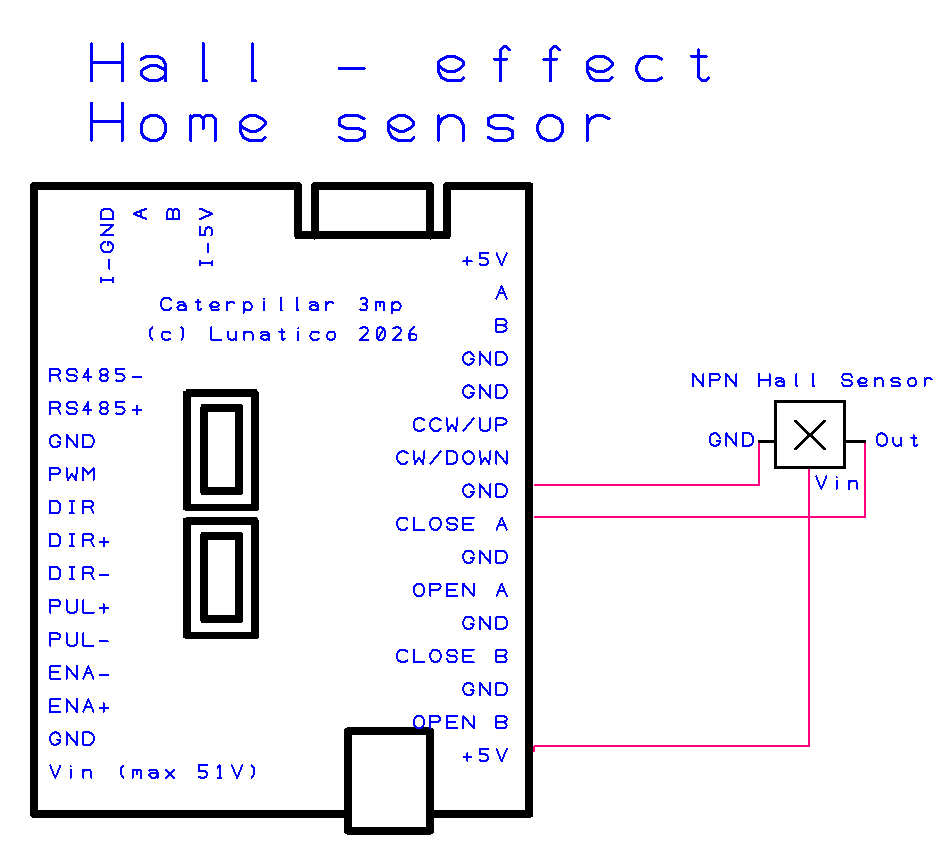
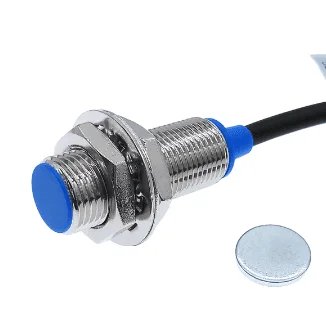
Tested Hall-effect sensors
One sensor we have tested to work with the +5 V from the Caterpillar board is the NJK 5002C.
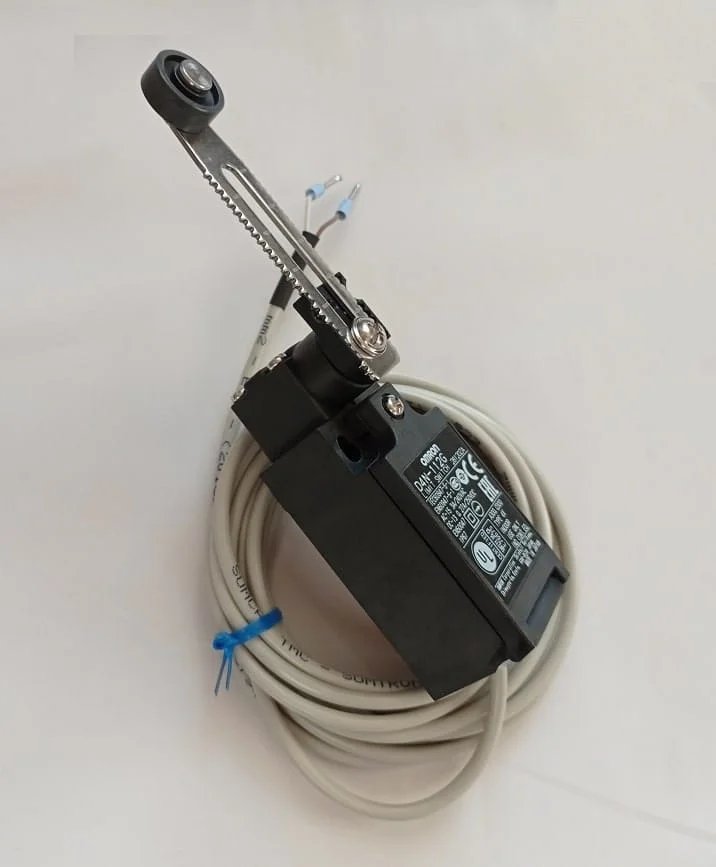
Mechanical limit switch
A mechanical push-button or lever switch can also be used. For switches with two closed positions (i.e. the lever can be pressed from either side), precautions must be taken so it is only triggered at one point per revolution. A good approach is placing the sensor horizontally, so the dome lowers the switch when reaching the home position, rather than pushing it sideways—this way only one consistent trigger point is possible.
2.3. Encoder
Rotation of the dome is measured by a rotary encoder, and the home position is confirmed by the home sensor. The combination of these allows for very precise positioning of the dome.
The encoder is required, except for stepper motors; without it, the system cannot track dome position accurately. If the encoder does not detect motion when the dome is running, the system will stop and issue a warning.
The encoder can be coupled either to the motor axle—downstream of any reduction gearing—or directly to the dome rack, using a dedicated coupling. A non-friction coupling is preferable in either case, to avoid slippage.
On the shutter's opening, the encoder is optional—open and close positions come from the limit switches—but we recommend fitting one anyway: it lets the system catch a stalled or slipping motor as an extra safety check. Flaps never take an encoder.
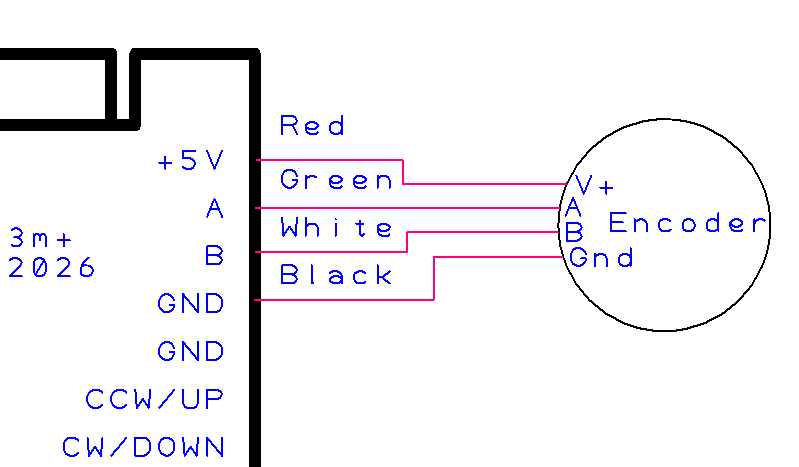
NPN, 5V DC quadrature encoder required. The system will track up to 2 KHz step pulses, which is clearly overkill. Anything above a few counts per degree will provide ample resolution for dome tracking.
2.4. Stepper motor—external driver
For stepper motors, the Caterpillar board does not drive the motor directly. Instead, it outputs 5 V control signals to an external stepper driver (such as a DM860I or TB6600), which handles the high-current motor supply. Many stepper drivers accept opto-isolated ENA+/ENA-, PUL+/PUL-, and DIR+/DIR- inputs referenced to 5V as supplied by the Caterpillar.
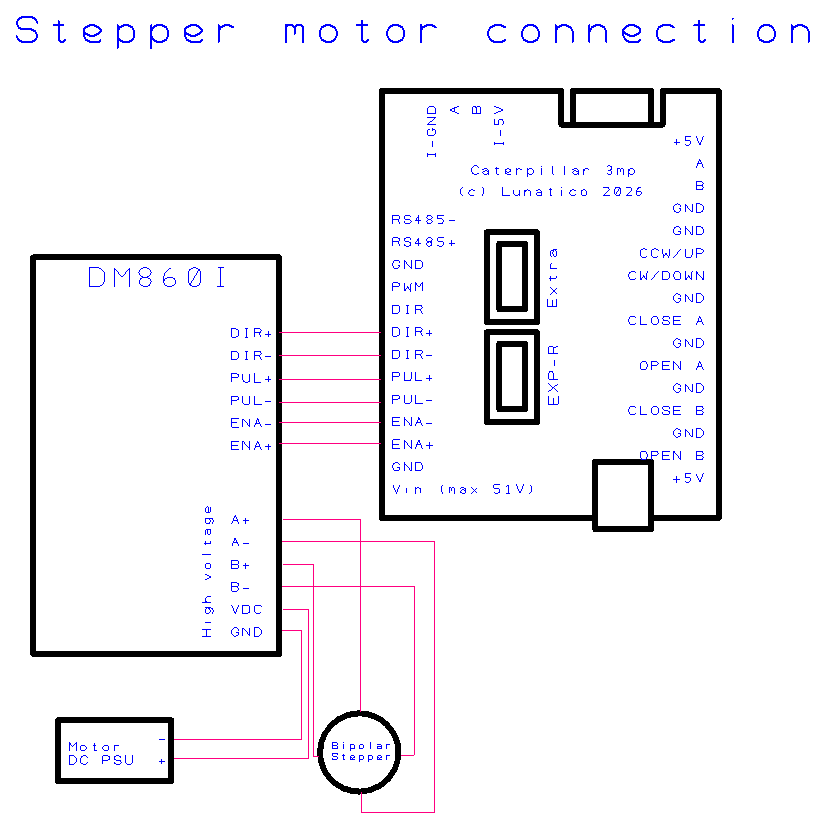
Tested drivers
- DM860I—up to 7.2 A, suitable for larger NEMA 34 motors
- TB6600—up to 4.5 A, common choice for NEMA 23 motors
2.5. DC motor—external driver
For DC motors, the Caterpillar board does not drive the motor directly either. Instead, it outputs a PWM speed signal and a direction (DIR) signal to an external DC motor driver (H-bridge), which handles the higher current the motor needs. Any DC driver that accepts PWM + DIR control at 3.3 V logic is compatible.
Tested driver
- Cytron MD13S—13 A continuous (30 A peak for up to 10 s), 6–30 V motor supply, PWM (up to 20 kHz) + DIR control, 3.3 V/5 V logic; built-in overcurrent, undervoltage, and thermal protection.
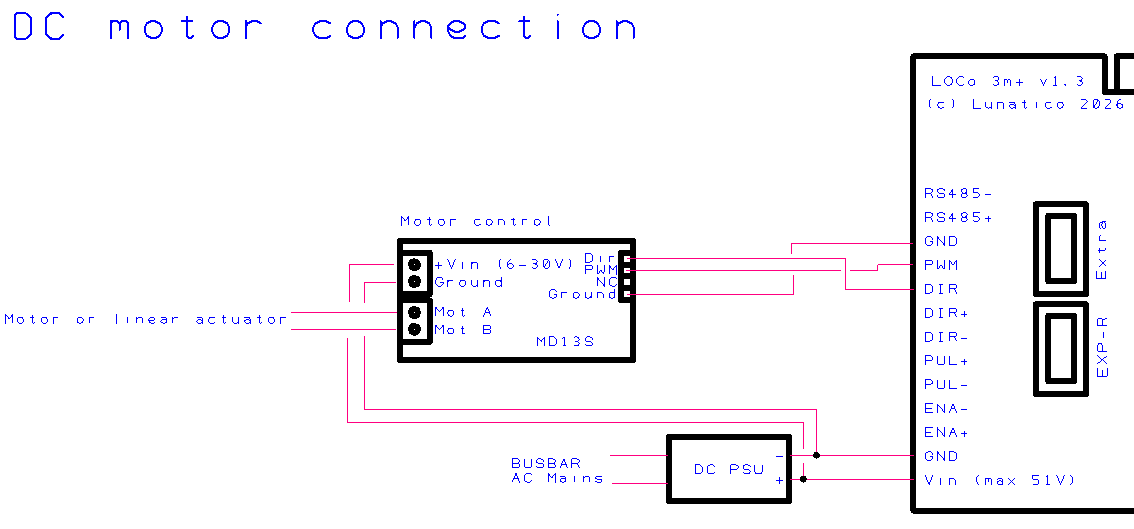
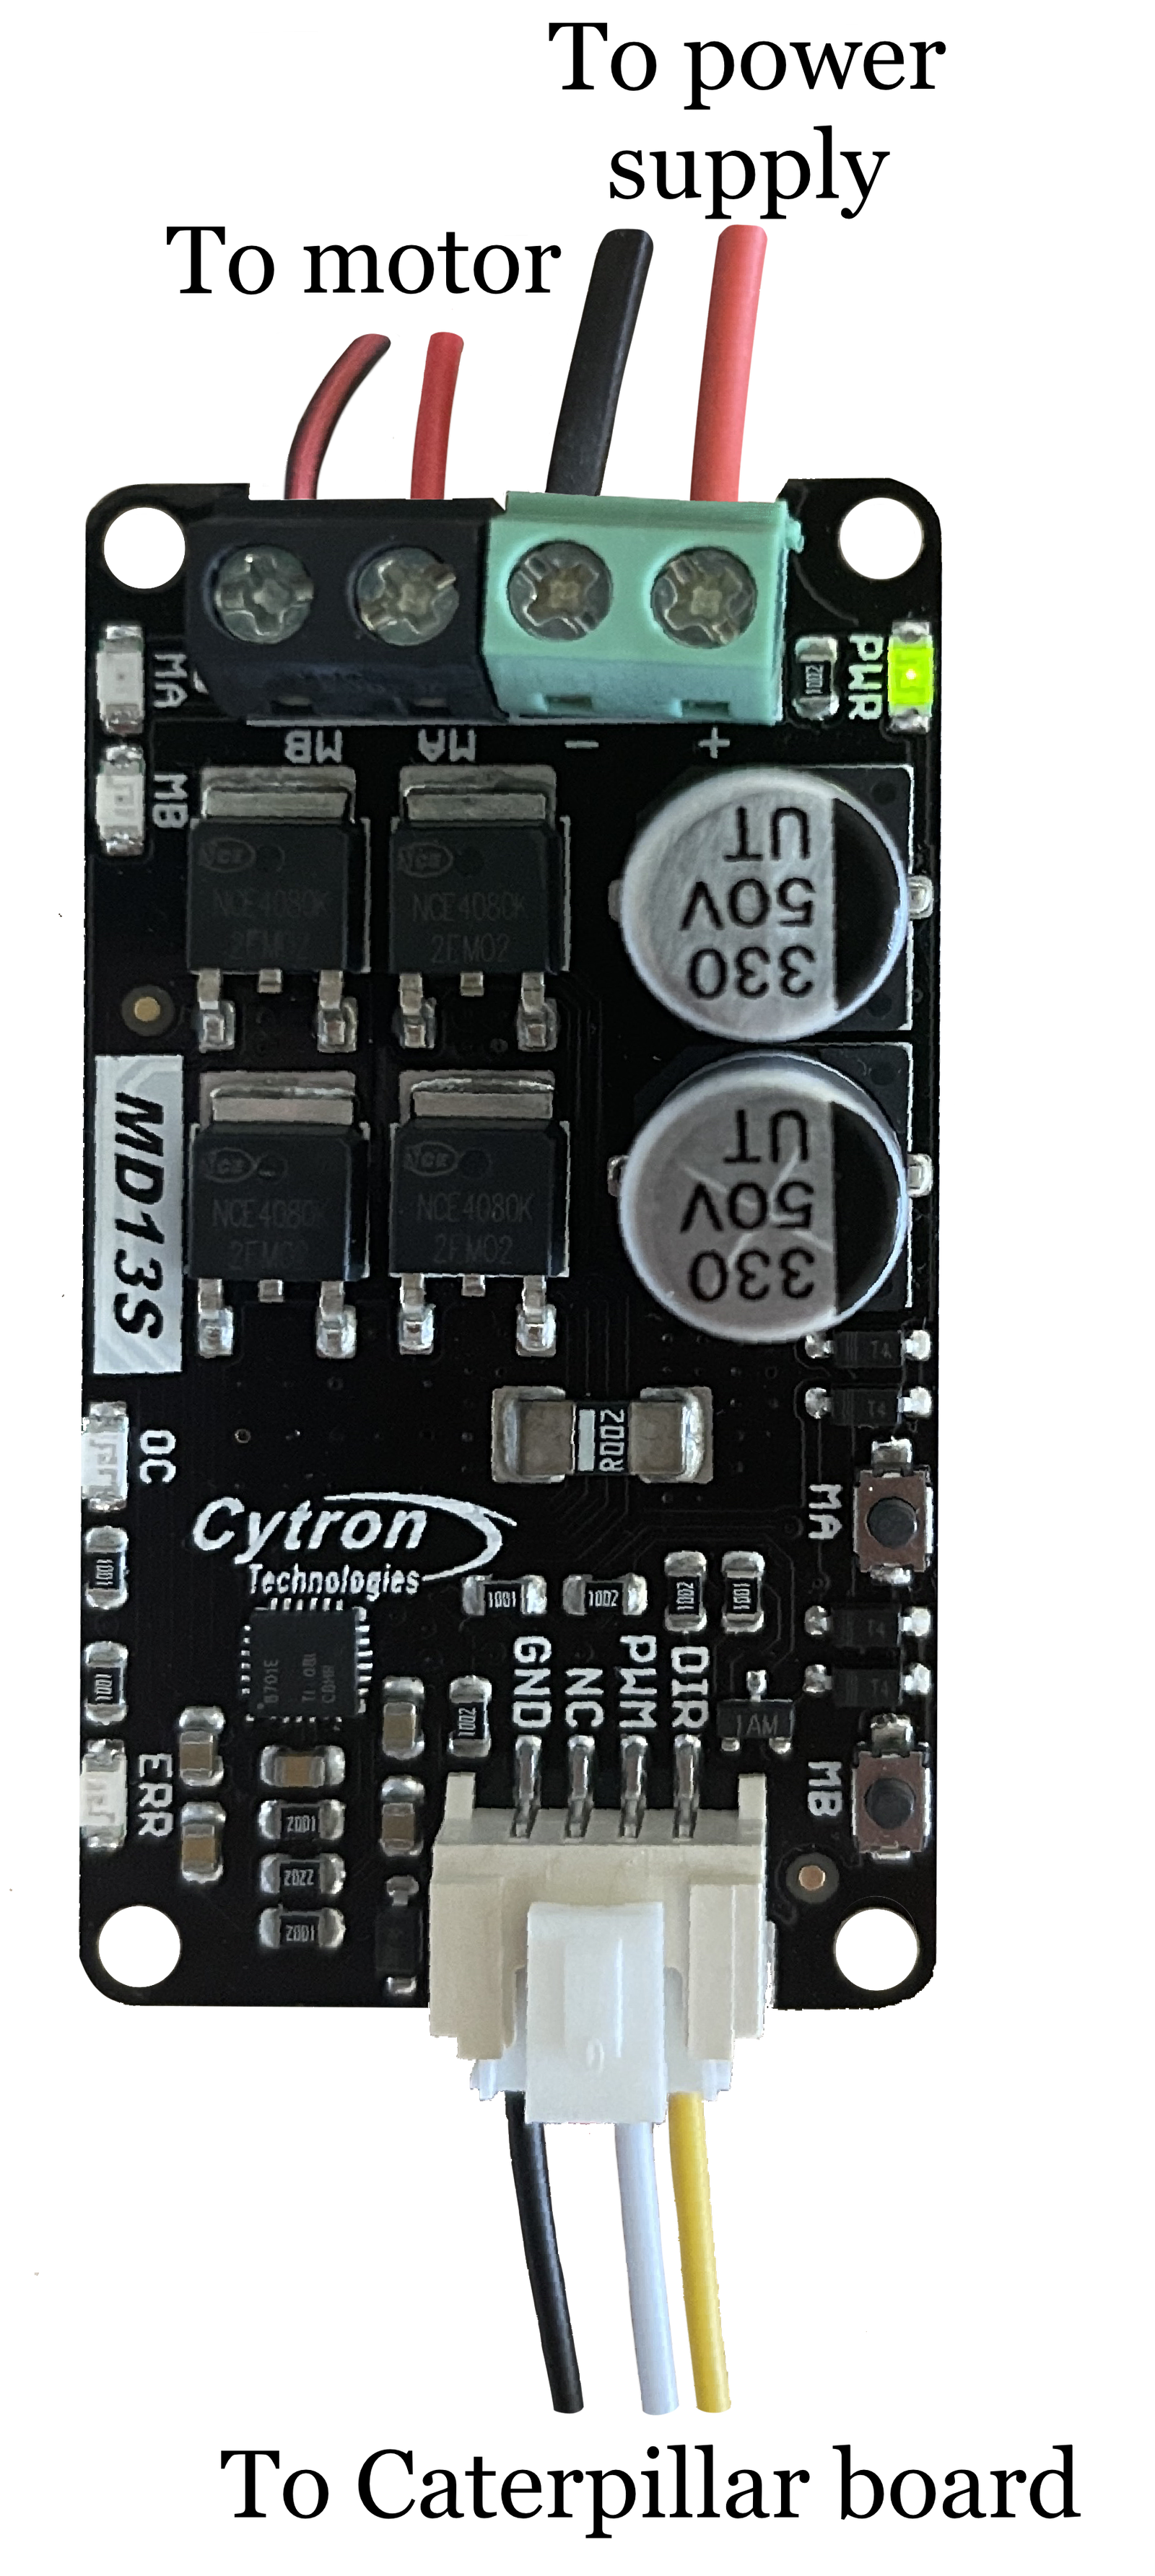
Need: exact connector pinout on the Caterpillar board for PWM/DIR signals.
2.6. Variable-frequency drive (VFD)
For 3-phase motors, the Caterpillar controls a variable-frequency drive (VFD) through its digital inputs (DIx), driven by relays on our relay expansion board—a convenient way to get run/stop and direction control without any serial link. Any VFD that lets you assign run/stop and forward/reverse commands to digital inputs can be used this way; the parameter names and numbers below are given for the WEG CFW300 as a concrete example—consult your VFD's manual for the equivalent digital-input parameters if you are using a different model.
For the VFD to read its digital inputs the way the Caterpillar's relays expect, a few parameters have to be adjusted. On a CFW300, these are:
| Param | Description | Value | Meaning |
|---|---|---|---|
| P220 | LOC/REM Selection Source | 4 | DIx (0 always LOC, 1 always REM) |
| P223 | LOC FWD/REV Selection | 4 | DIx |
| P224 | LOC Run/Stop Selection | 1 | DIx |
| P263 | DI1 Input Function | 9 | LOC/REM |
| P265 | DI3 Input Function | 4 | Forward Run |
| P266 | DI4 Input Function | 5 | Reverse Run |
After this configuration, the VFD will obey the run/stop and direction relays wired from the expansion board's outputs to its digital inputs, and will also be capable of manual operation with the flip of a switch.
Need: wiring diagram showing expansion board relay outputs to VFD digital input terminals, and which digital inputs (CFW300 numbering or otherwise) should be used for run/stop and direction.
2.7. Relay expansion board
For motors or drives that are normally operated through simple on/off switches or contactors, the Caterpillar can automate that control using our relay expansion board. Rather than wiring to the motor or drive electronics directly, the board's relay outputs connect to whatever would otherwise be flipped by hand—a contactor coil, a VFD's digital inputs (see Variable-frequency drive), or any other low current switch-operated control point.
This makes it a convenient, driver-agnostic option: as long as a motor or drive can be commanded through dry-contact switch closures, it can be automated this way, without needing a dedicated speed/direction interface like PWM+DIR or a serial connection.
Need: number of relays and contact ratings on the expansion board, connector pinout, and example wiring diagrams for common cases (VFD digital inputs, contactor-driven 3-phase motor, etc.).
2.8. Shutter hardware
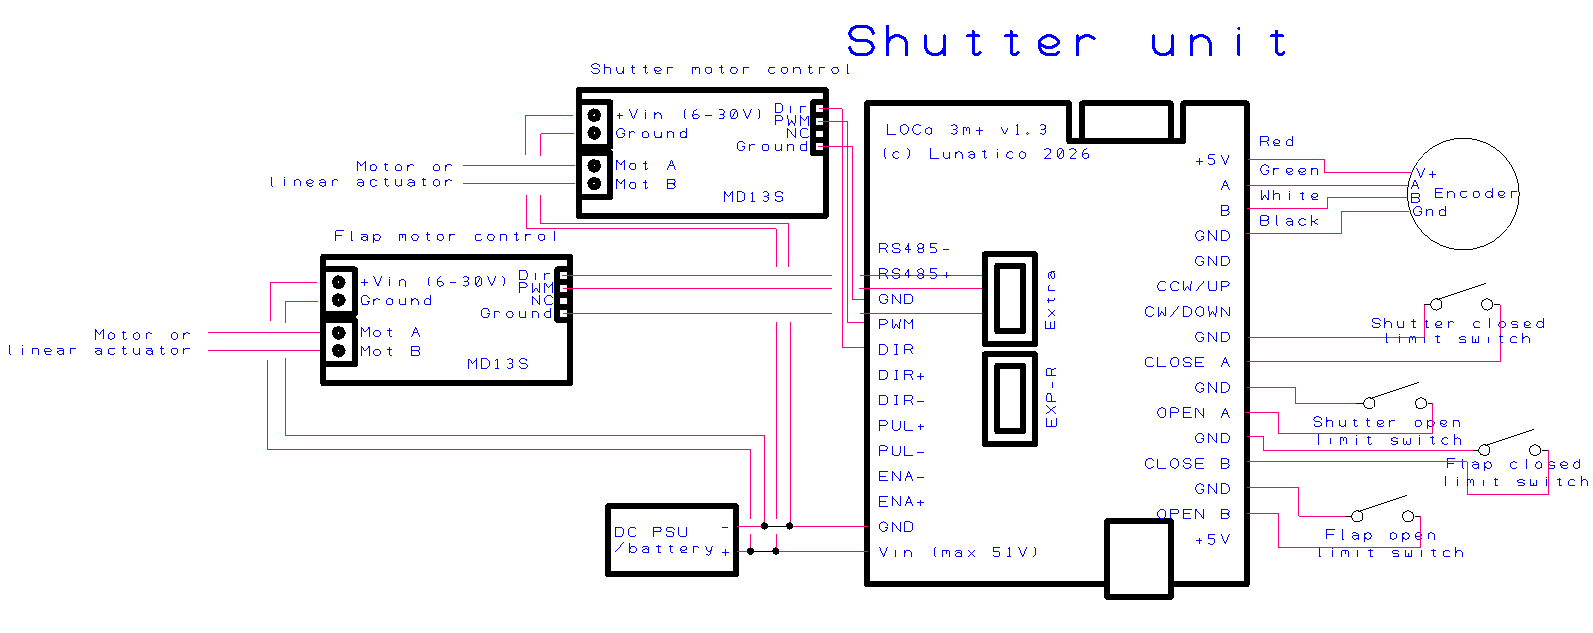
The shutter board controls up to two independent elements: the opening and, if fitted, the flaps (AKA lower shutters). Each element has its own motor/driver and its own pair of limit switches.
Opening
The opening motor can be any type—DC, stepper, 3-phase (via VFD), or relay/contactor—wired and configured exactly like the rotation motor; see the DC motor, Stepper motor, VFD, and relay expansion board sections for wiring details.
Two limit switches (open and close), normally open, are required. There is no home sensor for the opening—the limit switches themselves define the open and close positions—and a rotary encoder is optional, though recommended as an extra safety check (see Encoder).
| Opening motor | Any type—DC, stepper (external driver), 3-phase (via VFD), or relay/contactor |
| Opening limit switches | 2 (NO, open/close), required |
| Opening encoder | Optional, recommended as an extra safety check |
Flaps (lower shutters)
If your shutter has two elements—a main opening and flaps (AKA lower shutters)—the flaps are always driven by a DC motor or a linear actuator (or 2) through a dedicated connector on the shutter board, separate from the opening's motor connector. The flap driver has no encoder input; instead, two limit switches (open and close) are always required to track its position.
Note that even if the flaps use 2 linear actuators, these can be controlled by the same driver; alternatively 2 drivers can be wired in parallel if the power requirements demand it.
| Flap driver | DC only, via a dedicated connector on the shutter board |
| Flap limit switches | 2 (NO, open/close), required |
| Flap encoder | Not supported |
Flaps are enabled in Initial motor configuration and settings by checking Has flaps? in the Shutter panel—see Enabling the shutter.
Need: shutter board connector pinout for the dedicated flap driver connector and its limit switch connectors, and the flap driver's cable/connector part number.
3.1. Software overview
The Caterpillar can be controlled from any operating system, but it's important to note that the first configuration has to be done with the Initial motor configuration and settings application, which runs on Windows. The Caterpillar's USB Windows drivers can be found here: CP210x_Universal_Windows_Driver.zip.
The Caterpillar's software package includes:
- The Initial motor configuration and settings, which as mentioned, is an application used usually just once, to set everything up according to your specific dome characteristics
- The ASCOM dome driver and ASCOM safety monitor driver
There is an INDI driver available as well. Refer to its section for more information.
3.2. Initial motor configuration and settings
The Initial motor configuration and settings application is a small Windows application used to fine-tune the Caterpillar's settings. You will use it to:
- Select the correct motor preset for your drive system
- Set physical and logical speed parameters
- Configure the WiFi so the board can be reached over your observatory network
- Run motor and encoder calibration
- Save all settings to the board's internal flash storage
Once your observatory is up and running, you will rarely need this tool again; day-to-day operation goes through your ASCOM or INDI driver and automation software.
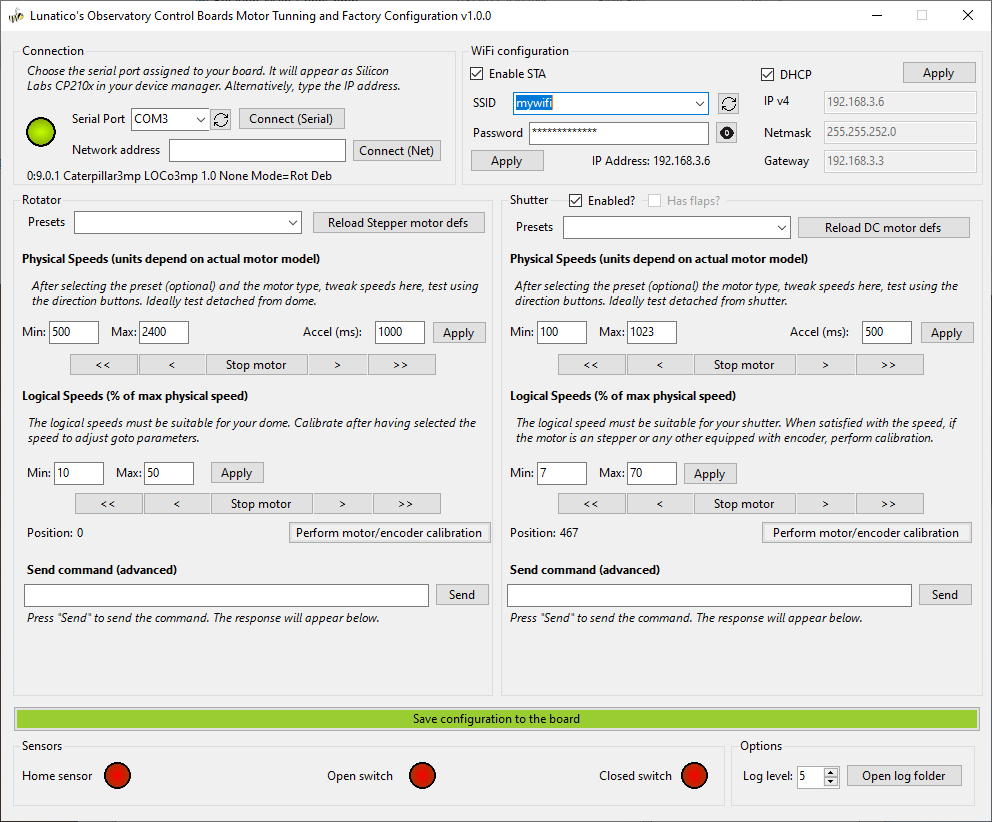
The window is split into two mirrored halves, Rotator (left) and Shutter (right). The shutter half only becomes active once you check its Enabled? box. Both halves share the same layout:
- A preset dropdown and a "Reload … motor defs" button. See Selecting a motor preset.
- Physical Speeds and Logical Speeds, each with jog buttons (
<<<Stop motor>>>) to test movement directly from the app. See Configuring speeds. - A live Position readout and a Perform motor/encoder calibration button. See Motor and encoder calibration.
- A Send command (advanced) box to send raw commands straight to the board. This is only needed for low-level diagnostics or support requests.
At the bottom, Sensors shows live indicators for the home sensor and, on the shutter side, the open/closed limit switches. This is handy for checking wiring without leaving the app. The green Save configuration to the board bar writes everything to flash (see Saving settings to the board). Options lets you raise the log level and open the log folder if you need to troubleshoot or file a support request.
Connecting via USB
Connect your computer to the board with a USB cable, and turn the Caterpillar on. Windows will detect a new device and may install the drivers automatically. If it does not, install the CP210x driver manually: CP210x_Universal_Windows_Driver.zip .
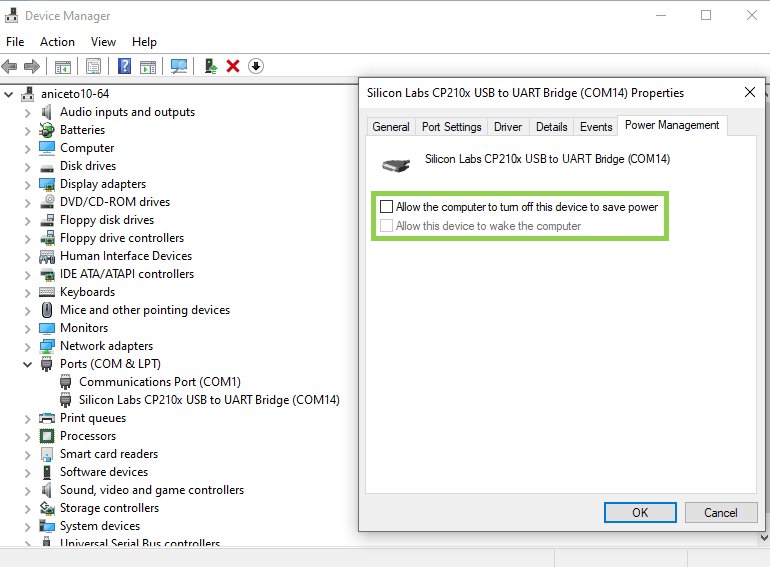
In order to find out which COM port has been assigned to your Caterpillar, use the Windows Device Manager. This number will always be the same for your device, and will be required to configure the connection.
You should also disable the power saving feature of the USB port: in Device Manager, find the CP210x device under Ports (COM & LPT), open its Properties → Power Management, and uncheck "Allow the computer to turn off this device to save power".
Open Initial motor configuration and settings. The Port dropdown will list all available serial ports. If the board does not appear, click Reload Ports. Select the correct port and click Connect.
The status bar will show the board's firmware version string once connected (e.g.
Caterpillar3mp LOCo3mp 1.2.0 None Mode=Rot|Shut).
If you have a separate shutter board, Initial motor configuration and settings will connect to the rotator board first, then wait up to 30 seconds for the shutter board to respond. A "Waiting for shutter…" message will appear in the meantime—make sure both boards are powered on.
Connecting via WiFi
Once the board has been configured with your WiFi credentials (see Configuring board WiFi), you can connect to it over the network instead of USB.
In the Network address field, enter the board's IP address—you
can find this in your router's DHCP lease table, or from the address shown in
Initial motor configuration and settings after a USB connection. The default port
is 10000, so entering just the IP address is enough; to use a different port, enter
192.168.x.x:port. Press Enter or click Connect.
Assigning a static IP to the board—either via a DHCP reservation on your router, or using the Static IP settings in Initial motor configuration and settings—means the address will not change between sessions.
Selecting a motor preset
Motor presets load a complete set of factory default parameters tuned for a specific motor and drive combination. This is the first thing you should do after connecting to a freshly installed board.
The rotator and shutter each have their own preset dropdown. Select the preset that matches your motor.
Selecting a preset resets all parameters (speeds, acceleration, calibration) to factory defaults for that motor type—any custom values you have set will be overwritten. The board will reboot automatically; Initial motor configuration and settings will reconnect after a few seconds.
| Preset | Motor/drive type | Encoder |
|---|---|---|
| Stepper | Stepper motor via external driver | Not needed—position comes from steps |
| DC motor with encoder | DC motor via external driver (e.g. Cytron MD13S) | Yes |
| DC motor no encoder | DC motor via external driver | No |
| Relay motor with encoder | Relay-driven motor or contactor, including a VFD driven through the relay expansion board | Yes |
| Relay motor no encoder | Relay-driven motor or contactor, including a VFD driven through the relay expansion board | No |
The "no encoder" presets are only offered in the Shutter preset dropdown—on the rotator, an encoder is always required except with the Stepper preset, which tracks position by step count instead (see Encoder).
Configuring speeds
Speed configuration uses two layers, and the split is intentional: physical speeds describe what the motor and driver can do, while logical speeds describe what your specific dome needs given its mechanics (gearing, dome diameter, friction, desired real-world rotation speed, etc.).
Keeping them separate pays off in two situations:
- If you install the same motor/driver combination on more than one dome, you only need to re-tune the logical range for each one—the physical range stays the same.
- After a mechanical repair or adjustment to the dome, you typically only need to revisit the logical range too, since the motor and driver themselves have not changed.
Physical speeds
Physical speeds are the raw parameters the motor driver works with. Their units depend on the motor type (e.g. steps/s for a stepper or a PWM-related value for a DC driver). They should be set once per motor/driver combination and left alone afterward—they do not depend on the specific dome the motor is installed on:
- Min—the slowest speed the motor can turn without stalling. Below this, the motor may not move reliably.
- Max—the fastest safe speed for your drive system.
- Accel—how quickly the motor ramps up from min to max, in ms.
Your preset loads sensible defaults, only adjust these if you know your motor's characteristics and are seeing stalling or noise.
Each side has its own jog buttons (<< < Stop motor
> >>) next to both the physical and logical speed
fields, so you can test a speed immediately after applying it. Test with the
motor disconnected from the dome or shutter mechanism first, so a wrong setting
cannot drive it into a limit or cause damage.
Logical speeds
Logical speeds are what your ASCOM driver and automation software see, expressed as percentages of the physical range. This is the layer you tune to match the concrete mechanical installation: setting logical min to 20% and max to 80%, for example, limits the software-accessible range to the middle portion of the motor's capability, which is useful if extreme speeds cause vibration or inaccuracy on that particular dome. Expect to revisit this range whenever the dome's mechanics change (after a repair, a gear or belt adjustment, added friction, and so on) even though the physical range underneath stays the same.
Initial motor configuration and settings will warn if logical min > logical max, or if the derived step value at logical min falls below the physical min. Always apply physical speeds before adjusting logical speeds.
If your motor type is Relays (CaterpillarR), speed controls are not available so the fields are disabled. This is expected: relay-based drives run at whatever speed the existing motor system provides.
Click Apply in each speed section to send the values to the board, then Save configuration to the board to persist them.
Enabling the shutter
If your dome has a shutter or flap controlled by a separate Caterpillar board, enable it in the Shutter section of Initial motor configuration and settings.
- Check Enabled?. The shutter controls will become active.
- Select the shutter motor preset from the Shutter preset dropdown.
- If your shutter has two elements—a main opening and flaps (AKA lower shutters)—check Has flaps?. Note that the flap motor must be DC (motor or linear actuator), and flaps require their own open and close limit switches. There is currently nothing to configure for flaps.
- Click Save configuration to the board.
On power on, both boards connect to each other over a private, internal Wi-Fi link—this is automatic and requires no configuration from you. The observatory computer must be connected to the rotation board, which can be done via USB or your own Wi-Fi network. The rotation board controls the shutter board; you do not need to address the shutter board separately from ASCOM. Similarly, the rotation board will automatically update the firmware of the shutter one when required.
Configuring board WiFi
You can use Initial motor configuration and settings to configure WiFi so the board can be reached over your observatory network. To do so, follow these steps:
- Connect via USB first, as WiFi configuration requires an existing connection.
- In the WiFi section, enable Station mode by checking the STA checkbox.
- Click Scan to discover nearby networks, or type your SSID directly.
- Enter the WiFi password.
- Choose DHCP (default), or enter a static IP, subnet mask, and gateway if you prefer a fixed address.
- Click Apply WiFi. The board will apply the settings and disconnect—this is normal. If connected via USB, Initial motor configuration and settings will attempt to reconnect automatically.
Applying new WiFi settings over a WiFi connection will disconnect you. You will need to reconnect manually once the board has joined the network using the new settings.
After reconnecting, the current IP address is shown in the WiFi section; note it down, as you will need it to connect without USB in future sessions.
Motor and encoder calibration
Calibration matches the encoder response to motor motion. Run it after initial setup, and after changing a motor or encoder.
- Make sure the dome is clear to move through its full range of travel.
- Click Perform motor/encoder calibration.
- The dome will exercise the motor, both in CW and CCW direction, stopping, moving again, until the system measures every parameter it needs for accurate operation. Do not interrupt this process unless necessary.
- On success, a confirmation dialog appears. Click Save configuration to the board immediately to preserve the calibration data.
Check that the encoder is properly connected and that the board can detect movement. Try reducing the physical max speed and re-running. If the issue persists, check wiring and ensure the motor is turning in the correct direction.
Saving settings to the board
The green Save configuration to the board bar writes all current settings—speeds, WiFi configuration, calibration data, and motor parameters—to the board's internal flash (non-volatile) storage.
Until you click Save configuration to the board, your settings exist only in the board's RAM and will be lost when it reboots or loses power. Always save after completing configuration.
A confirmation dialog appears once the save completes. You can then close the application and proceed to ASCOM driver setup.
3.3. ASCOM dome driver
The Caterpillar's software includes the ASCOM dome driver and is available from this link. It has two components: the dome driver and a safety monitor driver for the optional weather input (a CloudWatcher can be used for this purpose).
The ASCOM Platform must be installed before running the Caterpillar installer. The software and drivers are the same for both the Caterpillar and the CaterpillarR.
Selecting the driver
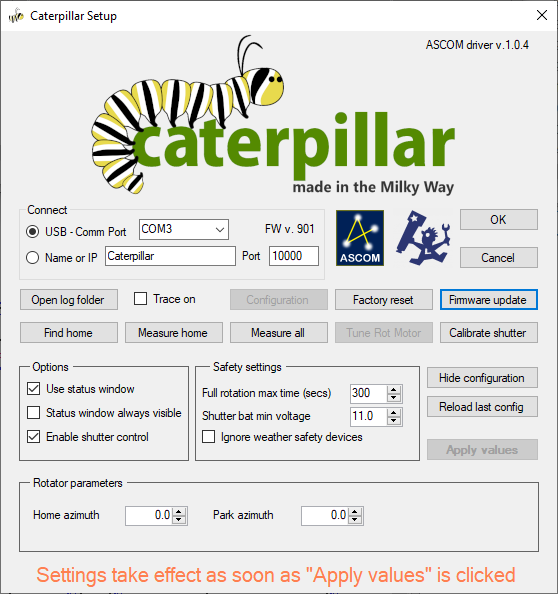
In your astronomy software's dome chooser, select Caterpillar Dome from the list. Open the driver's Setup dialog to configure the connection before connecting for the first time.
Connect
Enter the board's IP address (for WiFi) or select the COM port (for USB); the board communicates on UDP port 10000. The dialog also shows the connected board's firmware version (FW v.), and Firmware update lets you flash a new one without leaving the driver.
Open log folder and Trace on are diagnostic aids—enable tracing and reproduce an issue to be able to send the logs for support. Configuration / Hide configuration toggles the extended panel described below, and Factory reset resets the driver's own settings back to defaults.
Homing and calibration
These buttons perform the same kind of homing/calibration work as Motor and encoder calibration in Initial motor configuration and settings, but from the driver itself, without needing to reconnect with that tool:
| Find home | Drives the dome until it locates the physical home sensor. |
| Measure home | Finds the home sensor, then sweeps back and forth across it to precisely measure its trigger point from both directions. |
| Measure all | Measures the full circumference together with the home sensor; the complete calibration. |
| Tune Rot Motor | Matches the motor to the encoder, the same operation Initial motor configuration and settings performs, but for a different board revision; on the Caterpillar it is normally disabled. |
| Calibrate shutter | Measures the distance between the shutter's open and close limit switches. |
Options
| Use status window | Shows a small floating status window. |
| Status window always visible | Keeps that window on top at all times, instead of only when relevant. |
| Enable shutter control | Activates the shutter commands/buttons when a shutter board is present. |
Safety settings
| Full rotation max time (secs) | The longest a full rotation should take; if exceeded, the driver treats the dome as stuck and faults instead of spinning indefinitely. |
| Shutter bat min voltage | If the shutter's independent battery drops below this voltage, the shutter closes automatically. |
| Ignore weather safety devices | Lets the shutter open, and keeps it from auto-closing, even while the Safety Monitor reports unsafe weather. Use at your own discretion. |
This bypasses a safety feature meant to protect your equipment from weather—only enable it if you understand the risk (e.g. bench testing indoors, or taking sky flats under conditions the safety monitor would otherwise flag as unsafe).
Rotator parameters
Home azimuth is the real-world azimuth, in degrees, that corresponds to the home sensor position; Park azimuth is where the dome should move to when parking.
There is no separate "save" step—settings take effect as soon as you click Apply values. Reload last config discards any unapplied changes and reloads the last saved values instead.
Status window
Checking Use status window opens a small floating window with live status and quick manual controls—handy for keeping an eye on the dome without opening your full automation software.
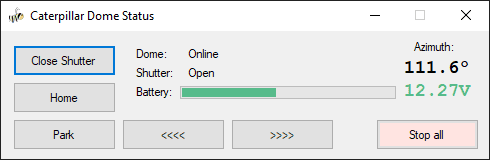
| Dome / Shutter | Connection and open/close state at a glance. |
| Battery | The shutter's independent battery voltage (see Shutter bat min voltage above). |
| Azimuth | The dome's current azimuth. |
| Close Shutter (toggles to Open Shutter) | Opens or closes the shutter. |
| Home / Park | Send the dome to its home or park position. |
<<<< / >>>> | Rotate the dome manually, one direction each. |
| Stop all | Immediately stops all motion, rotation and shutter alike. |
ASCOM Device Hub setup
ASCOM Device Hub lets multiple astronomy applications share a single dome driver connection, and handles telescope-dome slaving so the dome follows the telescope automatically.
Some programs—such as Voyager, Sequence Generator Pro, or N.I.N.A.—include their own dome to telescope slaving. It is up to you to choose the software to synchronise both elements. The ASCOM Device Hub is used here for reference.
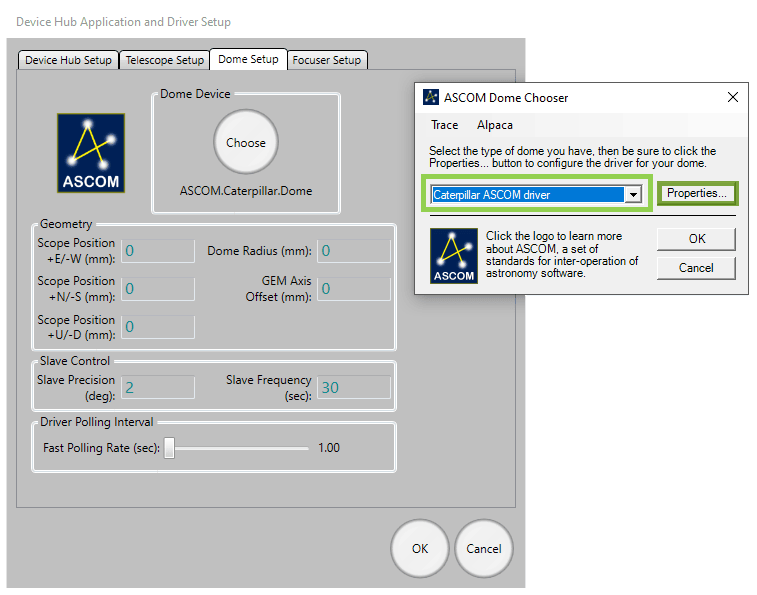
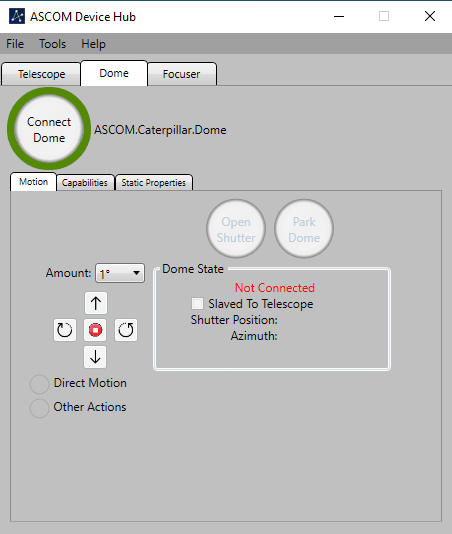
Connecting the dome driver
- Open ASCOM Device Hub.
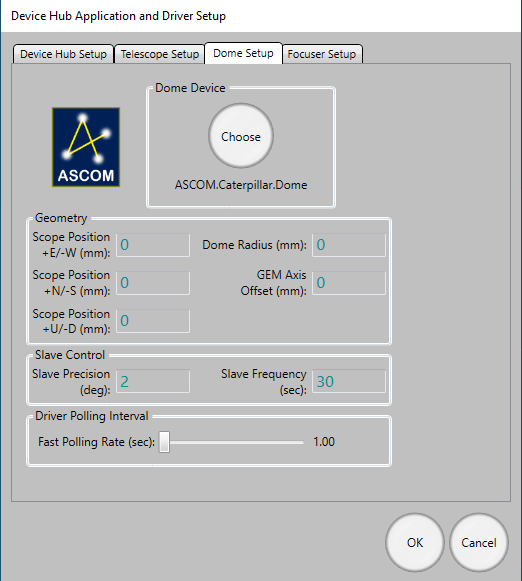
- Go to Tools → Setup → Dome Setup.
- Click Choose and select the Caterpillar ASCOM driver.
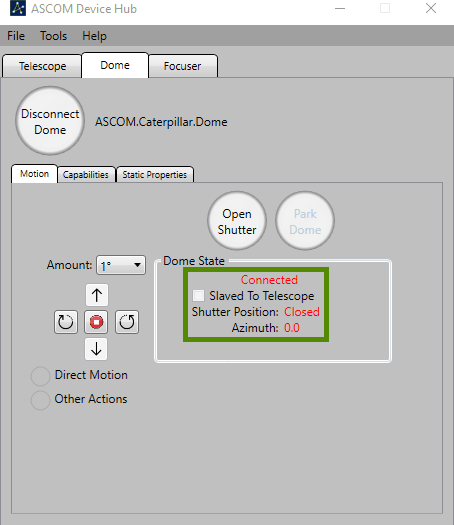
- Click Connect.
Telescope slaving
Configure the Telescope tab to connect to your mount's ASCOM driver, then enable slaving. Recommended parameters:
| Slave precision | 2° |
| Slave frequency | Every 5 seconds |
| Driver polling | Every 2 seconds |
Dome geometry
For accurate slaving, you need to tell Device Hub the physical geometry of your dome and mount. Open Dome Setup → Geometry and enter:
| Dome Radius | The inside radius of the dome |
| GEM Axis Offset | Distance from the GEM pier to the dome's geometric centre |
| E/W Offset | East–West offset of the mount's intersection point from dome centre |
| N/S Offset | North–South offset |
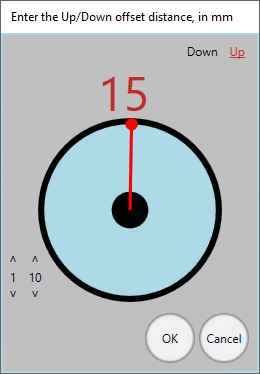
| Up/Down Offset | Vertical offset |
The N/S, E/W, and Up/Down parameters describe by how much the mount's optical axis intersection point is offset from the centre of rotation of the dome. The best way to measure these is often by taking differences—position the telescope at different azimuths, note the dome positions required, and back-calculate the offsets.
ASCOM Safety Monitor
The safety monitor driver is included in the same installer as the dome driver ( Caterpillar-Install.exe), and allows your automation software to close the observatory automatically when unsafe conditions are detected. It is fully compatible with the Lunaticoastro CloudWatcher and other monitors such as Hydreon's rain gauges.
Need: full configuration instructions for the Safety Monitor driver — how to configure the unsafe condition thresholds and which inputs are supported.
3.4. INDI driver
A dedicated INDI driver is coming soon. In the meantime, the Caterpillar is fully compatible with the Nexdome Beaver INDI driver, which is included with the default drivers, and that one can be used.
If you encounter issues with INDI support, please get in touch with us at support@lunaticoastro.com.
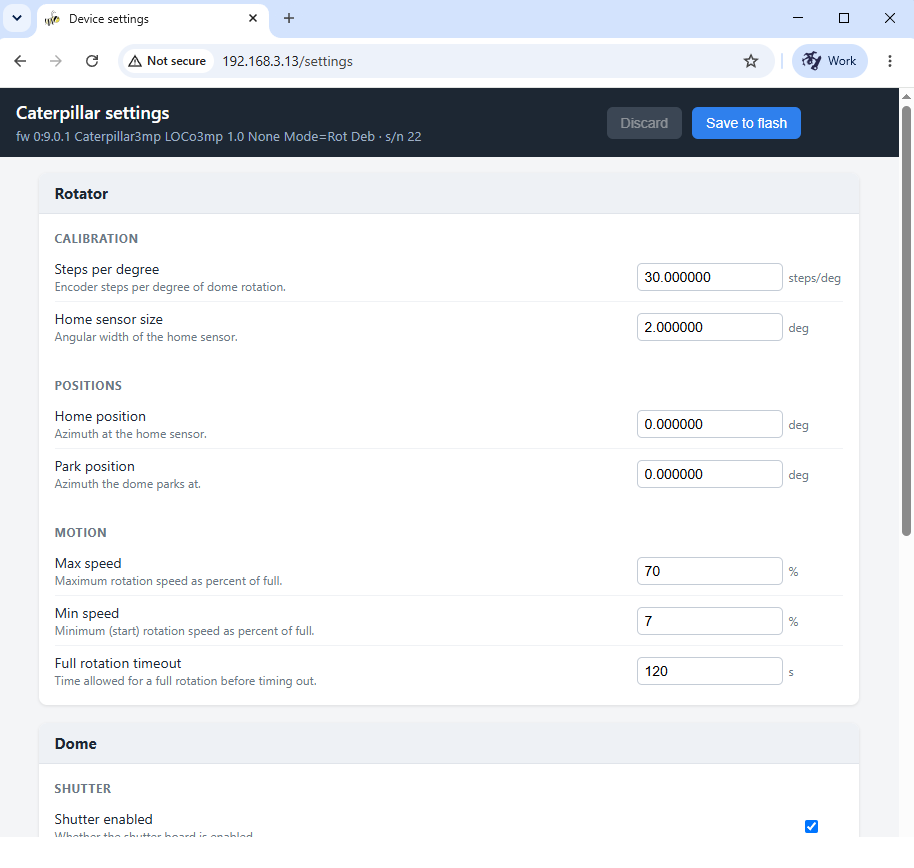
3.5. Configuration via internal webserver
Some settings of the Caterpillar can also be configured from its own internal webserver, accessed via its IP address, as in the screenshot below.
4.1. Connection issues
Board not appearing as a COM port
Install the CP210x driver: CP210x_Universal_Windows_Driver.zip. Try a different USB cable (some cables are charge-only and carry no data), and try a different USB port on your computer.
Connection drops unexpectedly
You should disable the power saving feature of the USB port. In Device Manager, find the CP210x device under Ports (COM & LPT), open its Properties → Power Management, and uncheck "Allow the computer to turn off this device to save power".
Cannot connect over WiFi
- Verify the IP address; check your router's DHCP table, or reconnect via USB to see the current address shown in Initial motor configuration and settings.
- Make sure the board and the PC are on the same network.
- Check that no firewall is blocking UDP port 10000.
- Confirm that Station mode is enabled and the board has successfully joined your network.
Shutter board not connecting
- The rotator↔shutter link is a private, internal Wi-Fi connection that pairs automatically—no network settings to check here. If it is not coming up, power-cycle both boards.
- Make sure both boards are powered and within range of each other.
- Initial motor configuration and settings waits up to 30 seconds for the shutter, be patient after connecting the rotator.
4.2. Unexpected stops
System stops with a warning during homing
Should the home sensor not be found after a complete revolution, the system will stop and issue a warning. Check:
- Home sensor wiring and connector.
- That the sensor is positioned to trigger as the dome passes. Test manually by activating the sensor while watching its indicator in the Sensors panel of Initial motor configuration and settings.
- For hall-effect sensors: confirm the magnet is close enough and correctly oriented.
- For mechanical sensors: check the plunger is not obstructed.
System stops with a warning during rotation
If the encoder does not detect motion when the dome is running, the system will stop. Check encoder wiring and connections, and verify the encoder is spinning when the dome moves.
4.3. Other issues
Calibration fails or aborts unexpectedly
- Check encoder wiring, a loose connection will cause no position feedback.
- Reduce the physical max speed in Initial motor configuration and settings and retry; the motor may be losing steps under load at high speed.
- Make sure the dome can complete a full unobstructed cycle during calibration.
Dome position drifts over time
- Re-run calibration, the encoder mapping may be stale after a motor or dome modification.
- Check that calibration data was saved to flash after the last successful calibration.
Dome not reaching target azimuth
- Check the logical speed range, if logical min is set too low, the derived motor speed may fall below physical min and the motor will not turn.
- If the motor runs but the dome barely moves, check the mechanical coupling.
Need: LED status indicator meanings (connected, AP mode, STA searching, etc.) and factory reset procedure.
If you believe your setup wasn't covered by this manual, it's still possible that the Caterpillar, whether it be this version or another one (check the Caterpillar's page on our website), is the right controller for you. Just flick us an email at support@lunaticoastro.com with the details of your observatory and we'll be happy to discuss automation with the Caterpillar or point you in the right direction.
Likewise, if you encounter any issues, we're always here to help.