
While it will not perform auto-focusing functions, it will make the task of focusing much easier as:
- It will drive almost any kind of motor, from inexpensive DC ones to high-accuracy stepper ones.
- As you won't touch the focus knob, the scope will not vibrate, thus making the process faster and more accurate.
- Focus positions can be permanently stored for a repeatable positioning of the imaging train.
- It includes a display to make the process much easier.
- And last, if a careful calibration is done, it will track the temperature as the session progresses and will automatically move the focuser to the correct position, avoiding the need to manually refocus every time.
Setup
For the device to operate, you will have to supply:
- A 12V DC power supply (standard power jack, positive inside).
- A suitable motor coupled to your telescope focuser: either a stepper one (any of the Seletek focuser motors and plates, apart from motors by Technical Innovations, Moonlite, FeatherTouch, Lakeside…)—these motors will use the DB9 connector of the Tarsier—or an inexpensive DC one (from Orion, Rigel Systems or many others)—these ones will connect to the mono audio jack of the Tarsier.
- Optionally, an external temperature sensor (again, compatible with all other Seletek models).
Operation of the Tarsier
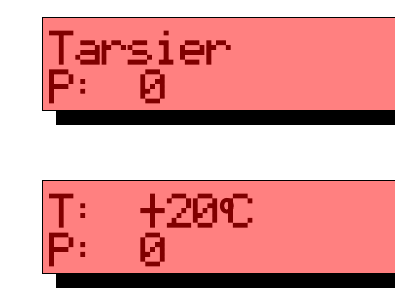
Once powered, we'll be presented with the main screen, where we can see the actual position of the motor ("0"). If we have installed the optional temperature sensor, the current temperature in ºC will also be displayed.
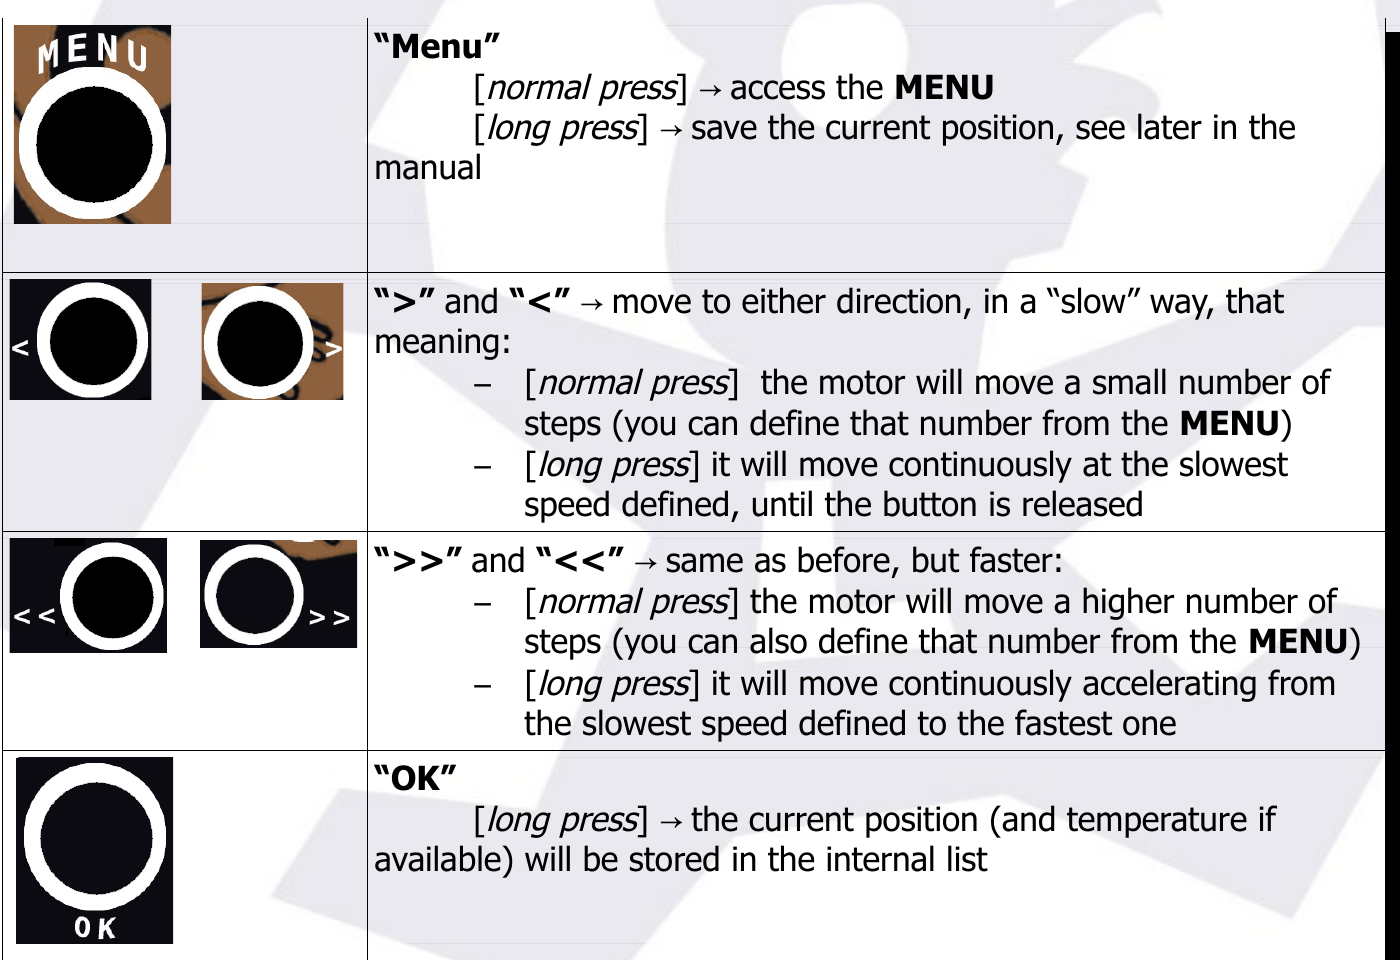
First, please note the buttons can be pressed in two ways: a "normal" one, button pressed and released in a few tenths of a second, and a "long" one, if the button is kept pressed for longer.
So, going to business, the buttons will operate in the following way:
The menu
So far, we can already operate our Tarsier; no configuration is needed in many cases, and our "focusing experience" has already improved compared to a fully manual operation. To make the most of the Tarsier, however, it is recommended to keep reading.
From the MENU, we will access quite a few options:
- Saved points
- Temperature compensation (submenu): from current point, from saved point, parameters
- Motor configuration (submenu): minimum speed, maximum speed, high accuracy (steps), low accuracy (steps), motor type, wiring, backlash, halfstep, power while moving, power while stopped, reset position
- Backlight
- Contrast
- Volume
Pressing "OK" at any option will go down in the MENU; pressing "MENU" will go up until back to the main screen.
Saved points
Access to the list of saved positions; use the direction keys to navigate, OK to perform a "goto" to the displayed point, long press of OK to delete the point.
The points with a stored temperature reading will be used for the temperature compensation algorithm. Press Menu to go back.
Temperature compensation (submenu)
From current point: the controller will understand the scope is already correctly focused, and will start applying corrections, based on the temperature drift, from this moment. Press "Menu" to leave the temperature compensation mode—no other buttons will have any effect while active.
From saved point: the controller will understand the scope is NOT correctly focused, and will first move to the position matching the current temperature, then apply corrections based on the temperature drift from this moment. This feature is the most powerful for users with a fixed imaging train, as, if the focuser is not moved manually (disengaging the motor) at any time, they can be up and running in no time! Press "Menu" to leave the temperature compensation mode.
Parameters: will simply display the parameters calculated for the current set of points, showing the slope and the offset.
Motor configuration (submenu)
- Minimum speed: specify the minimum speed of the motor, in milliseconds/step.
- Maximum speed: specify the maximum speed of the motor, in milliseconds/step.
Note: as it is specified in ms/step, the value for min. speed should be higher than the value for max. speed!
- High accuracy (steps): this number defines the number of steps that the focuser will move when the buttons "<" or ">" are pressed normally, and will wait for the temperature correction algorithm before applying any actual movement. So, basically, this number should be related to the length, in steps, of your CFZ (critical focus zone)—we suggest using ½ the CFZ.
- Low accuracy (steps): number of steps a "normal press" of the "<<" and ">>" buttons will imply.
- Motor type: used to select unipolar stepper (default), bipolar, DC, or even step/direction interface.
- Wiring: Lunático (default), Lunático reversed motion, RF/Moonlite, RF/Moonlite reversed.
- Backlash: backlash of the setup, in steps.
- Halfstep: true or false, to drive the motor in full (default) steps or halved ones.
- Power while moving: % of the input power to be applied to the motor while in motion (PWM).
- Power while stopped: same as before, while the motor is stopped (defaults to 0, only change if very sure of what you're doing).
- Reset position: sets the current position as "0", then clears the "saved points" list and also updates the power-on position to 0.
Backlight, Contrast, Volume
- Backlight: adjust the brightness of the screen.
- Contrast: adjust the contrast of the screen.
- Volume: adjust the volume of the "key click".
A few final notes
a) About focuser position when storing the telescope
If you want your "goto" points, or your absolute temperature tracking parameters1 (that is, when you select "from saved point") to work between sessions, then it is important that the Tarsier "memorises" the current position before switching it off.
This can be accomplished simply by pressing "Menu" with a long press, before switching it off, until the message "position saved" is displayed.
b) Saving the "fully racked in" position in the list
It may be convenient to store this position as one (the first?) of the "goto" points in the controller. Doing so, it won't be needed to save the position every day (just the first one), and packing up to go home will be faster.
Beware, however, if you plan to use temperature compensation, and the temperature is stored with that position—this will void the algorithm, as it will believe that point to be a valid focus point for that temperature.
A trick for this to work without fooling the temperature compensation:
- Press the direction buttons until the focuser is fully racked in.
- Carefully unplug the motor, so the temperature sensor is also removed (in general, hot plugging is not recommended—just be careful this time!).
- Wait a few seconds until the temperature reading disappears from the main screen (it will be replaced by "No temp"); please be patient until "No temp" is fixed on the screen, as it may take a while since the temperature readings are averaged.
- Now long-press "OK" to save the point to the list.
- Also long-press "Menu" to store the position as the one it will start from on power up.
You can now go to the "Saved points" menu option to check the current position was saved with no temperature attached.
c) About temperature compensation in general
The accuracy of this approach will depend on motor and focuser quality, and on the thermal behaviour of the telescope. With a good stepper motor (not with a DC one!), and a decent focuser, if you are careful setting it up, you'll be surprised by the results.
In order to maximise the possibilities of success, you should remember that:
- It is recommended to place the temperature sensor in contact with the OTA, covered in such a way that no wind affects the reading.
- Usually the tubes "shrink" with the fall of temperature during the night. So it is better to do the first focusing outwards, pulling out the focuser, to have it match with small compensation motions, that will also be outwards.
- A good backlash calibration will be of real help in case the motor has to change direction.
- And of course, and foremost, a careful selection of points, as perfectly focused as possible, and good temperature readings.
Last, for those curious, even if the temperature is displayed in approx. Celsius degrees, with no decimal places, it is stored in the system in 1/37 degree increments—far more than enough for the purpose of focusing.
1 The other way of applying temperature compensation—focusing first—will always be available whatever the focuser position, as long as you don't change the focal length of the setup!
Recommended values
| MinSpeed | MaxSpeed | MotorType | Wiring | Halfstep | Power moving | Power stopped | |
|---|---|---|---|---|---|---|---|
| Lunático | 10 | 8 | unipolar | Lunático | Optional | 100 | 0 |
| RoboFocus | 5 | 5 | unipolar | rf/moonlite | Optional | 100 | 0 |
| FeatherTouch | 3 | 3 | bipolar | lunatico | Optional | 100 | 0 |
| Typ. DC | 50 | 50 | DC | lunatico | No | 100 | 0 |