
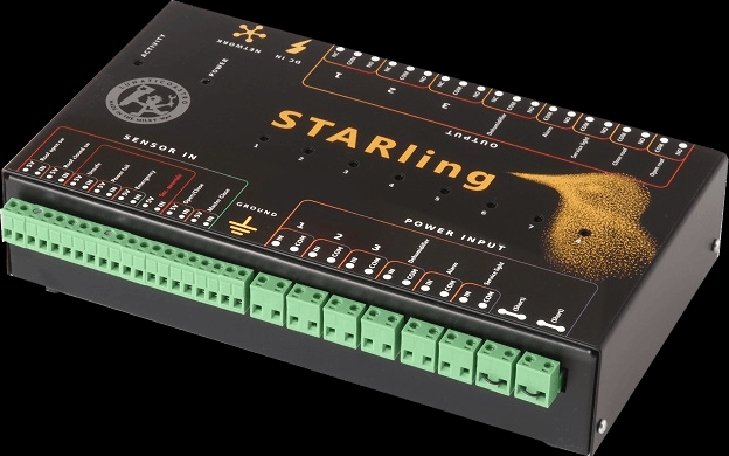
Sentinel’s manual
1.Introduction
The Starling is our shared observatory controller. It is designed to enable several users to seamlessly interact with a shared observatory, while including safeguards for the owner of the roof (the sentinel) to be able to take over where necessary.
In a nutshell, the Starling handles open and close requests from users, allows them to interact with the roof as if they were the only ones sending commands to it, and ensures that ASCOM compliance is maintained in the same way. From the user’s point of view, interacting with a shared roof via the Starling is analogous to interacting with an individual roof using the Dragonfly or the Caterpillar.
The sentinel is also able to control some observatory devices, such as dehumidifiers, lights, and alarms.
2.Physical installation
Setting up your Starling should be an easy process. If you own a Dragonfly, you can probably skip to the next section. Otherwise keep reading.
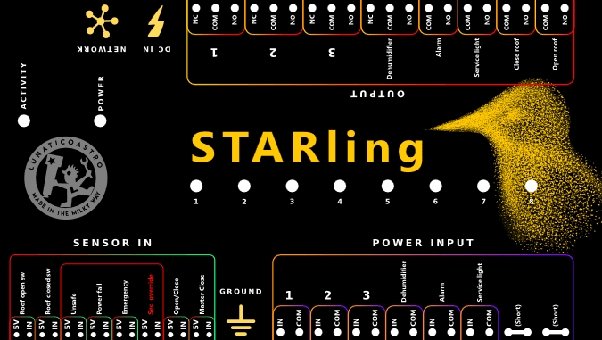
The Starling’s sticker aims at making the setup process as smooth as possible. At a glance, we can see all the sensors, as well as most of the relays (outputs) and power inputs, have labels. Since it’s designed with shared observatories in mind, these features will be common to most of them, and the device has been designed accordingly (although it is possible to accommodate it to different setups).
2.1. The sensors
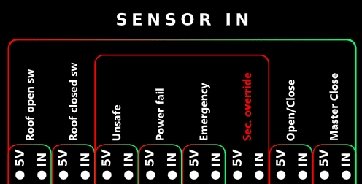
The first two sensors are straightforward—they should be the open and closed sensors of our roof.
The four sensors inside the red box are associated with the safety of the observatory. The unsafe sensor can be connected to a safety monitor (say, for example, the CloudWatcher), power fail can be connected to a relay that remains open while it’s receiving power, and the emergency sensor can be connected to a manual switch to activate an alarm or some other device. By default, any of these being active will trigger the closing of the roof. The security override sensor enables you to override this behaviour. Depending on your setup, you may wish to hook this up to a physical button or switch, or something you can access remotely (there is, however, a remote security override setting that can be toggled from the web server or sent as a command through the API).
Lastly, we have the open/close sensor, which should be connected to a push button (a switch can do the trick too, but then it will have to be toggled and untoggled to mimic a push button) to open or close the roof, and the master close, which forces a close. In both cases, the command will be enforced regardless of what other connected clients have selected (more on this in the control panel section).
2.2. Power inputs and outputs
Let’s now take a look at how to connect the rest of the devices mentioned in the sticker. Current, be it AC mains (max 240V) or DC from a battery or power supply, will enter the Starling via the power inputs and will be blocked or routed to the output side.
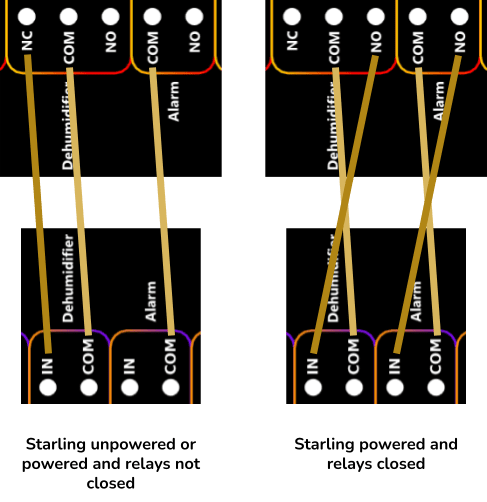
The internal wiring is as follows:
- “COM” will be internally routed from the input to the output side, always.
- “NO” (Normally Open) will be connected to “IN” when the relay is closed by the software.
- “NC” (Normally Closed, only available in the extra relays and the dehumidifier), will be connected to “IN” when the relay is open in the software
When the Starling is unpowered, all the relays will be in the relaxed (normal) state, so:
- All “NC” contacts, present in the first four relays will be connected to their matching “in” (so they'll be closed)
- All “NO” contacts, will be, of course, just open.
If there’s any doubt, the following image may help.
So now we have all the information we need to wire our devices to the Starling. Note that the names of the three extra devices can be customised in the software (more on this later), and you may find it helpful to stick the names of whatever you’re plugging in onto the Starling itself.
The key things to remember here is that:
- neutral (AC) or ground (DC) should be wired to “COM” (common)
- phase or live (AC) or positive (DC) should be wired to “IN”
Also, for reference, the LED for each relay will be on when the relay is closed.
Note: the box of the unit must be connected to ground (earth). To achieve this simply wire the banana-style socket to earth.
The rule is simple—all A.C. current appliances should be earthed. Even if all current routed by the Starling is D.C., the box should be earthed. The circular socket on the box is there for that purpose (it’s connected to the box itself).
So now you should be able to wire the devices according to the information on the sticker.
3.The Starling’s web server
The Starling comes with an internal web server that can be accessed via its IP address or its name (http://{ip-address}, http://starling, http://starling.local—where “starling” will be replaced by its name if a different one has been assigned), and offers full control of the device, as well as information about the different users connected to it and a number of other features we will delve into below. The first login credentials are username starling and password starling; be sure to change those through the configuration page.
This web server (other than the /public page, the control panel for users) is password-protected to ensure only the sentinel can access it directly (users will interact with the device via the ASCOM driver or the public panel). It is also accessible from a mobile device via the same address.
Tip: if you’re planning on using the web server from your phone, consider pinning it to the homepage, that’ll make it easily accessible and give it an app-like feel!
3.1. The homepage
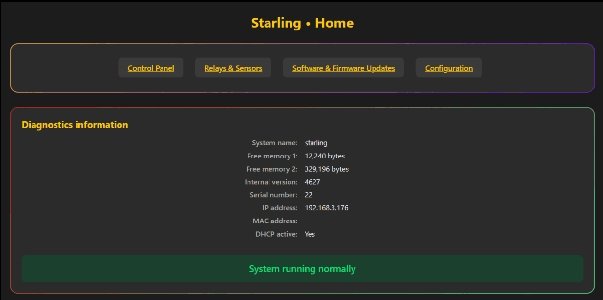
The homepage includes buttons for each of the other pages, as well as the Diagnostics information box, which displays information about the device and its current state.
3.2. The control panel
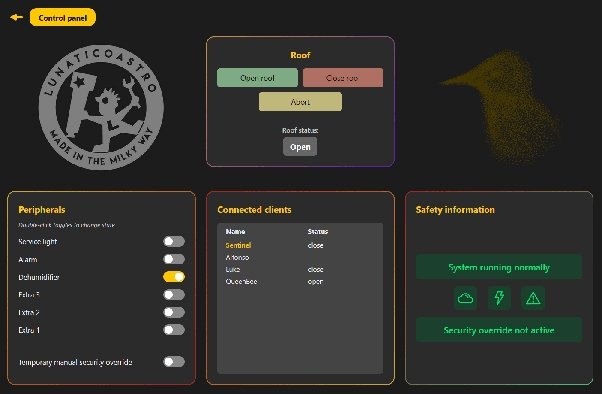
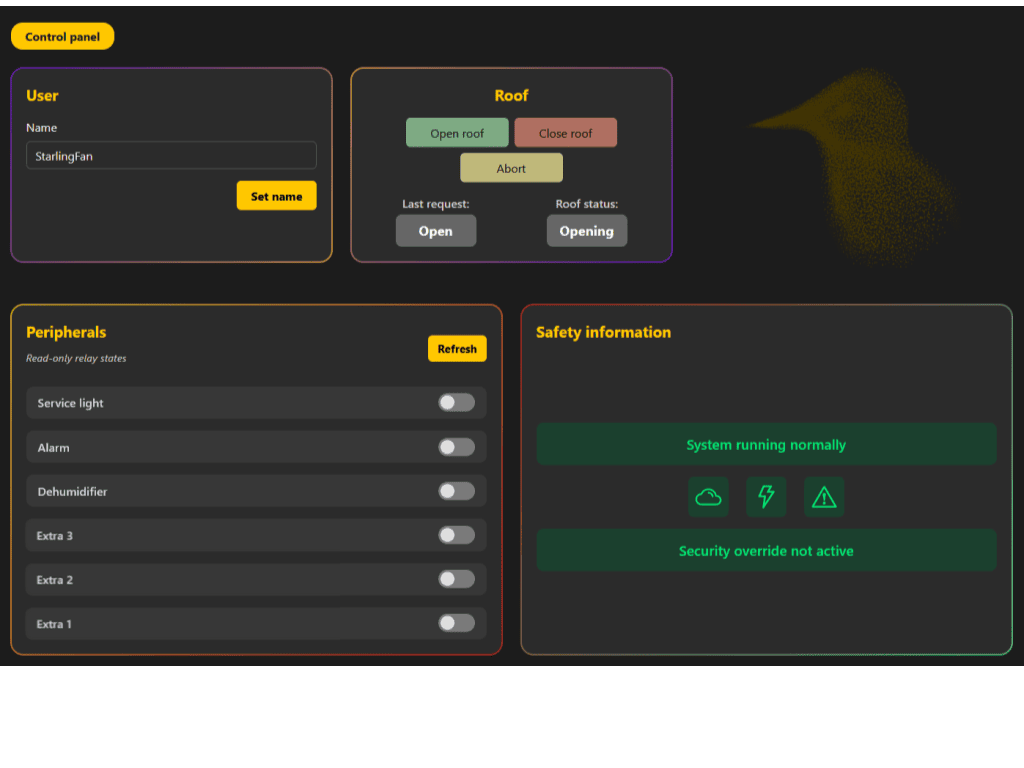
The control panel features easily accessible buttons to open and close the roof, as well as to abort roof operation. However, note that as the sentinel, when pressing the open or close roof buttons, these act like any other user’s request (i.e. if conditions are safe and there are still users wanting the roof open, even if you request to close the roof, it will remain open until one of those conditions changes). If you wish to override other users you will need to use the master close or Open/Close inputs.
The peripherals list shows the 6 relays that can be controlled at will (the other two are the roof control relays and should not be changed manually). The Extra 1, Extra 2, and Extra 3 relays don’t have a fixed function and can be used for whatever you wish. They have editable names (just hover over them and you’ll see a pencil to edit) that will be stored in the device and will show up across all pages (including the public control panel), regardless of where you’re accessing the Starling from. Toggling the relays requires double-clicking, to ensure they’re only ever changed intentionally.
Under the relay toggles, there is a toggle (which also requires a double-click) to enable the security override. This override is temporary, where temporary here means it won’t persist through a reboot, but it’s not time-dependent. Enabling the persistent manual override (from the configuration page) will turn this off automatically, as it would be redundant otherwise.
3.3. The relays and sensors page
The relays and sensors page is fairly straightforward, here you can access the relays (again, except for the roof control ones, which shouldn’t be changed manually), and the readings of all the sensors.
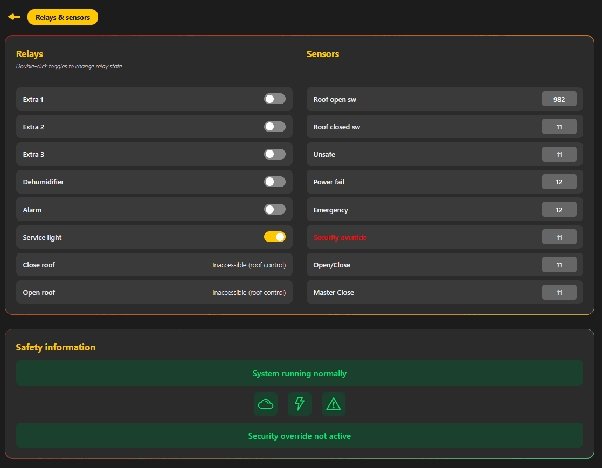
The safety information box is present in most pages, and here you can see that aside from the first banner (“System running normally”), which depends on the state of the device, the rest are associated with sensor readings. The cloud is the unsafe sensor, the lightning bolt is the power fail, and the emergency icon is, you guessed it, the emergency sensor. The other banner corresponds, of course, to the security override sensor (and virtual toggles).
3.4. The software and firmware updates page
You shouldn’t need to access the updates page often. From it, you can reboot the system (you can do this from the configuration page as well), and verify if the software and firmware are up-to-date. If they aren’t, this page also allows you to update them.
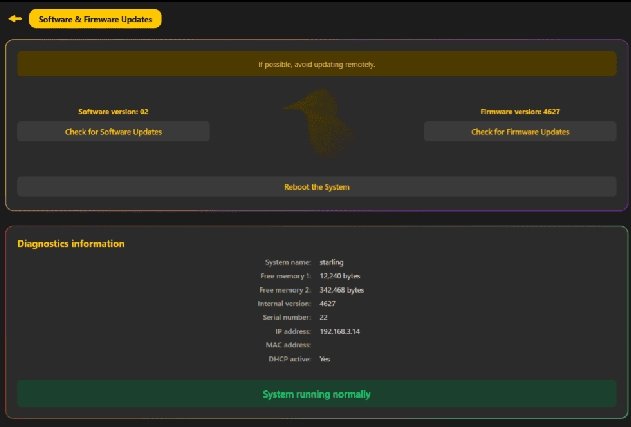
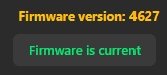 When pressed, the Check for Software Updates and Check for Firmware Updates buttons will take a couple of moments to load and then will either show that the system is current, or the option to update it.
3.5. The configuration page
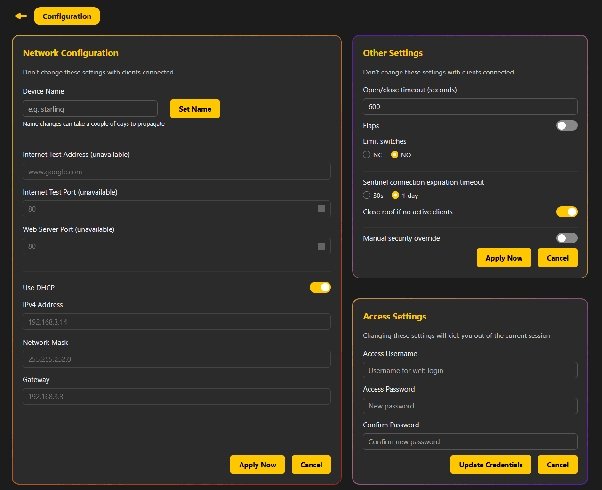
The configuration page is also unlikely to be one you frequent. The settings here are mostly self-explanatory. A few things worth noting, though:
- If you change your Starling’s name, this will take some time to propagate. For more noteworthy limitations, check out the disclaimers section.
- Should you lose your Starling after changing the DHCP settings or the IP address, you have more information on this page about how to retrieve it.
- The Sentinel connection expiration timeout refers to how long it takes for the sentinel to be considered inactive (and hence removed from the list of active users). 30s is the equivalent of the sentinel being considered like any other user.
- Enabling the Flaps will turn relays 2 and 3 into flap relays, and they’ll become inaccessible (the flaps open will be toggled automatically when the roof starts to open, and analogously for the flaps close).
- After making changes, please wait until the settings have stopped loading before leaving the page, to ensure they are applied properly. Loading takes a bit as the page double-checks the changes have persisted, but again, these settings won’t be modified often, so please be patient when you do make changes to prevent any issues.
3.6. The public panel
The public panel isn’t part of the sentinel’s commonly accessed panels, but it’s worth noting as it is the part of the web server that clients can use to interact with the roof. Clients can use third-party software to interact with the roof via the ASCOM driver (INDILib support coming soon!), or the public panel (available across devices, just like the rest of the web server). For more information, please refer to the Starling roof user’s minimanual.
4.Starling API
Aside from through the Starling’s web interface, you may wish to communicate with it in other ways. This can be done through the Starling’s API, which comprises a series of commands that can be sent via http to it (and are in fact the ones used by the public Starling panel). These should have the following structure:
http://starling/api/v1/command_group/command/param1/param2
Where:
- starling may be replaced by the appropriate name or IP address,
- api/v1 for the first version of the API,
- the commands are SLP commands, if you’re familiar with our devices you may already know the Seletek Line Protocol, but this is explained in the next section.
4.1. SLP commands
All Lunático products can be accessed and programmed in a number of ways. Scripting, directly or ASCOM, is always available for Windows, and there are also several options for lower level integration.
When it comes to Seletek-related products (this means almost all of them, including the Starling), the protocol is the same, we call it “SLP” (standing for Seletek Line Protocol). In this section we will cover a few commands relevant to the Starling and all in the context of http, if you’re after more specific information please refer to this guide, or email us.
The following table includes commands per group, with parameters (here separated by forward slashes) and notes. Please note that extra parameters will be ignored and missing parameters will default to 0.
As an example, the first command could be sent to the Starling as:
http://starling/api/v1/relio/relayreadall
And may return something like:
!relio relayreadall:20#
Where 20 in binary is 0001 0100, i.e. all relays are open except for the third and the fifth.
|
Group |
Command |
Parameters |
Returns |
|---|---|---|---|
|
relio (Relay and sensor box) |
relayreadall |
— |
Byte with 8 relay status values |
|
sensorreadalldig |
— |
Byte with 8 sensor as dig status values |
|
|
seletek (System) |
getdhcp |
— |
|
|
setdhcp |
0 for on, 1 for off |
|
|
|
gettip |
— |
The IP address |
|
|
settip |
The new IP address (in text format) |
|
|
|
applynetc |
— |
Applies the main network parameters (including the ones above) and makes them persistent |
|
|
shutter |
open |
— |
|
|
close |
— |
|
|
|
abort |
— |
|
|
|
physstatus |
— |
Actual status of the roof (as opposed to the curated status for driver compatibility) |
|
|
status |
— |
ASCOM compliant status |
5.Disclaimers
The fact that the Starling’s main access point for most of the configuration and monitoring is its internal web server makes it conveniently accessible across devices without need for apps and wirelessly. However, like with everything, this system isn’t entirely bulletproof, and some limitations associated with the usage of a third-party browser (whichever one you may choose) are unavoidable.
For example, the Starling’s tab has to be focused for it to continue sending requests to the device consistently, as browsers may otherwise sleep the tab to save energy. In many cases this won’t matter, but if you wish to remain an active client and you’re using the web server (whether it be the public panel or one of the sentinel-only pages), you’ll need to keep this in mind.
Browsers also have a tendency to cache the contents of pages to save time and avoid having to load it all every time. This is mostly fine, but in situations like after an update, to ensure the contents (and backend functionality!) of the pages are consistent with the current version, you will need to force a reload of the page (hold the Shift key and press the reload button).
Another thing to keep in mind is that name changes take a long time to propagate, as mentioned in the configuration page section. This will hardly be an issue as changing the name of the unit is something that usually is done just once at the beginning of its life, but it’s noteworthy to prevent confusion when the changes take a long time to take effect.