Lost your Starling? Don't panic! Here's how you can find it again.
If you’ve changed your Starling’s IP address or its DHCP settings, you may be wondering where on earth it is now. But there’s no need to worry, finding out your Starling’s new IP address is an easy enough process.
In all the sections below, where we refer to starling or starling.local, if you’ve changed your device’s name, «starling» will have to be replaced by the new name. It’s relevant to know though that it may take a bit of time for the changes to take effect, so for a while the previous name will be the one you need to use.
You can now access your Starling via http://the-new-IP-address, or if you don’t remember it, you can simply just go to http://starling or http://starling.local. If you do this immediately after changing the settings, it may not work, if the device is still updating the settings. Give it a few seconds and try again.
If it still doesn’t work or there’s an issue with the IP address you set, scroll down to the «If nothing is working» section to find out how to manually re-enable DHCP.
DHCP will have dynamically assigned a new IP address to your Starling. You should be able to access it via http://starling or http://starling.local. If you do this immediately after changing the settings, it may not work, if the device is still updating the settings. Give it a few seconds and try again.
If you want to use the IP address to access it in the future, you can always see it in your Starling’s webpage.

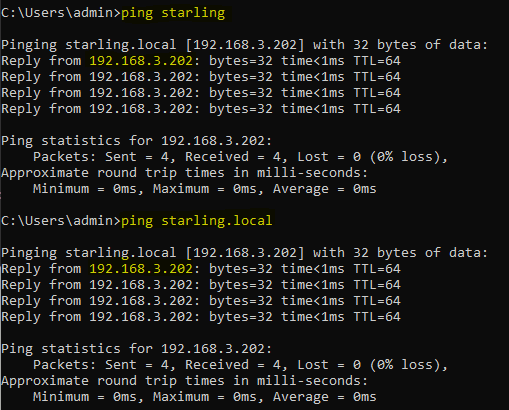
If you can’t reach your Starling via http://starling.local even after having waited for a bit, you can try to reach your Starling directly from the command prompt. Open a command prompt (look for cmd on the Windows menu) and type ping starling or ping starling.local. If your Starling is alive and well, both of those should get replies from the device, and display its current IP address as well.
Tip! On occassion Windows will decide to show you the IPv6 address of your Starling, instead of IPv4, which is the one we use with the device. In that case, use ping -4 starling to force it to show you the IPv4 address.
If nothing is working or you want to re-enable DHCP manually because there’s something wrong with the IP address you manually assigned to your Starling, your device has a failsafe to ensure you can revert back to the original DHCP settings without needing to remotely connect to it.
In order to achieve this, you will need a USB drive. Save this file into that drive, and plug it into your Starling. Watch the LEDs, one of them will turn red, when this happens, take the USB drive out. The unit will be rebooting to apply the new settings.
Important: don’t edit the file unless you know what you’re doing, and if you do, note that you’ll need to ensure the line endings are LF for the script to work.
Curious about what’s going on? Whenever a USB drive is plugged into the Starling, it looks for a script named starling.txt in it, and if it exists, it runs it (this process is repeated periodically, which is why you should take the drive out after the script has run). This is a helpful failsafe for when there are issues with remote communication with the device.
Reach out to us at support@lunaticoastro.com, we’ll be happy to help.