
Step 1 — determining which IP address to use
First of all is knowing what address to assign, because we need a fixed (static) address to later configure our router.
This question can be hard to answer, depending on your network configuration. For most home networks, you will have a router supplied by your telco that will assign addresses to PCs using a protocol called DHCP (the SOLO gets its address using DHCP by default). This protocol is not useful if you want to access it remotely, however, as we need it to have a fixed address.
There's plenty of information on the web about IP addresses. For a quick fix, follow these steps:
- Open a command prompt (yes, like the old DOS window)—start menu, accessories, command prompt, or start menu, run, cmd…
- At the command prompt, type "ipconfig" followed by the Return key.
- Now look for a few rows with meaningful information, such as these:
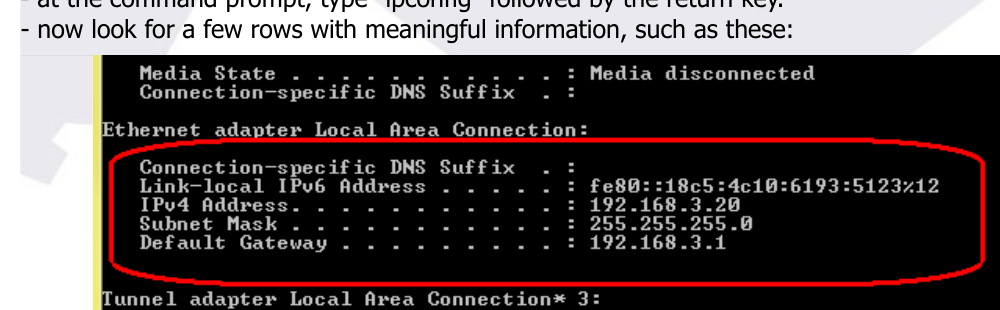
- Your local router will be, most probably, the device with an address ending in "1" ("192.168.3.1" in this example, the default gateway).
- Your PC has an address of "192.168.3.20" and your network mask is "255.255.255.0".
- If your network is the typical home one, you'll be safe selecting an address a bit above the one of your PC—"192.168.3.100", for instance, will do in this case.
- If you have tweaked your network configuration, then go ahead and find the range of DHCP addresses of your router, and select one that's outside that range (and does not match any currently used one!).
Step 2 — changing the SOLO configuration
Since SOLO v1.3, this is a snap—just go to your SOLO configuration page, System, and fill in the fields:
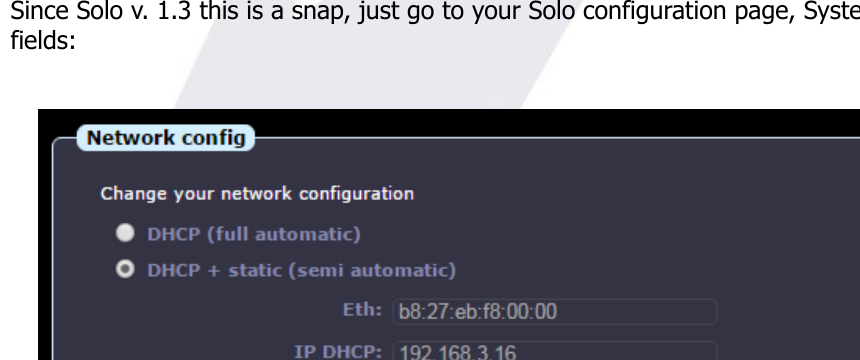
…and that's it.
Technical note for those interested: the DHCP protocol (the one used to get an automatic address) is kept active, as it will provide a nice time synchronization (very important given the Raspberry does not have a real-time clock, and the card is mounted read-only), and also acts as a safeguard, getting a valid internal IP address every time.
Step 3 — modifying your router to enable remote access
Again, this is specific to each router; it consists of adding a rule, so connections from the Internet at a given port get redirected to the SOLO. In this example:
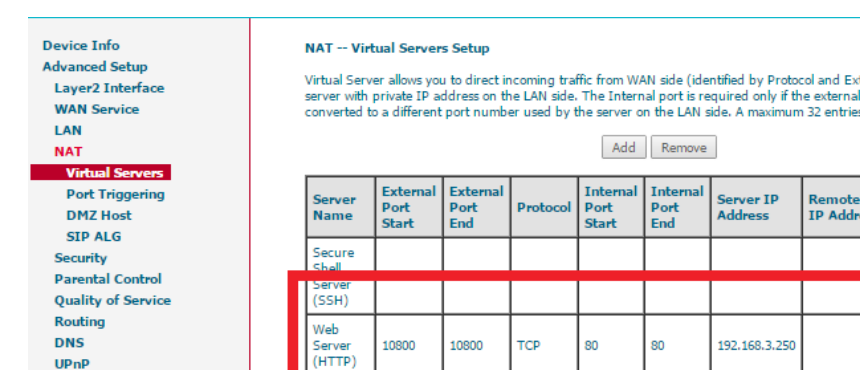
Notice that in this router it is called "virtual servers", under the "NAT" menu. A rule has been added, so incoming connections on port 10800, protocol TCP, get redirected to port 80 of the SOLO (in this case, its address is 192.168.3.250).
So, to connect to this SOLO from the outside, one would type: http://aagsolo.lunatico.es:10800
You can choose whatever port—10800 was chosen here because it was easy to remember and not the standard one. Naming the host is out of the scope of this document; if you need help with that, check the "dynamic DNS" providers on the internet (noip.com, dyndns.com, etc.), or see the DynDNS section of the fuller remote access guide.