
The problem
When you have your beautiful observatory away from your home, you will have an internet connection in the observatory itself and another internet connection at home. Each internet connection creates a private network where the devices connected to the router live.
As a result, your SOLO lives peacefully in the private network created by its internet connection, and it is not reachable from home.
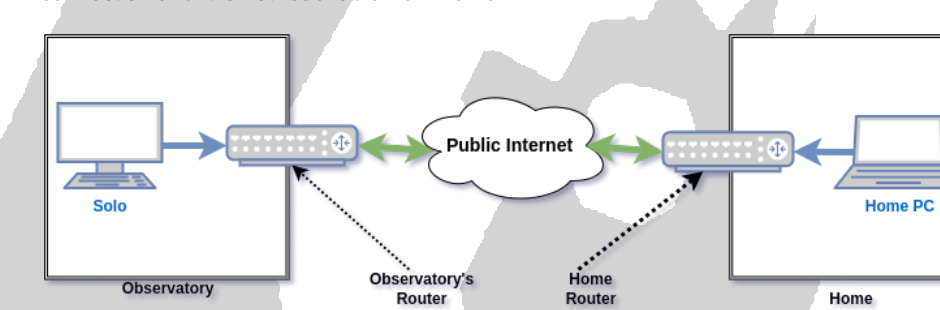
The arrows here are important to understand the problem:
- Green arrows mean bidirectional communication. This means any device on the internet can reach the routers, and the routers can reach any device on the public internet.
- Blue arrows mean conversation can only be initiated from the device (SOLO or Home PC) to the router (which, in turn, communicates with the public internet). But unless we do something custom, there is no way "Home PC" can reach "SOLO" or the other way around.
The highway: remote viewers
There is a solution used by many users:
- Add a PC in the observatory (most already have one in which imaging software runs).
- Install a remote viewer solution such as TeamViewer, AnyDesk, Google Remote Desktop, etc.
- Access the remote session from home.
Ok! Done! Yes, kind of. But what if:
- The PC fails or restarts (power outages happen!).
- You want to access your SOLO from your phone or tablet. Yes, you still can, but managing a remote session from a mobile phone is far from comfortable.
Ok, you are convinced. You want to access your SOLO's web interface from any browser on any device. Let's see the hard (but better) way.
The hard (better) way: publishing your SOLO
We do not need to change the internet connection at home. We only need to change the observatory's connection to:
- Publish the SOLO's web interface so that the blue line becomes a green line (bidirectional).
- Be able to reach it by name instead of IP address.
Publishing the SOLO's web interface will turn the blue unidirectional arrow into a green bidirectional one:
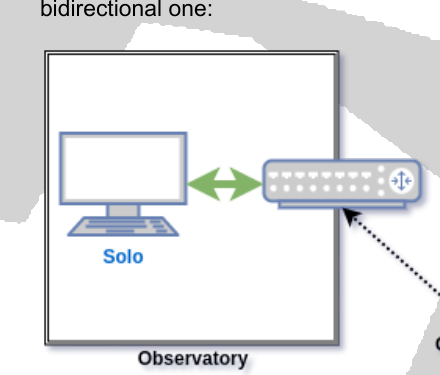
…this means we will be able to access the SOLO's web interface from outside the observatory.
If you feel comfortable with networking terminology such as "IP Address", "Port", "Private IP Address" and "Public IP Address", please skip ahead to Publishing the SOLO's web interfaces. Otherwise, the next section gives a quick review of these terms.
Quick review of networking terminology
You can think of the internet as a postal mail service. Each address has a postal address you can use to find your way to that specific place. What the postal address is in the real world, an IP address is in the internet world. Every computer or device connected to the internet has an IP address.
The same way two different places cannot have the same postal address, two different devices cannot have the same IP address.
What does an IP address look like? It is just a series of four numbers, separated by a dot. For example: 80.3.122.1
Wow, but that is extremely difficult to remember! Don't worry. There is a thing called DNS that associates easier-to-remember names with their IP address. Do you remember when you type http://aagsolo in your browser to access your SOLO? Well, actually "aagsolo" is a name that corresponds to your SOLO's IP address. The DNS system takes care of converting that for you. You can think of the DNS system as your address book: you don't have to remember every person's address, just look for their name in your address book and you can find it there.
Is the postal address enough for my letter to reach its destination? Well, actually, many postal addresses are buildings in which many people live. So we need some extra information for our letter to be successfully delivered: where, inside the building, the addressee lives.
On the internet, something similar happens. Our computer has an IP address, but it may serve more than one service. It may serve as a backup system, and also as a streaming service, and also as a network file server, and much more. So when I want to talk to the streaming service, an IP address will not be enough—I have to say which service within that IP address I want to talk to. That is the port.
So, in the internet world, in order to communicate with a service, I will need to know its IP address and its port.
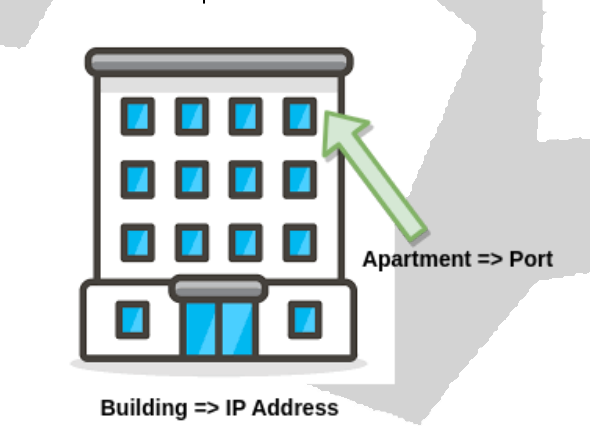
The port is nothing more than a numerical value. For example, the SOLO's standard web is on port 80. So, when I type http://aagsolo in the browser, the browser is:
- Using the DNS to convert "aagsolo" to its IP address
- Connecting to that IP address and port 80 to display our beloved charts page 🙂
Public internet and private networks
All we have seen applies to the public internet. But when we are at home with our smartphone connected to our router, we are not on the public internet. Why? Well, there are many reasons, but a strong one is that if we were, what would prevent any malicious person from reaching our smartphones?
Fortunately, when a device is connected to a home router, the device is not exposed on the public internet. The device resides in a private network guarded by the router itself, which is connected to both the public internet and our private network.
You can think of your router as the security guard of the building. Nobody can access the building without going through the security guard (the router). In fact, somebody trying to talk to "SOLO" will only speak to the security guard (the router).
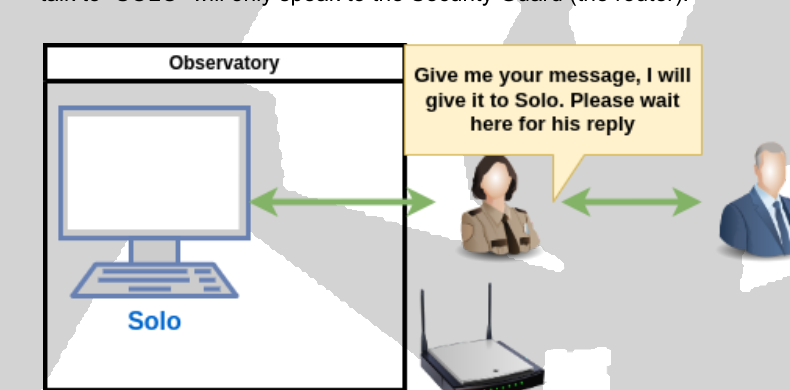
This is nice because it is secure 🙂 But it makes things complicated for our purpose of publishing the SOLO's webpage: somebody from outside our private network wanting to see the SOLO's webpage will never reach SOLO—they will just reach the security guard (the router).
How do we fix this? Well, just as in real life, we will have to give some rules to the security guard. Let's see how this is done.
Publishing the SOLO's web interfaces
The SOLO has two web interfaces: one is reachable using http://aagsolo and displays the well-known weather information, safe status and charts; this is the SOLO's port 80. The configuration (password protected) web is reachable using https://aagsolo/config (the former is "http" internet service, the latter is "https" internet service; "s" stands for "secure"); this is the SOLO's port 443.
To publish the SOLO's web interface we will have to publish both services.
Obtaining the SOLO's IP address
We need to tell the router to redirect some traffic to the SOLO. In order to do so, we need to know the SOLO's IP address. You will need a PC in your observatory. Open a "CMD" on your PC connected to the observatory's network:
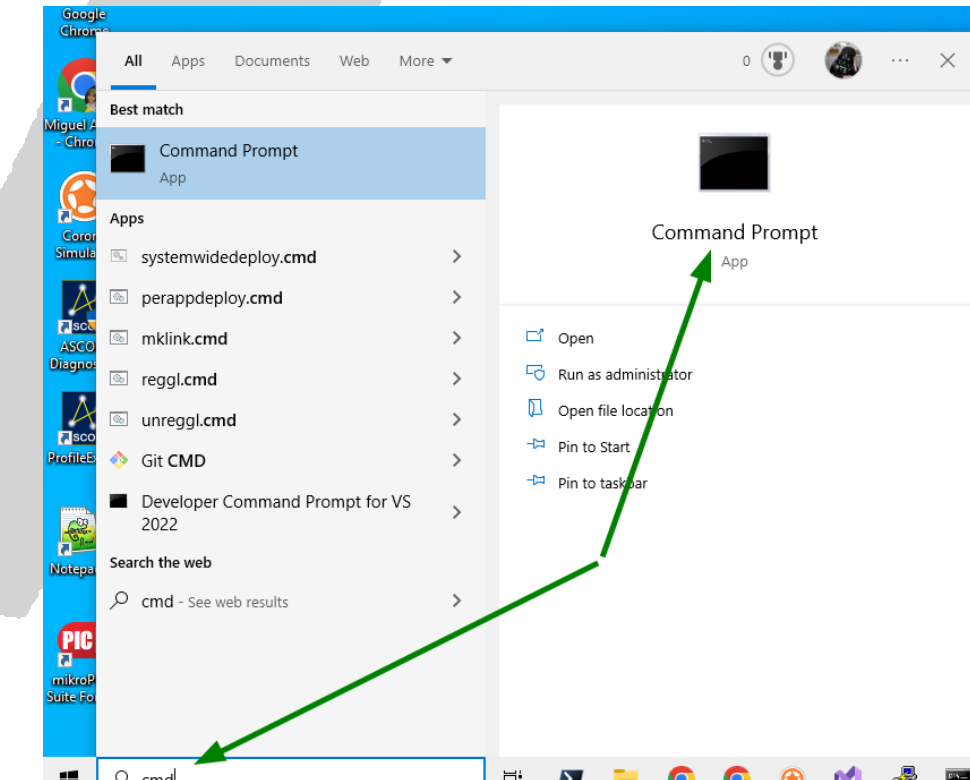
This will open Windows' default terminal application. Now type "ping aagsolo" and press the Enter key.
- "aagsolo" is the name of your SOLO.
- "ping" is a utility that serves two purposes: it determines the IP address of the name we give ("aagsolo" in our case), and it checks if such a device is alive.
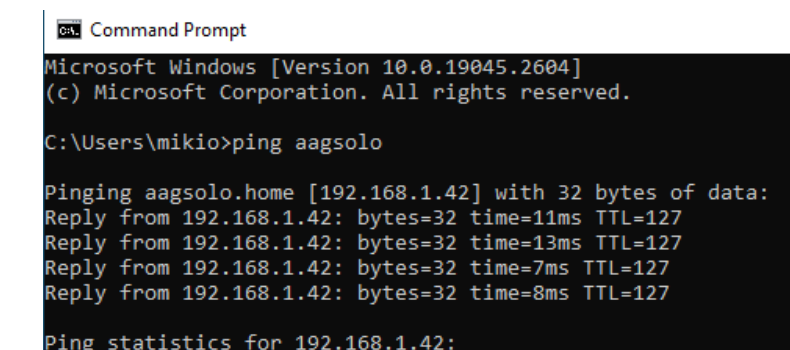
In this example, the "ping" command is telling us that "aagsolo"'s IP address is "192.168.1.42". Yours will be different, as your router's configuration will be different.
Adjusting the router configuration
In your router, redirecting traffic from one router's port to a different device is called NAT (Network Address Translation).
Note: please keep in mind that we will be changing the router's configuration, and each router brand will have its own interface to do this configuration. We are showing one specific interface—yours may differ.
Look for an option called NAT in your router's configuration and enter information similar to this:
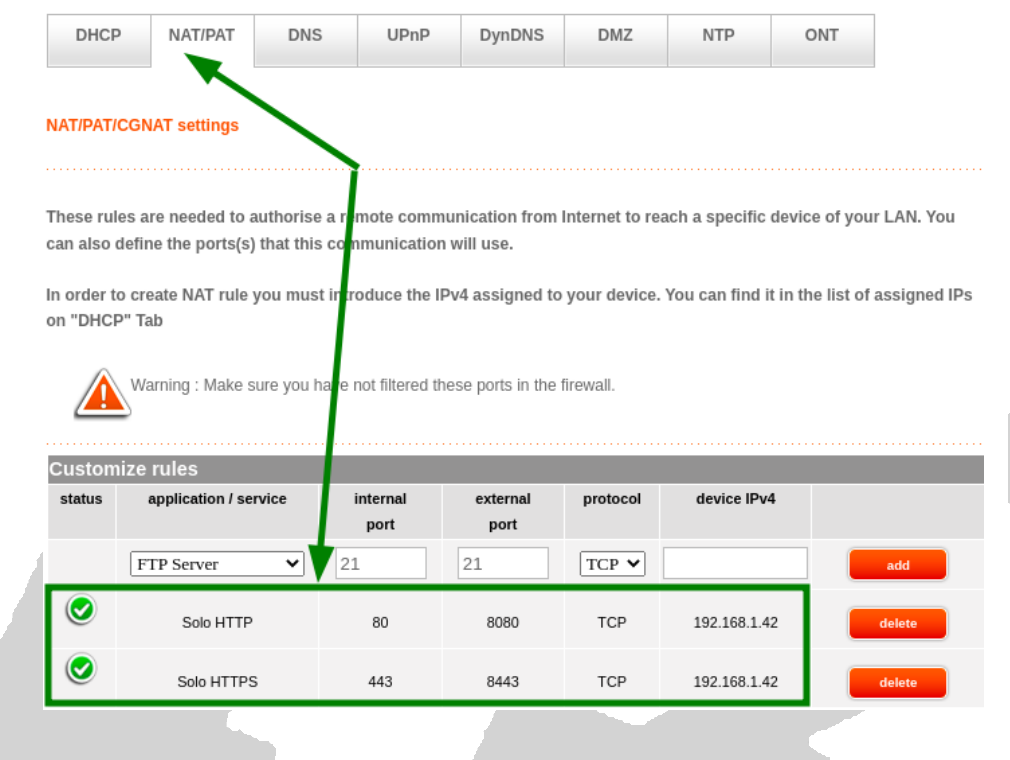
What we are telling the router here is: "when someone reaches the router on port 8080, redirect the conversation to 192.168.1.42 (SOLO's IP address) on port 80 (http service)".
Something similar happens for the second rule: "when someone reaches the router on port 8443, redirect the conversation to 192.168.1.42 (SOLO's IP address) on port 443 (https service)".
Now, SOLO's web interface will be reachable from any browser on any device using http://<ip_of_your_observatory_router>:8080, and the configuration interface at https://<ip_of_your_observatory_router>:8443/config.
Determining the router's IP address
How do you know your router's IP address? The easiest way is to open a browser from a PC inside your observatory and go to whatismyipaddress.com.
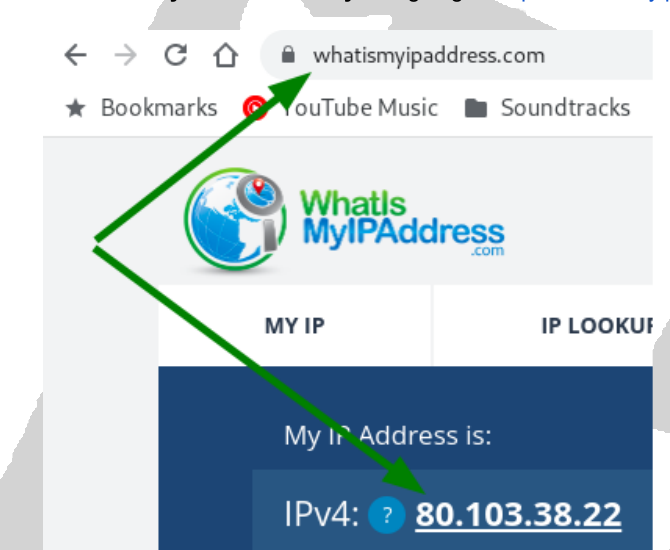
So, in this example, SOLO's web interface will be reachable using http://80.103.38.22:8080:
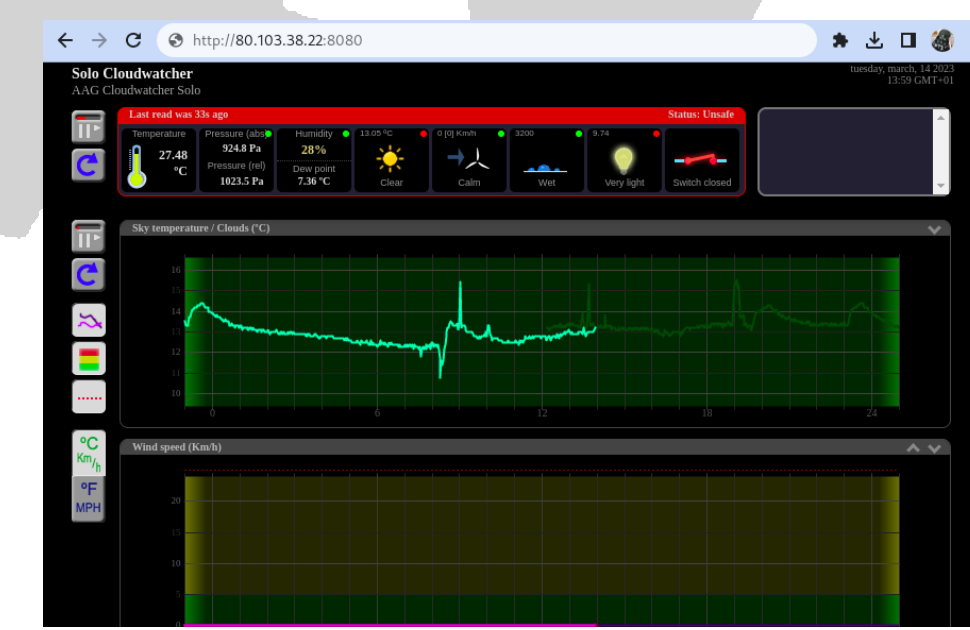
Name instead of IP address: DynDNS
Remembering a name is easier than remembering four numbers. For example, it is easier to remember "aagsolo" instead of "192.168.1.42". So let's look for an easier way to remember the router's IP address.
There are several sites that allow you to assign a name to an IP address. DynDNS is one of the most popular. There are others, like FreeDNS, which is used in this example since it is free, but they all work in a similar way.
After registering, you can go to the "Subdomains" section to register your router's IP address:
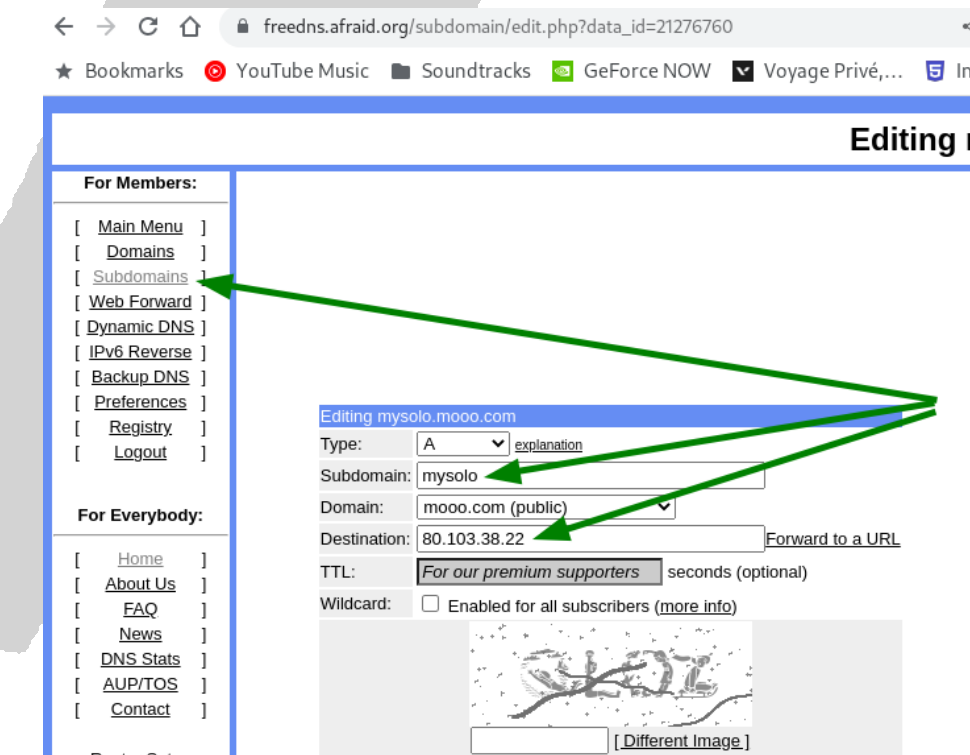
We won't go into detail on what "Type" and "Domain" mean (it is all part of DNS culture, and it is quite long to explain), but let's just say that when we hit "Save!", the name "mysolo.mooo.com" will be resolved to the router's IP address, 80.103.38.22, so it will be possible to use http://mysolo.mooo.com:8080 to reach the SOLO:
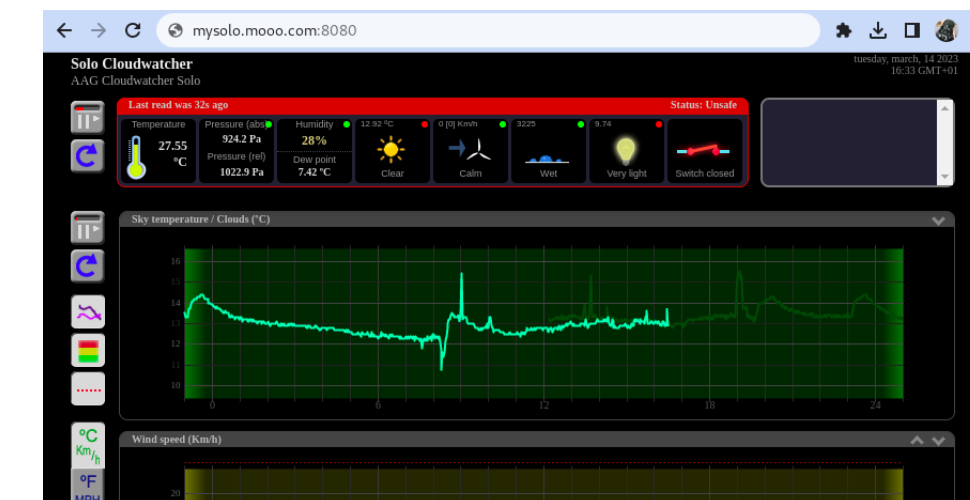
Now, this would be enough if your router had a fixed (static) IP address. But this is not usually the case—most routers have a dynamic (changing) IP address.
So… will everything done in FreeDNS be useless when the router's IP address changes? Yes, but fortunately most routers have support for DynDNS or similar systems. For example:
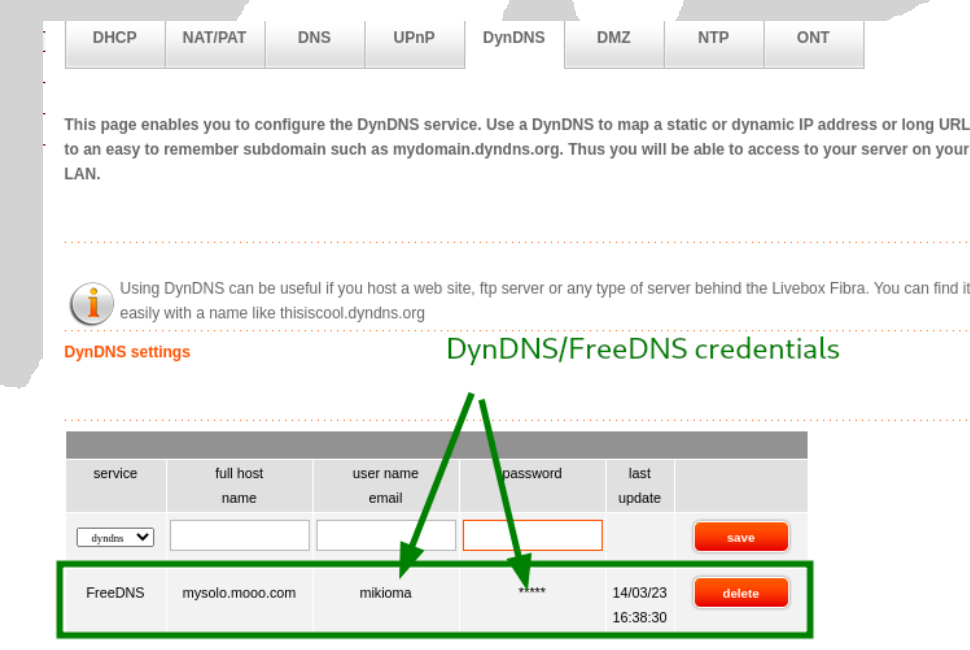
If we register our DynDNS/FreeDNS credentials into the router, when its IP address changes, the router itself will notify DynDNS/FreeDNS, keeping it synchronized—so it won't be necessary to worry about what IP address the router has.