
What "zero configuration" means
Traditional remote access to observatory equipment requires network configuration: assigning a static IP to the observatory PC, opening firewall ports, setting up port forwarding on the router, and often a dynamic DNS service. This works, but it's a setup burden, and it can break when the router or ISP changes something.
Which products it covers
This is currently available for Dragonfly customers, and users of the Solo CloudWatcher Android Widget. We'll add this to other products as soon as possible.
How the connection is established
Solo / CloudWatcher Widget
For the Solo/CloudWatcher Widget the system will just be "in the middle", so your weather data is available from anywhere. You can check it out in the Android widget for CW / Solo users guide.
Dragonfly
For the Dragonfly, as the connection is in both directions, the system follows a few steps:
Please note relayed communications are costly. They are not intended for extended periods, so expect them to be limited in time in the future.
Even with this system, it is strongly recommended to have a computer connected to the Dragonfly in the observatory during the imaging sessions. Any remote connection, even if easy to setup, is not by far as reliable as a local one.
At your observatory
So, if you own a Dragonfly and want to try it out, these are the steps you have to follow.
- Download the new firmware (4.x) from the Dragonfly firmware & software page.
- Install it in your Dragonfly with the program—remember, just drag-and-drop it on the Dragonfly drawing in the MainDragonfly program window.
- Now install the new software.
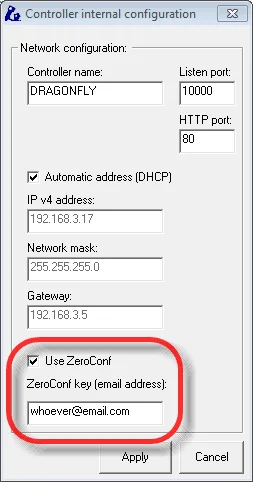
- Run "Dragonfly Main"; once connected, go to Configuration → Controller configuration. You'll see a new section—fill it in please, and click Apply.
Nothing else needs to be done at the observatory. Once applied, your Dragonfly will register itself in the system and will listen for remote connections.
At the remote place
Well, "remote" is probably proper for the observatory, but anyway…
- Install the new software.
- Again, run Dragonfly Main.
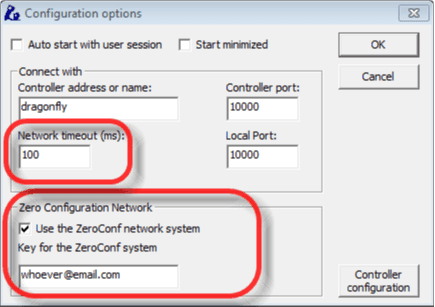
- Go to Configuration—just configuration—and fill it in, using the same email. Make sure it is.
- Last, modify the network timeout, depending on the quality of the internet at your observatory. I'd try 1000 ms (so 1 second) to start with.
When connecting using the system, it will look for a Dragonfly (product), with your same key (email) and same name (dragonfly in the example—it could be whatever name). Click OK, and it will start trying to connect, using different methods.
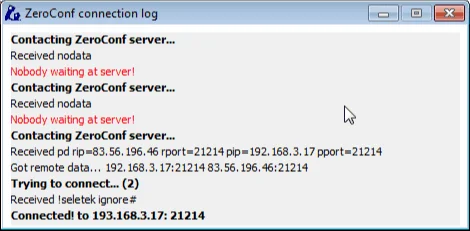
You'll then see a log window, shown mostly for our benefit: if you see anything weird, please capture the screen and send it to us. You can close the window when it has connected.
Last thing worth doing is changing the "refresh period" in the Dragonfly software (the control panel with all the relays and sensors) at home; not being the connection local, I suggest increasing the time to at least 500 ms.
And that's it!