
Purpose
The Dragonfly can take actions when a condition is met. These actions can be checked and executed from the Windows PC. This is called a "script", and more information can be found in the Dragonfly manual (Dragonfly - Users manual v. 2.0).
Scripts are very powerful, but they need the Windows PC to be ON and working.
The Dragonfly also allows you to define actions to be performed by the Dragonfly itself when certain conditions are met. These are called "macros" and have the advantage of being self-contained in the Dragonfly—hence, they don't need the PC to be connected—but have the disadvantage of being less powerful: specifically, macros cannot do ASCOM, since ASCOM is Windows-centric and only makes sense when executed on a Windows PC.
Nevertheless, the fact that the PC is not needed makes macros a great tool worth knowing. You can define up to 20 macros. The most common cases (open/close relays, send a pulse and a few more) can be easily created using the step-by-step process explained in "Simple Macros" below. For more elaborate cases, advanced macros are also available and covered later in this manual.
Simple Macros
Simple macros are defined very easily using the Dragonfly Configurator application: open it and click on Edit macros.
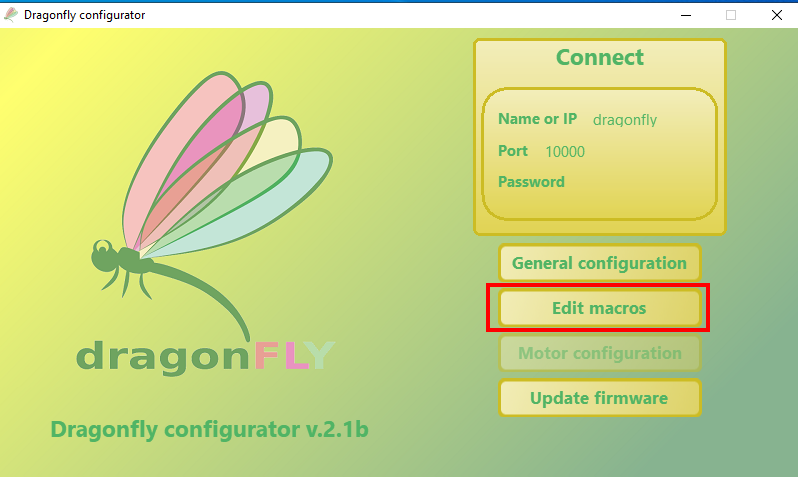
To create or modify a macro, simply click on the desired macro and follow the guided instructions:
Step 1: when (trigger)
A macro will be executed when a certain condition is met. This condition is called the "trigger" for the macro and is defined in the first step. The following triggers are supported:
- Every day at a specific hour and minute
- At a specific minute, every hour
- When there is no internet connection for a specific number of minutes
- When no connection to the Dragonfly occurs for a specific number of minutes
- When a relay is opened or closed
- When a sensor defined as digital gets open or closed
- When a sensor defined as analogue goes above or below a specific threshold
- When there is an internal failure within the Dragonfly
The "None (manual)" option allows you to define an action that only you can execute by explicitly commanding it. See Appendix 1 for details on how to run these macros.

Step 2: if (condition)
Sometimes you may want to define the macro at a specific time but also take the status of a relay or sensor into account, or execute the macro when a relay closes—but only if another relay/sensor has a given status.
Supported conditions are:
- A specific relay is open or closed
- A sensor is open, closed, above or below a specific threshold
- The Dragonfly has failed
- No condition (only take step 1 into consideration)
A typical case would be a macro that closes the roof if the CloudWatcher detects unsafe weather. Such a macro would be triggered when the relay the CloudWatcher is connected to closes, and only execute if the sensor that detects the roof is open still indicates the roof hasn't been closed yet.

Step 3: then (action)
Finally, you define the action to be performed by the Dragonfly. As mentioned, these are simple actions and do not require the PC to be connected. Supported actions are:
- Open a relay
- Close a relay
- Send a pulse to a relay's output (see the Dragonfly manual for instructions on how to define a pulse)
- Change the status of a relay: close it if open, open it if closed
- Send an e-mail (see the Dragonfly manual for instructions on how to define the e-mail address)
- Send a PushBullet notification (the user's e-mail address is used for this)
- Send a Wake On Lan notification to a specific MAC address
- Reboot the Dragonfly
- Advanced macro (see the "Advanced macros" section below)

Step 4: extra action
Simple macros allow you to perform up to two actions, so after defining the first action, you are presented with the same list of actions (replacing "Advanced macro" with "nothing else") to define the second action, if any.
Step 5: test your macro
Optionally, before saving your macro, you can test how it works by clicking the Exec. now button. This executes the macro immediately, without waiting for the "when" trigger, so you can check your work right away.

If your macro works as expected, go to the next step to store it into your Dragonfly. Otherwise, click Back to return to previous steps and modify what you need.
Step 6: "Apply now" the macro… twice!
This is an important step some people miss. First, click Apply now on the window where you have been creating and testing your macro:
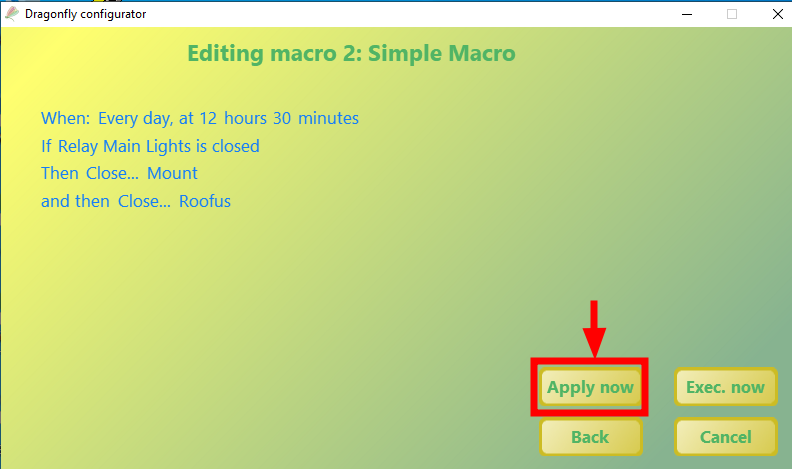
This takes you back to the list of macros. To actually store the macro into your Dragonfly, it is important to also click Apply now in this window too:

Advanced macros
But macros can do more than this. However, exposing all their capabilities would overcomplicate the interface needed to define them. So instead of making the process more obscure, we decided to leave the simple, most common tasks easy, and expose the Dragonfly's macro syntax in the "Advanced macro" option, for cases that do need it.
To define an advanced macro, you have to learn the Dragonfly's macro syntax and write it in Step 3 of the wizard explained in Simple Macros. Let's get started!
Define "when"; ignore "if"
The advanced macro is entered in Step 3 of the macro definition process (see Step 3: then (action) above), so to get there you first need to define when to execute the macro in Step 1.
However, if you are writing an advanced macro, you must select "ignore" in Step 2: if (condition). This is because advanced macros already have their own syntax to express this condition—so whatever you set in Step 2 is ignored in favour of your advanced macro.
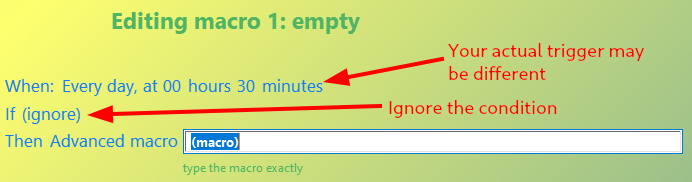
Write an advanced macro
To write and apply an advanced macro:
- Start as in the image above
- Type the expression for the macro you want to try
- Press ENTER when done
- The "Apply now" and "Exec. now" buttons become enabled
- Before saving the macro, it is wise to test it and verify it works as expected—press Exec. now to do so
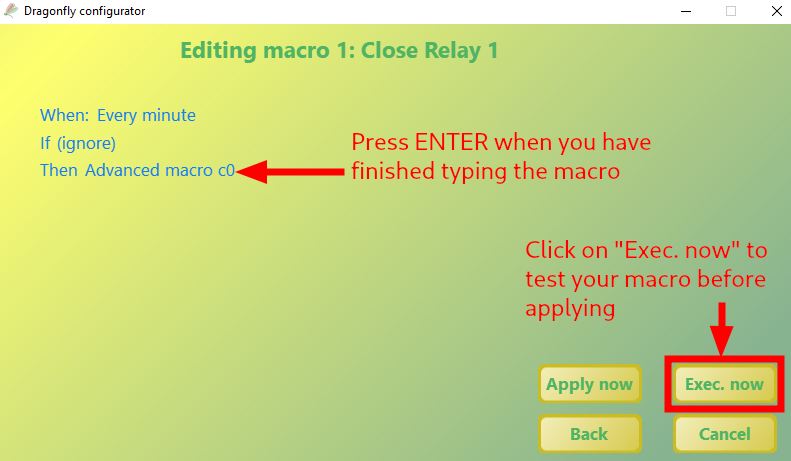
If, when testing your macro, you find that it does not work as you want, click Back to re-enable the edit box and modify your macro. When you are done editing and testing, follow the "Apply now" steps to save the changes.
Overall syntax: big picture
Just like a simple macro has a condition and actions, so does an advanced macro. The following sections cover how to write conditions and how to perform actions. Since conditions are actually optional (you can perform an unconditional action), actions are explained first.
Advanced macro syntax: actions—part 1
Every action supported by simple macros is, of course, supported here too:
| Action | Syntax |
|---|---|
| Open a relay | Use the letter o (for "open", lowercase) followed by the number of the relay to open. Internally, relay numbers start at zero instead of one.Example: o1 (open relay number two) |
| Close a relay | Use the letter c (for "close", lowercase) followed by the number of the relay to close.Example: c0 (close relay number one) |
| Send a pulse | Use the letter p (for "pulse", lowercase) followed by the relay number, a comma, and the pulse length in milliseconds.Example: p1,1000 (send a 1-second pulse on relay number two) |
| Change a relay | Use the letter g followed by the relay number.Example: g2 (close relay number three if it is open; otherwise open it) |
| Send an e-mail | Use the letter e followed by the message, surrounded by single quotes.Example: e'This is an email' (sends an e-mail to the address defined in ZeroConf configuration with the given text) |
| Send PushBullet | Use the letter h followed by the message, surrounded by single quotes.Example: h'This is a pushbullet message' (sends a PushBullet notification to the e-mail defined in ZeroConf configuration) |
| Wake On Lan | Use the letter k followed by the MAC address, surrounded by single quotes.Example: k'b8:27:eb:75:de:ea' (sends a WOL message to that address) |
| Reboot | Just type boot, lowercase, without quotes.Example: boot (reboots the Dragonfly) |
Advanced macro syntax: actions—part 2
The Dragonfly supports other actions too, not included in simple macros in order to keep those actually simple.
Park 10micron mount
Note: reach out to Lunatico if you're looking to park another type of network-enabled mount.
If you own a 10micron mount, and your Dragonfly is updated to software version 2.5 and firmware version 4.6.7, you can park your mount with a Dragonfly advanced macro. This means you no longer need the PC running to safely park your mount.
The syntax is:
s'park 10micron <ip-address> <port>'
Where <ip-address> and <port> must be replaced with the IP address and port where the 10micron is installed (by default, the port is 10000).
Example: s'park 10micron 192.168.1.100 10000' (parks the 10micron mount installed at 192.168.1.100, port 10000)
Note that the expression after the initial "s" is enclosed between single vertical quotes ('). This is important—otherwise the macro will not work at all.
Humidifier control
Also new to Dragonflies updated to software version 2.5 and firmware 4.6.7 is the ability to read weather data from a Lunatico SOLO device. Specifically, you can switch a humidifier OFF or ON depending on how close the dew point is to the ambient temperature, to protect your equipment.
The logic is as follows: if the ambient temperature and dew point are too close, the humidifier should start working until the difference is big enough. This requires two thresholds:
- ON threshold: if the difference between ambient temperature and dew point is lower than this threshold, the humidifier is switched on.
- OFF threshold: if the difference between ambient temperature and dew point is higher than this threshold, the humidifier is switched off.
You need a SOLO device to read the weather data from—take note of its IP address. Bundled with software version 2.5 and firmware 4.6.7, there are two ways to handle your humidifier: execute a macro to switch it ON and another to switch it OFF, or close a relay to switch it ON and open it to switch it OFF.
For the first case, use this syntax:
s'humctlmacro <solo-ip> <on-threshold> <on-macro> <off-threshold> <off-macro>'
Example: s'humctlmacro 192.168.1.132 4 0 6 1' (reads weather data from the SOLO at 192.168.1.132 and executes macro #0 if the difference is lower than 4 degrees, or macro #1 if the difference is higher than 6 degrees)
For the second case, use this syntax:
s'humctlrelay <solo-ip> <on-threshold> <off-threshold> <relay>'
Example: s'humctlrelay 192.168.1.132 4 6 2' (reads weather data from the SOLO at 192.168.1.132 and closes relay #2 if the difference is lower than 4 degrees, or opens it if the difference is higher than 6 degrees)
Again, the expression after the initial "s" must be enclosed between single vertical quotes (').
Execute another macro
If a macro becomes too complex, you may need to divide it into several steps. Or you may have separate macros for simple tasks—closing the roof, turning off lights—and want a "shut all down" macro that executes both. The "Execute another macro" action allows this.
Use the letter t followed by the number of the macro to execute. As with relays, the first macro is zero.
Example: t1 (executes macro number two)
Delayed execution of another macro
Similar to the previous one, only the macro is executed after waiting a while. Useful, for example, if you have a macro to park the mount and another to close the roof, and want a "shut all down" macro that runs both but must give the mount time to park before closing the roof.
Use the letter y followed by the macro number, a comma, and the number of milliseconds to wait before executing it.
Example: y0,2000 (executes macro number one after two seconds; as with relays, the first macro is zero)
Stop execution of macro
This is the advanced-macro version of the "nothing else" action in the simple macro wizard. For example, say you want to turn on humidifiers if the roof is open, and otherwise do nothing—the "do nothing" part is expressed with this action: simply use the letter q and the macro will terminate.
Advanced macro syntax: multiple actions
You can perform several actions within the same advanced macro—no longer limited to two actions, as with a simple macro. Separate each action with a comma and you're done (it is not strictly mandatory, but it makes things much more readable).
For example: c0,c1,o2,o3,y1,1000
This means:
- Close relay number one (remember, 0 is the first relay)
- Close relay number two
- Open relay number three
- Open relay number four
- Wait one second, then execute macro number two
Advanced macro syntax: counter
This is a more complicated one. As a use case: say you have the CloudWatcher connected to the Dragonfly, and you want to close the roof if the weather is not safe—but only if it has been unsafe for 5 consecutive minutes.
You could write a macro that executes every minute and checks the CloudWatcher sensor—but you need to count how many times in a row it read "unsafe". The Dragonfly offers this via the "@" symbol and the following actions:
| Action | Explanation |
|---|---|
@n | "n" is an integer value, such as "3". Assigns the value "n" to the counter. In the example above, this would be "@0" (assign zero to the counter) if the weather is safe, since the counter is only incremented when it is unsafe. |
@+ | Increments the value of the counter. In the example above, this happens if the weather is not safe. |
@- | Decrements the value of the counter. |
Advanced macro syntax: conditions—part 1
Advanced macros use an extended syntax for conditions. The construct is: "if our condition is met, then execute the actions for that; otherwise, execute the actions for when it is not met." In the Dragonfly's language:
<condition>?<actions-if-condition-is-met>:<actions-if-condition-not-met>
The "otherwise" part is optional, so a valid condition can simply be:
<condition>?<actions-if-condition-is-met>
Some examples (fully explained once you read the next section):
- If relay #1 is closed, then close relay 2, otherwise open relay 2:
r0?c1:o1 - If sensor #2 has an analogue value higher than 10, then send a one-second pulse to relay 3, otherwise open relay 3:
a1>10?p2,1000:o2
Advanced macro syntax: conditions—part 2
The conditions are pretty much the same ones offered in the simple-macro condition step, plus the counter:
| Syntax | Condition met if… |
|---|---|
r[n] | Where [n] is the number of a relay (zero is the first). Met if the given relay is closed. Example: r0 (met if the first relay is closed) |
d[n] | Where [n] is the number of a sensor (zero is the first). Met if the given sensor is active. Example: d2 (met if sensor number three is active) |
a[n]>[value] | Where [n] is the number of a sensor (zero is the first). Met if the given sensor's value is greater than [value]. Example: a0>100 (met if sensor number one has a value greater than 100) |
@>[value] | Met if the counter's current value is greater than [value]. Example: @>5 (met if the counter's value is greater than 5) |
w>[seconds] | "w" stands for "watchdog". Met if the Dragonfly has received no communication from outside (for example, the Windows application) for more than [seconds]. Example: w>10 (met if no external communication for more than 10 seconds) |
i>[checks] | Met if the Dragonfly has not detected a valid internet connection for more than [checks] consecutive checks. Example: i>100 (met if no valid internet connection for more than 100 consecutive checks) |
f | Met if the Dragonfly has detected an internal failure. |
Conditions using the ">" (greater than) operand can also be used with "<" (lesser than) and "=" (equals).
With this, the earlier examples—and others—now make full sense:
r0?c1:o1a1>10?p2,1000:o2- If the counter is less than 10, open relay 1, otherwise close it:
@<10?o0:c0 - If no communication for 10 seconds, reboot the Dragonfly:
w=10?boot
Advanced macro syntax: negating a condition
To check the opposite of a relay being closed ("r[n]") or a digital sensor being active ("d[n]")—that is, a relay being open, or a sensor being inactive—negate the original statement using an exclamation mark ("!") before the expression:
| Positive expression | Syntax | Negated expression | Syntax |
|---|---|---|---|
| Relay 2 is closed | r1 | Relay 2 is NOT closed (open) | !r1 |
| Sensor 3 is active | d2 | Sensor 3 is NOT active (inactive) | !d2 |
Some more complex examples:
- If relay 1 is open, then open relay 2:
!r0?o1 - If sensor 3 is inactive, increase the counter, otherwise set the counter to zero:
!d2?@+:@0
Advanced usage: you can also negate expressions such as "a3>100" (analogue sensor #4 reads more than 100), but you have to use brackets to enclose the condition you want to negate. For example:
- If analogue sensor #4 is NOT greater than 100, open relay #2:
!(a3>100)?o1 - If the counter is NOT 5, open relay #3:
!(@=5)?o2
Advanced macro syntax: "if this AND that", "if this OR that"
Conditions are not always simple; they can be compounded and linked with "AND" (both conditions must be met, or the action will not be executed) or "OR" (if either condition is met, the action is executed). This syntax is not available in simple macros, only in advanced macros:
- "AND" uses the "&" symbol
- "OR" uses the "|" (pipe) symbol
For example, say the roof-close mechanism is connected to relay number 3 (closed when the relay is closed), the CloudWatcher is connected to relay #1 (closes when weather is not safe), and a presence sensor is on relay #2 (open when you are in the observatory, closed when away).
To close the roof automatically when the weather is not safe AND you are away—that is, close relay #3 if both relay #1 AND #2 are closed, otherwise open relay #3:
r0&r1?c2:o2
Or, to open the roof if you are at the observatory OR the weather is safe—that is, open relay #3 if relay #1 or #2 is open (remember that "r1" asks if relay #2 is closed, so to ask whether it is open you need the negation):
!r0|!r1?o2:c2
Advanced macro syntax: multiple conditions
One of the strengths of advanced macros is the ability to check multiple conditions, by nesting several "<condition>?<actions>:<actions>" constructs.
For example, to close relay number 5 if sensor number 1 is inactive AND relay number 2 is closed—another way to say "if sensor number 1 is inactive, then if relay number 2 is closed, then close relay number 5":
- "If sensor number 1 is inactive", i.e. "if sensor number 1 is NOT active":
!d0 - "If relay number 2 is closed":
r1 - Close relay number 5:
c4
Combined: !d0?r1?c4
Advanced macro syntax: multiple conditions… otherwise
Conditions have a "positive" part (actions if the condition is met) and an "otherwise" part. Since you can nest several conditions, more complex statements are possible. For example:
- If relay #1 is closed: if sensor #2 is greater than 100, close relay #3, otherwise open relay #3
- Otherwise, open relay #3
That would look something like: r0?a1>100?c2:o2:o2 — confusing, right?
If you nest several conditions with the "otherwise" part, there is one rule you must follow: enclose inner conditions between brackets. So, type this instead:
r0?(a1>100?c2:o2):o2
That's more like it. Following that rule, you can nest conditions and use the "otherwise" clause on the combination of them.
Appendix 1: Manual macro execution
Say you have defined a macro to be executed manually by choosing "None (manual)" in the "when" step, or you simply want to test an existing macro instead of waiting for its "when" trigger. There are three ways to do this.
Method #1: Using the Dragonfly application
Open the Dragonfly application and click the Macros button. A small window appears with a button for each macro. Only the buttons associated with macros that are actually defined are enabled. To run a macro, click the button next to it, then confirm by pressing "Ok" in the message that appears.

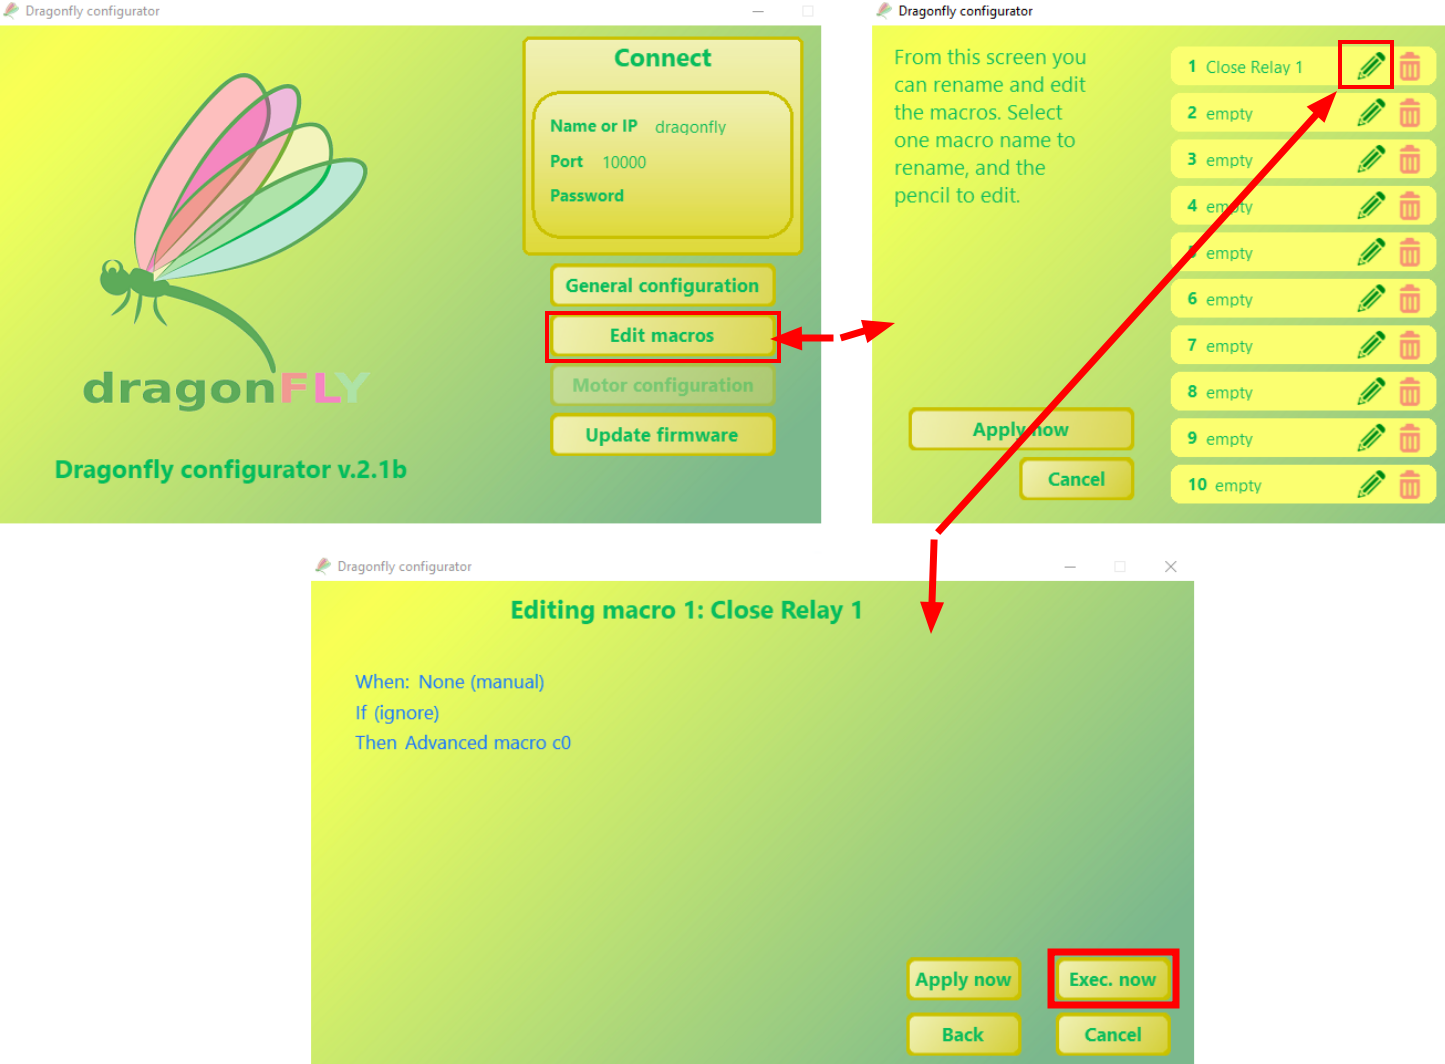
Method #2: Using Exec. now with the Dragonfly Configurator
Open the Dragonfly Configurator application and click Edit macros to display the list of available macros. Click the pencil icon of the macro you want to run to open its definition, then click Exec. now to run it.
Method #3: Run from another macro
As seen above, the "t" (execute macro) and "y" (delayed macro execution) actions do exactly this: run a macro from another macro.
Questions? As usual, feel free to check the forum or reach out at support@lunaticoastro.com.