
Most useful features are already supported via the web, either at the "standard" configuration page (https://aagsolo/config) or the "advanced" one (https://aagsolo/ExtraConf.html).
Getting started
Using PuTTY
For all this you'll need a means to access the SOLO via SSH (secure terminal). A popular and free program is "PuTTY". It can be downloaded from www.putty.org.
Once installed, start it and connect to the SOLO. Just type "aagsolo" in the Host Name field (unless you have changed it!) and leave the rest as it is, then press Enter.
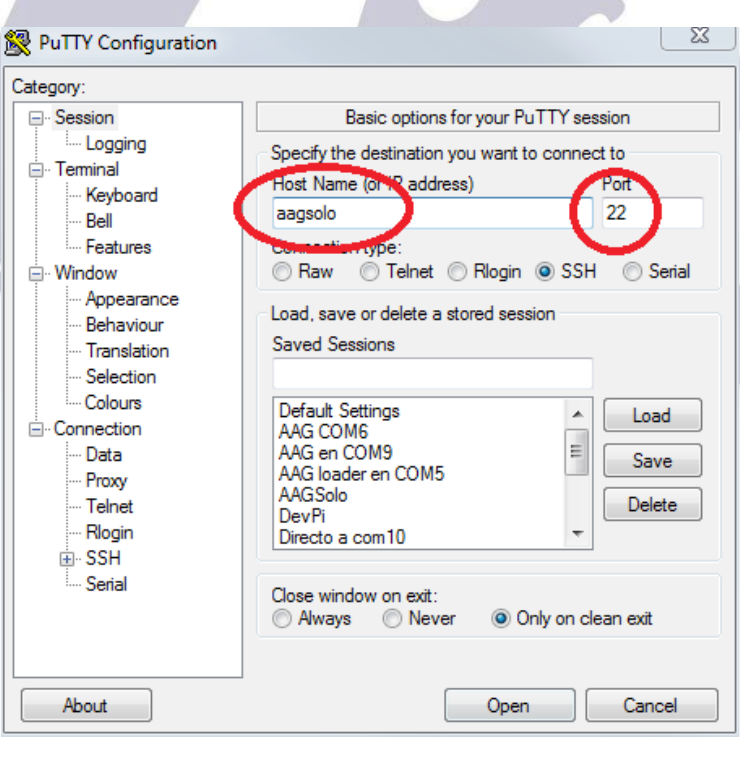
You'll be asked if the signature is valid—select yes, otherwise you won't connect. When prompted, enter:
- User:
solo - Password:
cloudwatcher
Note: the user "solo" was added with SOLO software version 3.x. If you are still using software version 2.x, you should log in using the username "pi".
Using Windows PowerShell
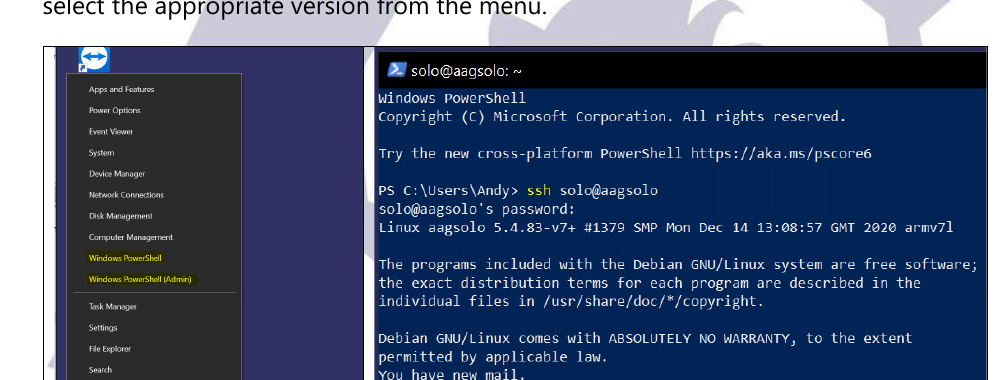
Another option for Windows 10 users is to use the built-in PowerShell, which includes an SSH client. To open PowerShell, right-click on the Windows icon on the taskbar and select the appropriate version from the menu.
1. Copying the Single Line Data files to a NAS
Note: this will only work with SOLO software version 3.x or later.
In some cases, it is convenient to have the "Single Line Data" files available on some network server, other than the SOLO. The SOLO already has support for this, but making the remote folder accessible from the SOLO has to be done manually—let's see how.
Login as instructed above, and once logged in, type:
solo@aagsolo:~ $ rootrw
(This will enable writing on the SD card.)
First, let's remove the script that will try to copy the files, to avoid it writing to an empty folder. The script will be created again after a reboot.
solo@aagsolo:~ $ sudo rm /home/aagsolo/cpToNas.sh
Now create a suitable folder:
solo@aagsolo:~ $ sudo mkdir /mnt/nas
(This is the folder the SOLO will expect—do not use any other name!)
At this point, you can check that your NAS is correctly configured by using the command:
solo@aagsolo:~ $ showmount 192.168.178.20 -e
(Replacing 192.168.178.20 with the IP address of your NAS.)
If the NAS is available, you should get a return like this:
Export list for 192.168.178.20:
/volume1/CloudWatcher 192.168.178.53
solo@aagsolo:~ $
(Where 192.168.178.53 is the address of your SOLO.)
You should now be able to mount the NAS manually with the command:
solo@aagsolo:~ $ sudo mount 192.168.178.20:/volume1/CloudWatcher /mnt/nas
If successful, you should be able to see the contents of the drive using:
solo@aagsolo:~ $ ls -l /mnt/nas
If not already there, the files aag_sld.dat and aag_sldc.dat should be written to the folder within approximately two minutes:
total 12
-rw-r--r-- 1 solo solo  104 May 10 13:24  aag_sldc.dat
-rw-r--r-- 1 solo solo  105 May 10 13:24  aag_sld.dat
d--------- 2 root root 4096 May  5 10:54 '#recycle'
solo@aagsolo:/mnt/nas $
To have the drive mounted automatically whenever the SOLO (re)starts, edit /etc/fstab and include a line for this mount. (Please refer to the documentation for your NAS to find the correct fstab settings to use.) An example of the /etc/fstab entry for a Synology NAS mounted using the NFS format:
tmpfs   /var/log     tmpfs   nosuid,nodev  0  0
tmpfs   /var/tmp     tmpfs   nosuid,nodev  0  0
tmpfs   /var/cache   tmpfs   nosuid,nodev  0  0
192.168.178.20:/volume1/CloudWatcher /mnt/nas nfs rw,nfsvers=3 0 0
solo@aagsolo:/mnt/nas $
2. Writing the userdata.csv file to a NAS instead of USB
Note: this will only work with SOLO software 3.x or later.
The SOLO is able to write the file userdata.csv to a USB storage device in order to allow long-term weather data to be collected. If you would like to store this data on a NAS instead, please follow these steps.
Important: if you already have a storage device in place, please unmount it using the SOLO config pages before removing the physical device.
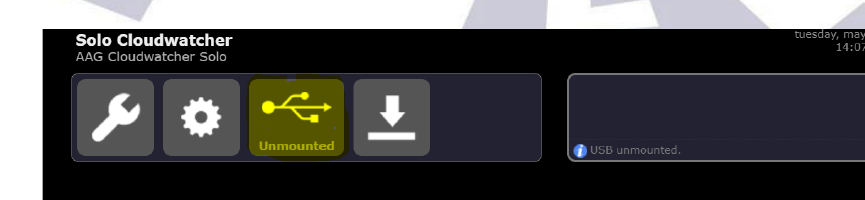
To enable the userdata.csv file to be written to the NAS, ensure that you first complete the steps in "Copying the Single Line Data files to a NAS", above.
Two additional steps are required. In /etc/fstab, create a second entry that mounts the NAS to /mnt/pen:
tmpfs   /var/tmp     tmpfs   nosuid,nodev  0  0
tmpfs   /var/cache   tmpfs   nosuid,nodev  0  0
192.168.178.20:/volume1/CloudWatcher /mnt/nas nfs rw,nfsvers=3 0 0
192.168.178.20:/volume1/CloudWatcher /mnt/pen nfs rw,nfsvers=3 0 0
solo@aagsolo:~ $
Restart the SOLO using:
solo@aagsolo:~ $ sudo reboot
Once the SOLO has restarted, log in again and enter the following command to create the userdata.csv file:
solo@aagsolo:~ $ touch /mnt/pen/userdata.csv
You should now be able to see the contents of the userdata.csv file being created:
solo@aagsolo:~ $ cat /mnt/pen/userdata.csv
"Date","Time","Cloud Condition","Rain Condition","Brightness Condition","Cloud Value","Cloud Sensor Temperature","Rain Value","Brightness Value","Ambient Temperature","Rain Heating Percentage","Rain Sensor Temperature","Heating Status","Switch Status","Read Cycle","Timeout Errors","Safe Status","Wind Condition","Wind Value","Rel hum Condition","RH Value","Raw IR reading","Rel. pressure","Abs pressure"
"2022-05-10","14:19:54","Overcast","Rain","Very light","14.8","25.1","3456","1","25.1","10%","","Closed","5","0","Unsafe","Calm","-1.0","Normal","48%","22.9","1000.6","956.0"
solo@aagsolo:~ $
Remember to back up and recreate the userdata.csv file from time to time, as, left alone, the file will grow indefinitely.
3. Changing the SOLO web server port
It seems there are some routers with very restricted port mapping capabilities, so it may be convenient to be able to set a non-standard port for the SOLO's web server. To do this, log into the SOLO as described in "Getting started", above.
First, we need to stop the web server:
solo@aagsolo:~ $ sudo service lighttpd stop
Then we make the file system writable:
solo@aagsolo:~ $ sudo mount / -o remount,rw
Next, we need to edit the web server configuration file:
solo@aagsolo:~ $ sudo nano /etc/lighttpd/lighttpd.conf
You can now edit the server port and save your changes with CTRL+O, before exiting nano with CTRL+X:
#server.document-root  = "/var/www/html"
server.document-root   = "/home/aagsolo/www"
server.upload-dirs     = ( "/var/cache/lighttpd/uploads" )
server.errorlog        = "/var/log/lighttpd/error.log"
server.pid-file        = "/var/run/lighttpd.pid"
server.username        = "www-data"
server.groupname       = "www-data"
server.port            = 80
Finally, reboot the SOLO:
solo@aagsolo:~ $ sudo shutdown -r now
For further information, or if you have some tips of your own to share on getting the most out of the SOLO, please visit the forum.