Clarifications and configuration notes for Lunatico software, drivers, and tools. If you need deeper documentation, check the Manuals and other documentation section of the relevant product page.
For questions not covered here: support@lunaticoastro.com
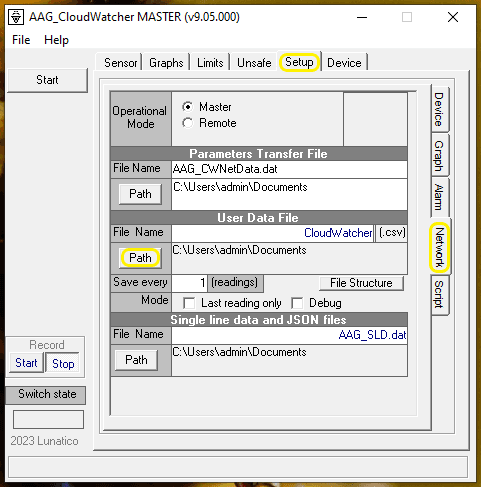
This Observing Conditions and Safety Monitor driver will hopefully be mostly self-explanatory. You can connect to your device either via http, in which case input the name or IP address of your pocketCW2 or Solo; or using a file. This file will be the aag_dat.json which the CloudWatcher software generates, you will have chosen the location as per this image.
Remember to check the validity of the file, name, or IP address by clicking check when you select it (in most cases you’ll only need to do this once).
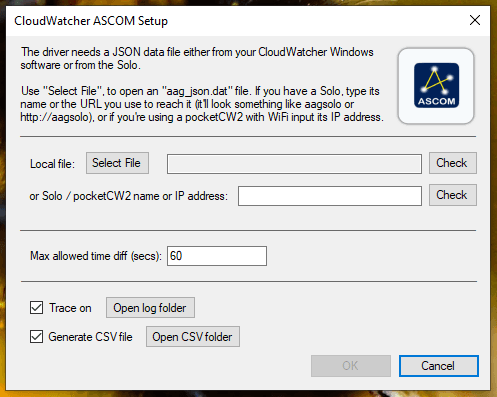
Max allowed time diff refers to the maximum time difference allowed between readings before it is considered unsafe (i.e. the device has lost connection). Setting less than 30 seconds is not a great idea as readings may be slightly delayed without it meaning a disconnection.
This driver also allows you to generate a TSV file with the data gathered by your device, which you can then use in any way you wish.
To access the Solo’s configuration page, remember to add the s to http in https://aagsolo/config.
Click the wrench to configure information about your observatory and things related to readings (limits, K-factors, units…). The gear includes other settings, most notably network configuration.
This portable configuration utility (no need to install, just run, configure, and delete the file if you wish) allows you to personalise your pocketCW2 to serve you best. With it you can configure the Wi-Fi connection, safety limits, K-factors, and more, as we explain below.
Select the COM port your pocketCW2 is connected to in the dropdown at the top. You can check which one it is in the Device Manager, simply go to COM ports and look for the COM port in between brackets after Silicon Labs CP210x USB to UART Bridge, in the Ports (COM & LPT) dropdown.
Use the first tab to configure the Wi-Fi. That is probably self-explanatory, just remember to click Save Values.
The next tab is the Safety Settings tab. Here you can set your preferred units, set the safety limits (i.e. values over/under this number will be considered unsafe), select which sensor failures should be interpreted as unsafe conditions, and we’ve also included the possibility of configuring unsafe conditions for sudden rise in clouds or sudden drops in pressure. Delay after unsafe refers to how long we’ll wait to signal safe after the unsafe condition has lifted (e.g. if it becomes unsafe because there’s wind, how long to wait since it’s not windy anymore to consider it safe again). Again, remember to click Save Values.
The bit of the Other Settings tab that requires the most attention is the Sky temperature model correction factors section. This document includes information about the K-factors and the rationale behind them. The alternative to calibrating your device using these, if you are looking for precise readings, is to calibrate it often. You can read more about both options here. As usual, save any relevant values!
You can update the device’s firmware from the last tab.
Can't find what you're looking for? Check the Manuals and other documentation section on the relevant product page, or contact support.
