
Introduction
In a nutshell, the Starling handles your open and close requests, allows you to interact with the roof as if you were the only one sending commands to it, and ensures that ASCOM compliance is maintained in the same way. From your point of view, interacting with a shared roof via the Starling is analogous to interacting with an individual roof using the Dragonfly or the Caterpillar.
Connecting to the Starling
There are two main ways in which you can connect to the Starling, and send your open/close requests to the roof. Most likely, you'll be using ASCOM-compliant software, and will use the Starling's ASCOM driver. It is, however, also possible to access the public interface of the Starling's web server, and interact with it via that (whether that be from a computer, a smartphone, or some other device connected to the same network as the Starling).
The ASCOM driver
The ASCOM driver is downloadable from our website. Once you download and install it, you'll be able to select it from the roof—depending on the software you use this may be referred to as dome—drivers dropdown in your preferred observatory control software.
The setup menu looks as in the image below:
It's important that you set your name so you'll be identifiable to the sentinel in the client list. Ask the sentinel if you're not sure if you should connect via the IP address or name of the Starling.
The Starling's web server
The public control panel
The Starling comes with an internal web server that can be accessed via its IP address or its name. This web server, in turn, includes a public control panel for users to be able to send commands to the device and see information about it. This can be accessed via the following (where in the last two, "starling" will have to be replaced by the device's name if it has been assigned a different one):
http://{ip-address}/publichttp://starling.local/publichttp://starling/public
Tip: if you're planning on using the control panel from your phone, consider pinning it to the homepage—that'll make it easily accessible and give it an app-like feel!


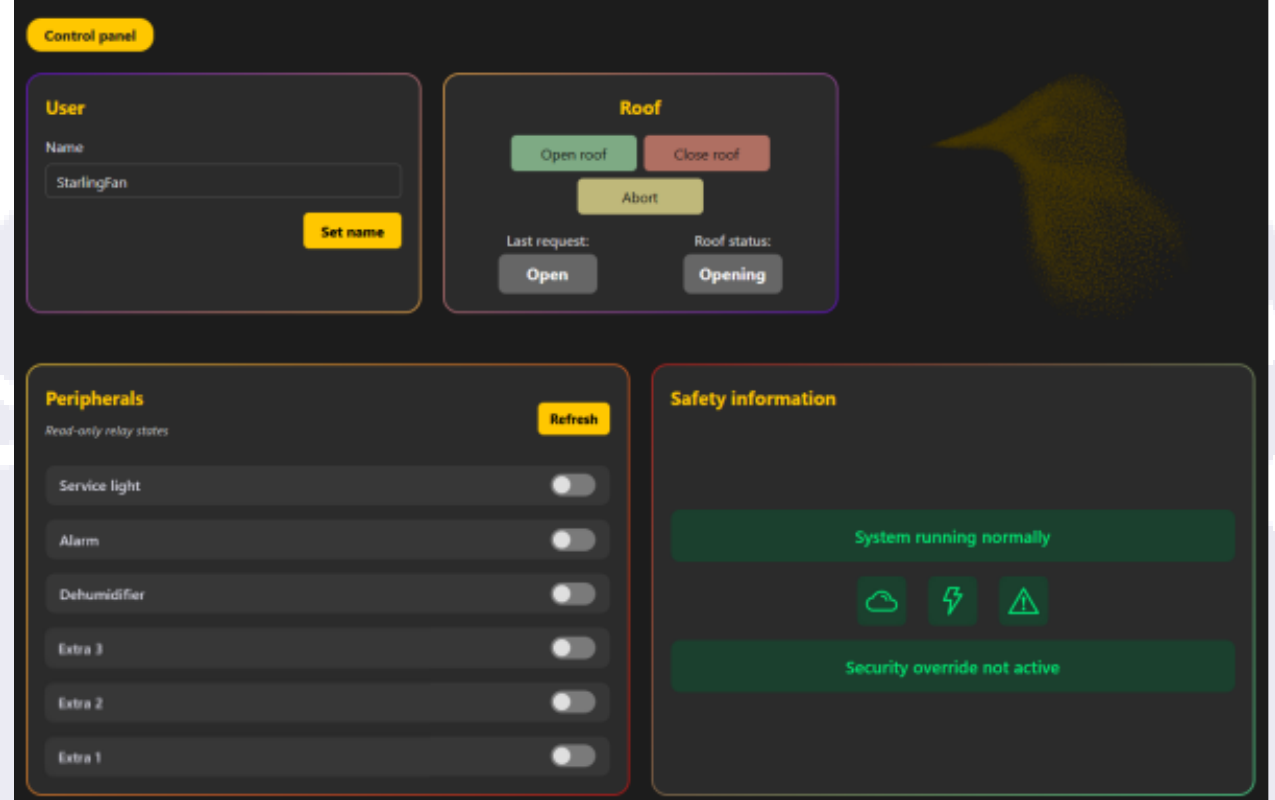
The public control panel has the following layout (the image below is as seen from horizontal displays; the arrangement of the boxes varies from device to device). Monitor the lower right-hand corner of the screen for feedback about your requests.
The user box
The user box allows you to set a name for yourself and enable the rest of the commands (without having set your name you won't be able to send commands or see the status of the device).
The roof box
The roof box is mostly self-explanatory, although note that the commands sent won't always translate to the roof reacting in that fashion. Depending on the safety status or some restriction applied by the sentinel, it may not open even when an open request is sent. Likewise, if it's safe and other users still want it open, it won't close upon a close request—but this request will be logged, and if conditions become suitable to close it, it will be closed. Conversely, however, open requests that are ignored or at any point overridden do not persist, for safety reasons.
Another important note is that the roof status shown on this page is the real roof status. Whereas the driver ensures compatibility with imaging software and the likes (e.g. upon first connection reporting the roof is closed, and upon a close request reporting that it has closed successfully so the rest of the expected end-of-session tasks can be carried out, regardless of the shared roof still remaining open for other clients), here you can see the actual physical state of the roof.
You will need to keep the public control panel page open to remain an active client. Unless the sentinel purges the roof requests from users for whatever reason (for example, if the roof is closed because of unsafe conditions, requests will be reset, but this can also happen for other reasons), your request will stay logged and impact the roof where applicable for as long as you keep the window open (and focused).
The peripherals box
The peripherals are the Starling's relays. Press refresh to load the current values. The names of the extra relays are customisable by the sentinel and will show up with the custom values to you.
The safety information box
The safety information contains the values of some relevant sensors, as well as the general status of the device. The cloud is the unsafe sensor, the lightning bolt is the power fail, and the emergency icon is, you guessed it, the emergency sensor. The other banner corresponds, of course, to the security override status (this can be enabled by the sentinel through a physical sensor, or a virtual toggle).
If connection is lost
If connection is lost to the device, you will see an overlay like the one in the image below.
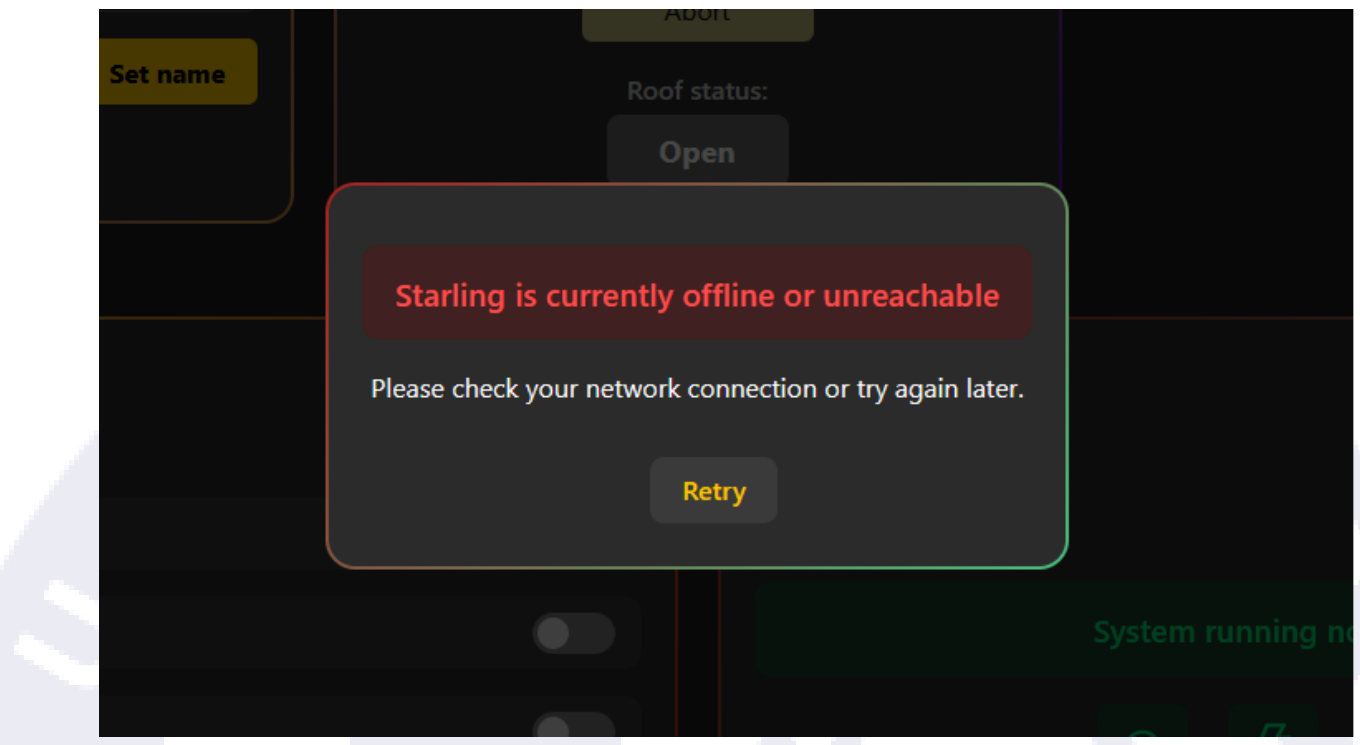
If your connection is fine, this will most likely have to do with the device itself, and the sentinel will sort out the issue. Pressing retry attempts to communicate with the Starling again, and where successful, will dismiss the overlay and show the control panel once more.