
The remote control software supplied with your Dragonfly allows you to name every physical connection so you don't have to guess, apply restrictions, configure relays and sensors… It is really easy to understand, and we'll review it while working on our example observatory.
So we are going to spend some time with the Dragonfly control panel:
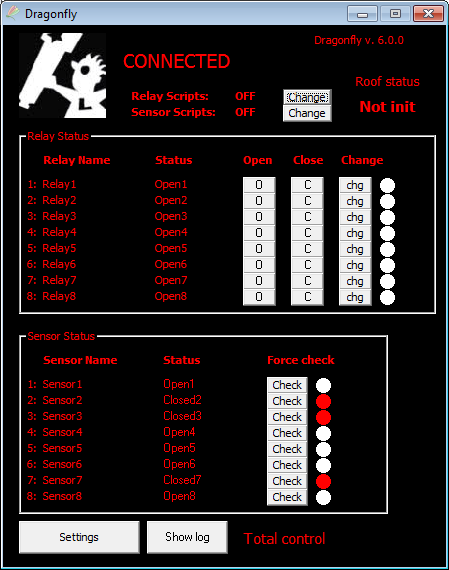
We'll focus, for now, on the two big areas: the upper one for relays, the lower one for sensors. It's easy to see there are 8 rows of relays and 8 of sensors, just as in the physical box.
Naming relays
Let's give a name to each relay, and even to each state—so relay 1 becomes "Roof motor", relay 2 "Mount power", with closed becoming "On" and opened "Off", etc. Just click over the current name of the relay, and you'll be presented with the settings for that relay:
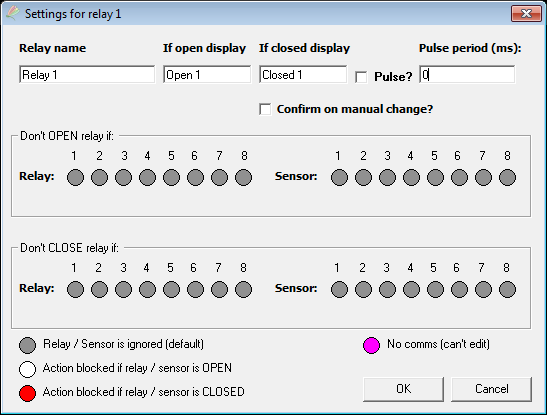
This has two zones: the upper one, and an advanced area to define restrictions (covered in Addenda 2 below). Let's start with the upper one.
You can name the relay and what should appear when it's closed and open. You can also define it to be a "pulsed" relay, as appropriate in the roof motor configuration. The pulse period, you surely guessed it, is the approximate duration of the pulse in milliseconds.
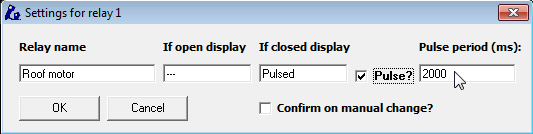
Keep naming relays (and ignoring the restrictions for the moment); please continue to do the same for the CCD power and observatory lights—don't forget the lights will be off if the relay is closed!
Last, and to avoid accidental clicks, get back to the roof motor relay settings; you can protect any relay by selecting the "confirm on manual change" option:
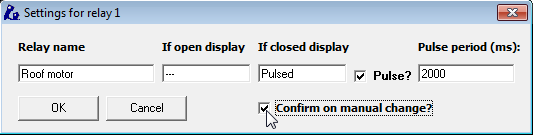
This way, you'll be asked for confirmation if you click any of the buttons concerning that relay. Now the relay panel should look like this:
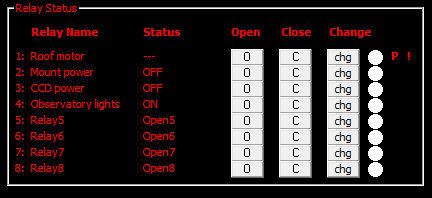
Notice both the "P" and the "!" on the right side of the roof relay row: the "P" means it is pulsed, the "!" means you'll be asked for confirmation before any action takes place.
Naming sensors
The same naming system applies to sensors:
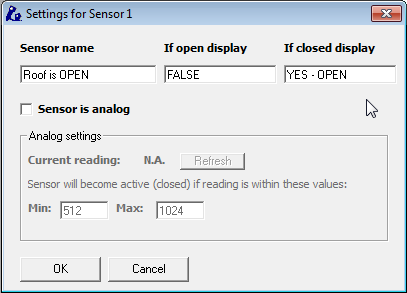
For the roof (roll-off roof) we suggest using two switches, one for signalling "open" and another one to signal "closed"—this way we will notice should the roof stop mid-way.
Trying it out
So, before an imaging session, with our observatory roof closed, our window will look like this:
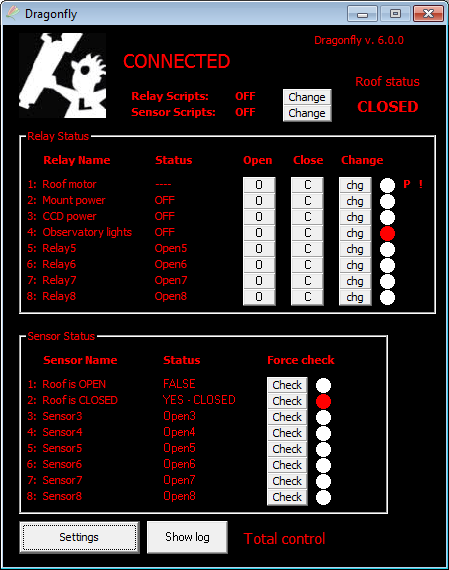
Lights enabled, roof not opened but closed, CCD and mount off. We are deliberately leaving the telescope park sensor for the moment. Great.
Switch off the lights (click "Close" in their row) and click "change" (chg) in the roof motor row—note that the pulse we defined earlier will only work when "change" is clicked. As we also selected "Confirm on manual change", we'll get a confirmation window; select "yes" to proceed. You can now also power the mount and CCD camera.
The roof will open, and once fully opened, we'll have the following:
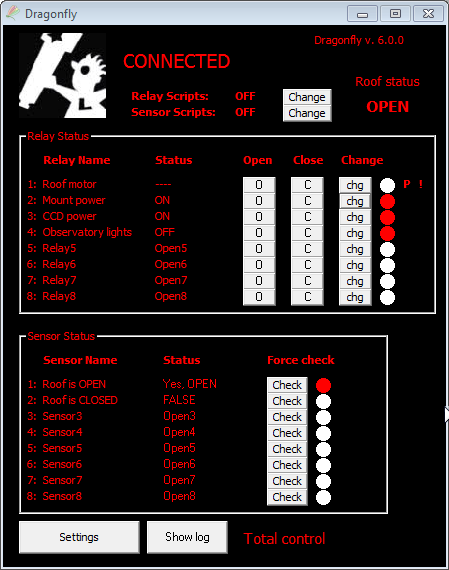
…as you can see, it reflects the current state of things.
The roof information zone
Let's review now the things we've ignored for the moment. If you plan to use ASCOM automation, then you'll have here the current status of the roof. Clicking on that area, you can command it to open and close conveniently:
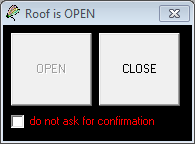
Note: you can disable this functionality by deleting the related roof scripts from the disk.
Here you can also see the relay and sensor scripts, disabled for the moment. The software can execute a macro (and/or script) every time a sensor or relay changes—check the Automated control: on/off macros (and/or scripts) section.
And maybe you've also noticed the "Total control" message: the Dragonfly implements a 3-level access control system, designed to assist in shared environments, or hosted observatories, to add security. For an isolated observatory, this is usually not needed.
Settings
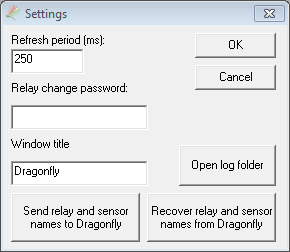
The refresh period establishes how often the sensors (and relays) will all be checked, one at a time. It can have any value between 100 and 60,000 ms. For local area networks, 250ms or even faster is okay. If you will be connecting from far away, via internet, using a higher value (1,000ms or so) may be better—you can always force the immediate check of a sensor by clicking on that sensor's "Check" button.
Then you can see the password, which was explained earlier, and the window title—useful in case you're managing several Dragonflies.
"Open log folder" will open a Windows file explorer in the folder where the Dragonfly logs are being stored. These logs contain data relating to every relay change, and all the information shown in the log window, from macros (and/or scripts) or from anywhere.
Lastly, you are offered the possibility of storing all the relay and sensor settings (name, names when open and closed, if analog or pulsed, etc.) in the Dragonfly—and recovering them from the Dragonfly.
During normal operation, any changes you make are stored locally in your computer, and also inside your Dragonfly. If you install the software in a new computer, recovering the names from the Dragonfly will be useful to be set up in no time. If installing Dragonflies for other users, for example, forcing the sending of everything to the Dragonfly can also be a time saver.
Addenda 1: analog sensors
Some sensors, such as our IR distance measuring one, yield analog instead of digital values. This means the reading from the sensor, instead of just open or closed, will be a value between 0 and 1024.
You may want to skip this section if you're not going to use any analog sensors—just know you can use them if the need arises.
In order to use one of these, you'll have to configure it as analog (note that we're using sensor 8, keep reading please):
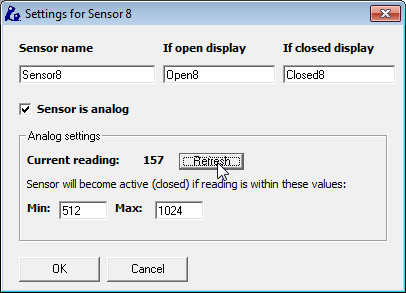
Clicking "Refresh" will update the current reading. The goal is determining the range of values where we can consider the object is in its place. In our example, the mount is parked, so we could:
- unpark it—the sensor should read near 0 (less than 20) if properly placed, but other values could do, too;
- or move it toward the parking position, clicking refresh and taking note of the values.
In a few tries, we'll be able to know in what range of values the mount is in a safe position, filling in these values in the "Min" and "Max" fields:
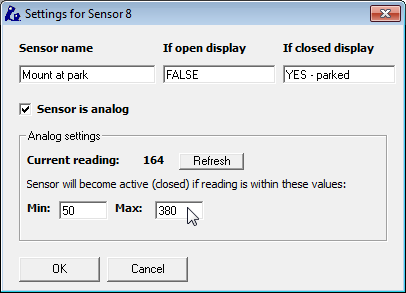
…the main Dragonfly window will update its display accordingly to the current position of the mount. As seen, we've also filled in the rest of the fields (sensor name, etc.), and used sensor number 8 as it is more convenient due to the ground plugs placement. There is a separate instruction sheet for wiring this kind of sensor—just check our website.
If you are going to use macros (and/or scripts) with an analog sensor, please read the corresponding addendum in the Dragonfly macros manual.
Addenda 2: relay restrictions
As requested by several users, we've added relay restrictions—meaning you can define certain conditions under which the relay won't open or close. This is performed from the relay settings window we partially saw a few pages ago.
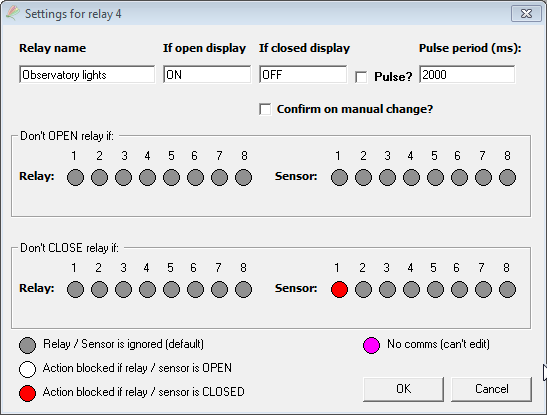
Clicking on each small circle, we can block the relay action (upper row blocks opening; lower row blocks closing) on each condition—relay or sensor open or closed.
In the image above, the observatory lights relay won't close if sensor 1 (roof open) is active—so if the roof is open, you won't be able to turn on the lights.
Two important notes about this:
- These restrictions are global, and imposed internally by the Dragonfly firmware. So, they work even if the action is commanded from a script, ASCOM, the web interface, smartphone app, or an internal macro.
- You can, however, circumvent it, by repeating the action within the 3-second period after trying for the first time. You click "close", get the message "Ignored – restrictions", click again, and then it will close. From scripts or macros, you can force any action by duplicating it.